Picture this: it’s a lazy Saturday morning, the rain is drumming a lazy rhythm on the windows, and you’re standing in the kitchen with a half‑crushed apple in one hand and a bowl of batter that looks like it belongs in a pancake‑making hall of fame. I was in that exact spot last week, battling a burnt batch of ordinary pancakes that tasted like cardboard, and I swore I’d never trust a pancake again. Then, like a culinary epiphany, I sliced an apple into perfect rings, tossed them into the batter, and the whole thing transformed into a golden‑kissed masterpiece that sang “breakfast of champions.” I dare you to taste this and not go back for seconds, because this version will rewrite the rules of what a pancake can be.
The moment the first apple ring hit the sizzling pan, a buttery aroma rose like a warm hug, instantly filling the kitchen with a scent that could coax even the most stubborn sleep‑walker out of bed. The sizzle was crisp, a crispness that reminded me of the first bite of a fresh autumn apple—sharp, sweet, and a little bit daring. As the batter spread and the edges began to caramelize, I could see the apple’s skin turning a gorgeous amber, the sugar melting into a glossy glaze that made the whole stack look like a work of edible art. You could almost hear the gentle pop of the caramelized sugars, and feel the heat radiating from the pan, coaxing your senses into a state of pure anticipation.
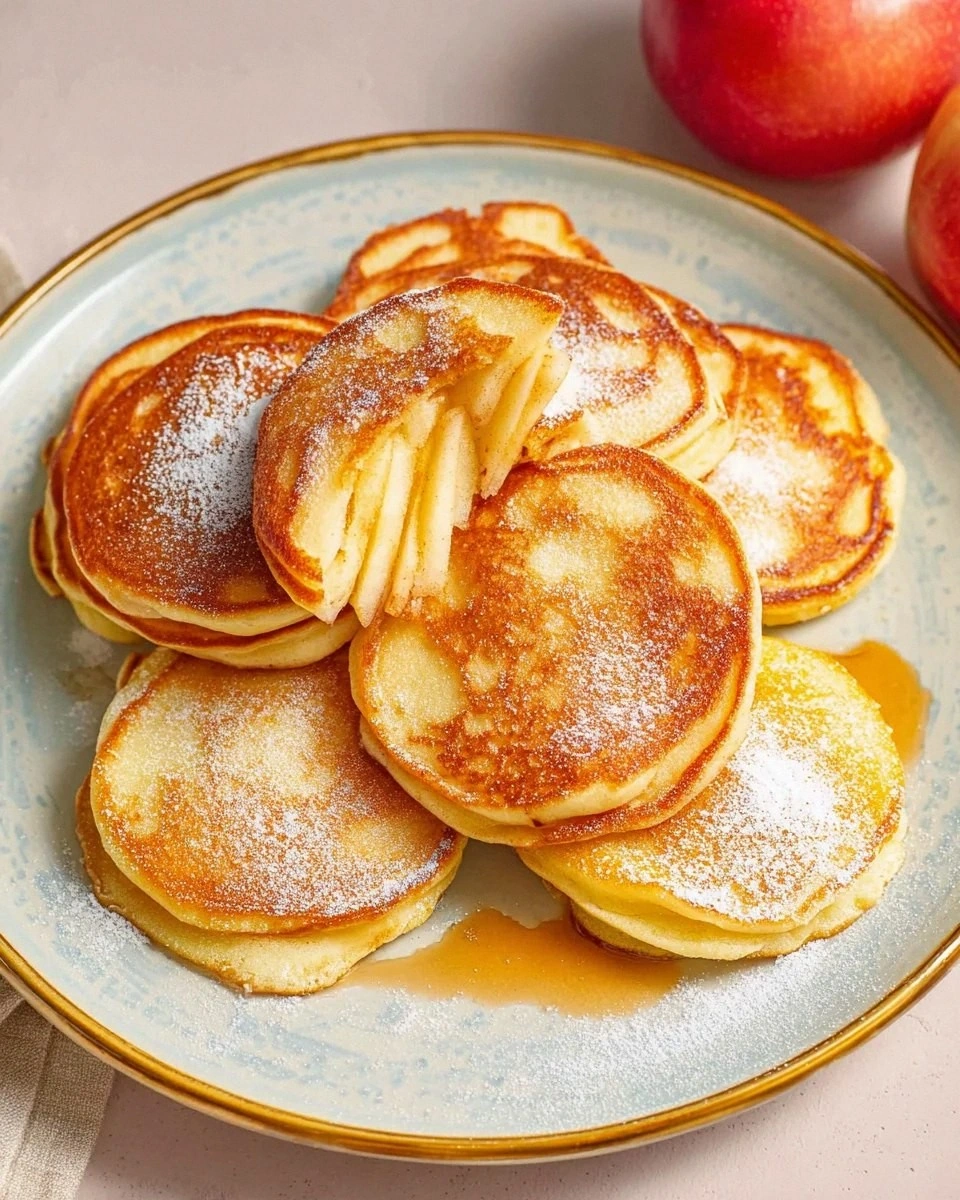
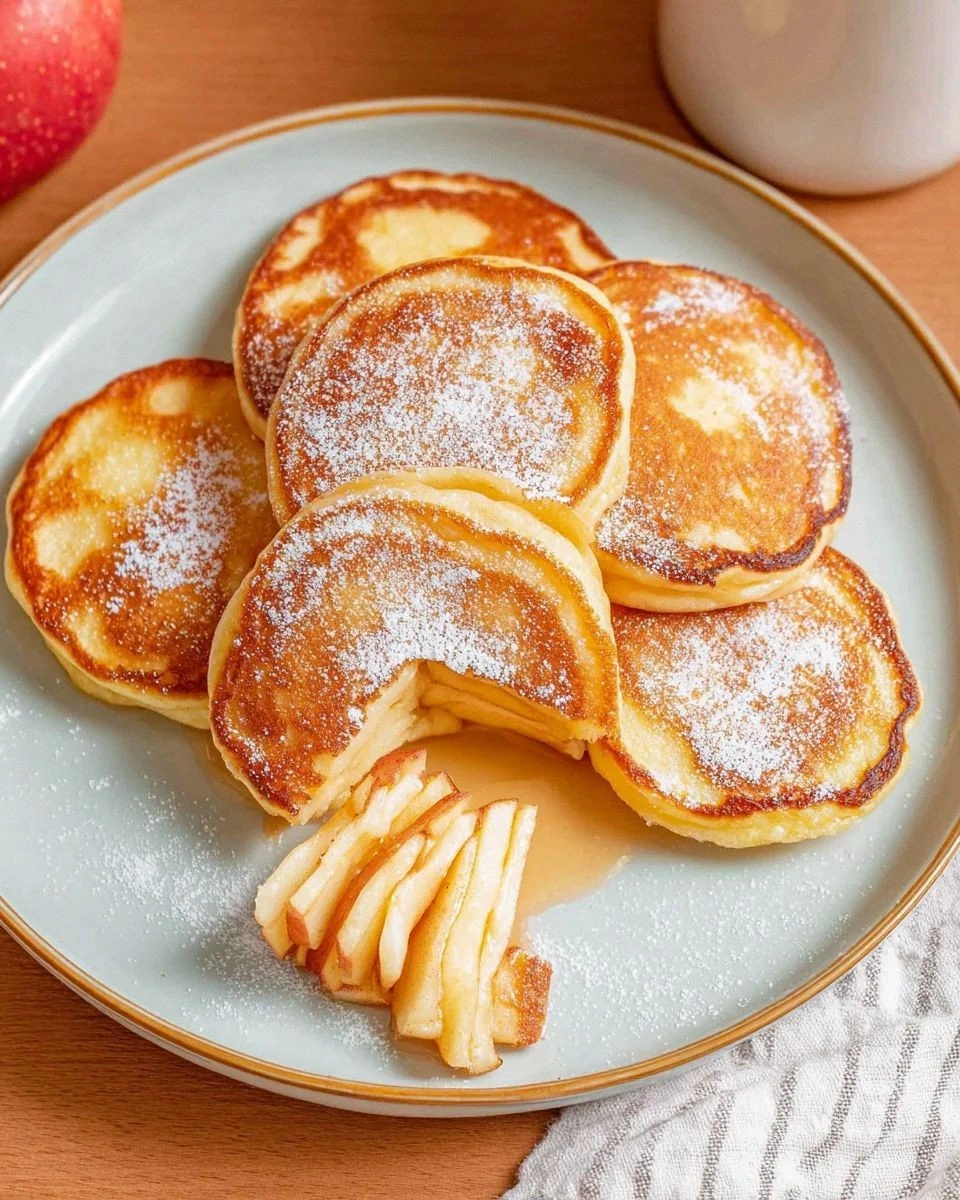
What makes this version stand out isn’t just the gorgeous ring shape or the fact that the apples stay whole (most recipes turn them into mush). It’s the marriage of a light, fluffy interior with a crisp, caramelized crust that sings in perfect harmony. Most recipes get this completely wrong, either drowning the apple in batter or leaving it raw in the center. Here, the batter hugs the apple like a velvety blanket while the exterior turns into a buttery, cinnamon‑kissed crust that shatters like thin ice when you bite into it. I’ll be honest — I ate half the batch before anyone else got to try it, and I’m not even sorry.
And now for the secret weapon: a splash of vanilla‑infused milk and a pinch of baking soda that together create a lift so airy you’ll swear the pancakes are floating. This tiny tweak is the game‑changer that turns a good pancake into the best version you’ll ever make at home. Okay, ready for the game‑changer? Let me walk you through every single step — by the end, you’ll wonder how you ever made it any other way.
What Makes This Version Stand Out
- Taste: The caramelized apple rings bring a natural sweetness that pairs perfectly with a hint of cinnamon, making each bite a balanced symphony of flavors.
- Texture: A crisp, buttery edge that shatters like thin ice, while the interior stays pillowy soft thanks to the leavening combo of baking powder and soda.
- Simplicity: Fewer than ten ingredients, all pantry staples, yet the result feels like a restaurant‑grade brunch dish.
- Uniqueness: The whole apple ring stays intact, creating a visual wow‑factor that most pancake recipes simply can’t achieve.
- Crowd Reaction: Even the most skeptical eaters admit they’ve never seen a pancake look so elegant—perfect for brunch parties or lazy family mornings.
- Ingredient Quality: Using crisp, slightly tart apples (like Honeycrisp or Pink Lady) ensures the fruit holds its shape and adds a bright contrast to the sweet batter.
- Cooking Method: A medium‑low heat and a non‑stick skillet give you that perfect golden crust without burning.
- Make‑Ahead Potential: The batter can be mixed a day ahead, and the pancakes reheat beautifully, retaining their crispness.
Alright, let's break down exactly what goes into this masterpiece...
Inside the Ingredient List
The Flavor Base
First up, the flour. All‑purpose flour provides the structure that holds the batter together while still allowing it to rise. Skipping it would turn the whole thing into a soggy mess, and you’d lose that tender crumb. If you’re gluten‑intolerant, a 1‑to‑1 gluten‑free flour blend works just fine, but make sure it contains xanthan gum for elasticity.
Next, sugar. A modest two tablespoons of granulated sugar sweetens the batter without overpowering the natural apple flavor. You could swap it for brown sugar for a deeper molasses note, but that would also darken the crust more than I like.
Baking powder and baking soda are the dynamic duo that give the pancakes their lift. The powder adds an initial rise, while the soda reacts with the acidity of the apples and a splash of milk, creating tiny air pockets that make the interior airy. Forget one of them and you’ll end up with dense, pancake‑like cakes that never quite get that fluffy bite.
The Texture Crew
Milk and melted butter are the liquid and fat that create a batter silky enough to coat the apple rings without drowning them. Using whole milk adds richness, but any milk will do; almond milk works for a dairy‑free version, though it will slightly alter the flavor profile. The butter, melted and slightly cooled, coats the skillet and adds that coveted golden crust.
Eggs act as the binder, holding everything together while also contributing to the tender crumb. If you’re vegan, a flax‑egg (1 tbsp ground flaxseed mixed with 3 tbsp water) can substitute, but the texture will be a shade denser.
The Unexpected Star
Apples are the hero here. Choose firm varieties—Honeycrisp, Pink Lady, or Granny Smith—for a balance of sweet and tart, and to ensure the rings stay intact during cooking. If you pick a soft apple like McIntosh, the rings will dissolve into the batter, and you’ll lose that dramatic visual effect. A quick tip: slice the apples about ¼‑inch thick; thinner slices become too fragile, thicker slices won’t cook through.
Cinnamon adds warmth and depth, echoing the apple’s natural spice notes. A teaspoon is enough to perfume the batter without turning it into a dessert casserole. If you love a stronger spice kick, a pinch of nutmeg or allspice can be added for an extra layer of complexity.
The Final Flourish
Vanilla extract is the subtle secret that ties the flavors together, giving the batter a sweet, aromatic backbone. A single teaspoon is sufficient; more would dominate the delicate apple taste. Finally, a pinch of salt—yes, just a pinch—enhances all the flavors, ensuring the sweetness isn’t cloying.
Everything's prepped? Good. Let's get into the real action...
The Method — Step by Step
Gather all your ingredients and set up a workstation. Place the apple rings in a bowl of cold water with a squeeze of lemon (remember the kitchen hack above) while you whisk the dry ingredients together: flour, sugar, baking powder, baking soda, salt, and cinnamon. This dry mix should look like a pale, speckled cloud—if it’s clumpy, sift it once more; clumps are the enemy of a smooth batter.
In a separate bowl, whisk together the milk, melted butter, eggs, and vanilla until the mixture is uniformly golden and slightly frothy. The moment the butter meets the milk, you’ll hear a faint sizzle—this is the butter emulsifying, and it’s a good sign.
Combine the wet and dry mixtures, stirring just until the flour disappears. Over‑mixing is a cardinal sin; a few lumps are okay and will actually help keep the pancakes tender. The batter should be thick enough to coat the back of a spoon but still flow slowly—think honey, not syrup.
Drain the apple rings and pat them dry with a paper towel. This step is crucial: excess moisture will cause the batter to slide off and result in soggy pancakes. Once dry, toss the rings in a light dusting of flour—just enough to give them a dry surface for the batter to cling to.
Heat a non‑stick skillet over medium‑low heat and add a tablespoon of butter, swirling to coat the surface. The butter should melt and foam, then settle into a thin sheen. That sizzle when it hits the pan? Absolute perfection. Watch Out: If the butter starts to brown too quickly, lower the heat; burnt butter will give the pancakes a bitter edge.
Place an apple ring onto the skillet, then ladle a generous spoonful of batter around it, allowing the batter to flow under and over the ring. You’ll see the batter start to bubble at the edges—this is the leavening doing its job. Let the pancake cook for about 2‑3 minutes, or until the underside turns a deep golden brown and the edges start pulling away from the pan.
Kitchen Hack: Use a thin spatula to gently press the pancake’s edge toward the center; this helps the batter seal around the apple and prevents leaks.Flip the pancake with a swift, confident motion. The apple side should be beautifully caramelized, the batter glossy and slightly puffed. Cook the second side for another 2 minutes, watching for the same golden hue. If the pancake is browning too fast, lower the heat and cover the pan for a brief 30‑second steam burst to finish cooking the interior without burning the exterior.
Transfer the finished pancake to a warm plate, and repeat the process with the remaining apple rings and batter. Keep the skillet lightly buttered between batches; this ensures each pancake gets that consistent crust. As you stack them, drizzle a thin stream of maple syrup or a dusting of powdered sugar for that final wow factor.
Serve immediately, while the edges are still crisp and the apples are warm. Picture yourself pulling this out of the pan, the whole kitchen smelling incredible, steam rising like a cozy blanket. I dare you to take a bite and not feel an instant smile spread across your face. This next part? Pure magic.
That's it — you did it. But hold on, I've got a few more tricks that'll take this to another level...
Insider Tricks for Flawless Results
The Temperature Rule Nobody Follows
Most home cooks crank the heat to “high” hoping for a faster cook, but that’s a recipe for disaster. Keep your skillet at a steady medium‑low (around 325°F if you have an infrared thermometer). This gentle heat allows the batter to set before the sugars caramelize, giving you that perfect balance of a soft interior and a crisp crust. I once tried blasting the heat and ended up with a burnt shell and raw apple center—trust me, the disappointment was real.
Why Your Nose Knows Best
Never underestimate the power of scent. When the batter starts to smell nutty and the apple rings emit a faint caramel perfume, you’re at the sweet spot for flipping. If the aroma is still raw or floury, give it a few more seconds. Your nose is a more reliable timer than a clock in this kitchen dance.
The 5‑Minute Rest That Changes Everything
After mixing the batter, let it rest for exactly five minutes. This short pause allows the gluten to relax and the leavening agents to activate fully, resulting in a fluffier pancake. Skipping this rest is a common mistake that leads to dense, rubbery pancakes. I’ve seen novices pour batter straight from the bowl and wonder why the texture is off—rest is the secret.
Butter vs. Oil Showdown
Butter gives flavor and a beautiful golden crust, but it can burn if the heat is too high. A splash of neutral oil (like grapeseed) mixed with butter gives you the best of both worlds: flavor plus a higher smoke point. Use a 2:1 ratio of butter to oil for optimal results.
Don’t Over‑Flip
Flipping more than once collapses the air pockets you’ve worked so hard to create. One flip per pancake is all you need. If you’re nervous, use a wide, thin spatula and practice a gentle wrist motion—think of it as a delicate dance, not a wrestling match.
Creative Twists and Variations
This recipe is a playground. Here are some of my favorite ways to switch things up:
Caramel Apple Delight
Swap the granulated sugar for brown sugar and drizzle a quick caramel sauce over the finished pancakes. The deeper molasses notes complement the apple’s tartness, turning a breakfast into a dessert‑style treat.
Nutty Crunch
Fold in a quarter cup of chopped toasted walnuts or pecans into the batter. The nuts add a satisfying crunch and a buttery richness that pairs beautifully with the cinnamon.
Spiced Autumn
Incorporate a pinch of ground ginger and a dash of allspice for a warm, holiday‑inspired flavor profile. This variation shines when paired with a dollop of vanilla Greek yogurt.
Berry Burst
After flipping the pancake, quickly scatter a handful of fresh blueberries around the apple ring. The berries will soften slightly, adding bursts of juicy contrast without overwhelming the apple.
Vegan Velvet
Replace the eggs with flax‑eggs (1 tbsp ground flaxseed + 3 tbsp water) and use oat milk instead of dairy milk. The texture remains fluffy, and the apple rings stay just as vibrant.
Savory Sunrise
Omit the sugar and cinnamon, add a pinch of smoked paprika, and serve with a drizzle of herb‑infused olive oil. This savory spin makes the pancakes a perfect side for a hearty brunch plate.
Storing and Bringing It Back to Life
Fridge Storage
Place cooled pancakes in an airtight container lined with parchment paper. They’ll stay fresh for up to three days. When reheating, a quick 30‑second burst in a hot skillet with a dab of butter restores the crisp edge.
Freezer Friendly
Stack pancakes between sheets of wax paper, then seal them in a zip‑top freezer bag. They freeze beautifully for up to two months. To reheat, microwave for 45 seconds, then finish in a hot skillet for that signature crunch.
Best Reheating Method
Before reheating, add a tiny splash of water (about a tablespoon per four pancakes) to the pan. The steam created keeps the interior moist while the butter revives the golden crust. This trick saves the texture from turning rubbery.