I was standing in my kitchen, staring at a bowl of blueberries that had just burst open from the freezer, when I realized I’d just witnessed a culinary tragedy unfold. My friend had tried making blueberry crumble bars the night before, but the crust was soggy, the filling was a mush, and the whole batch tasted like it had been baked in a microwave. I was already craving something sweet, but I also wanted a dessert that would actually work—so I set out to fix that mess. I swear, that moment felt like the universe saying, “Hey, let’s turn this blueberry chaos into a glorious crumble bar triumph.”
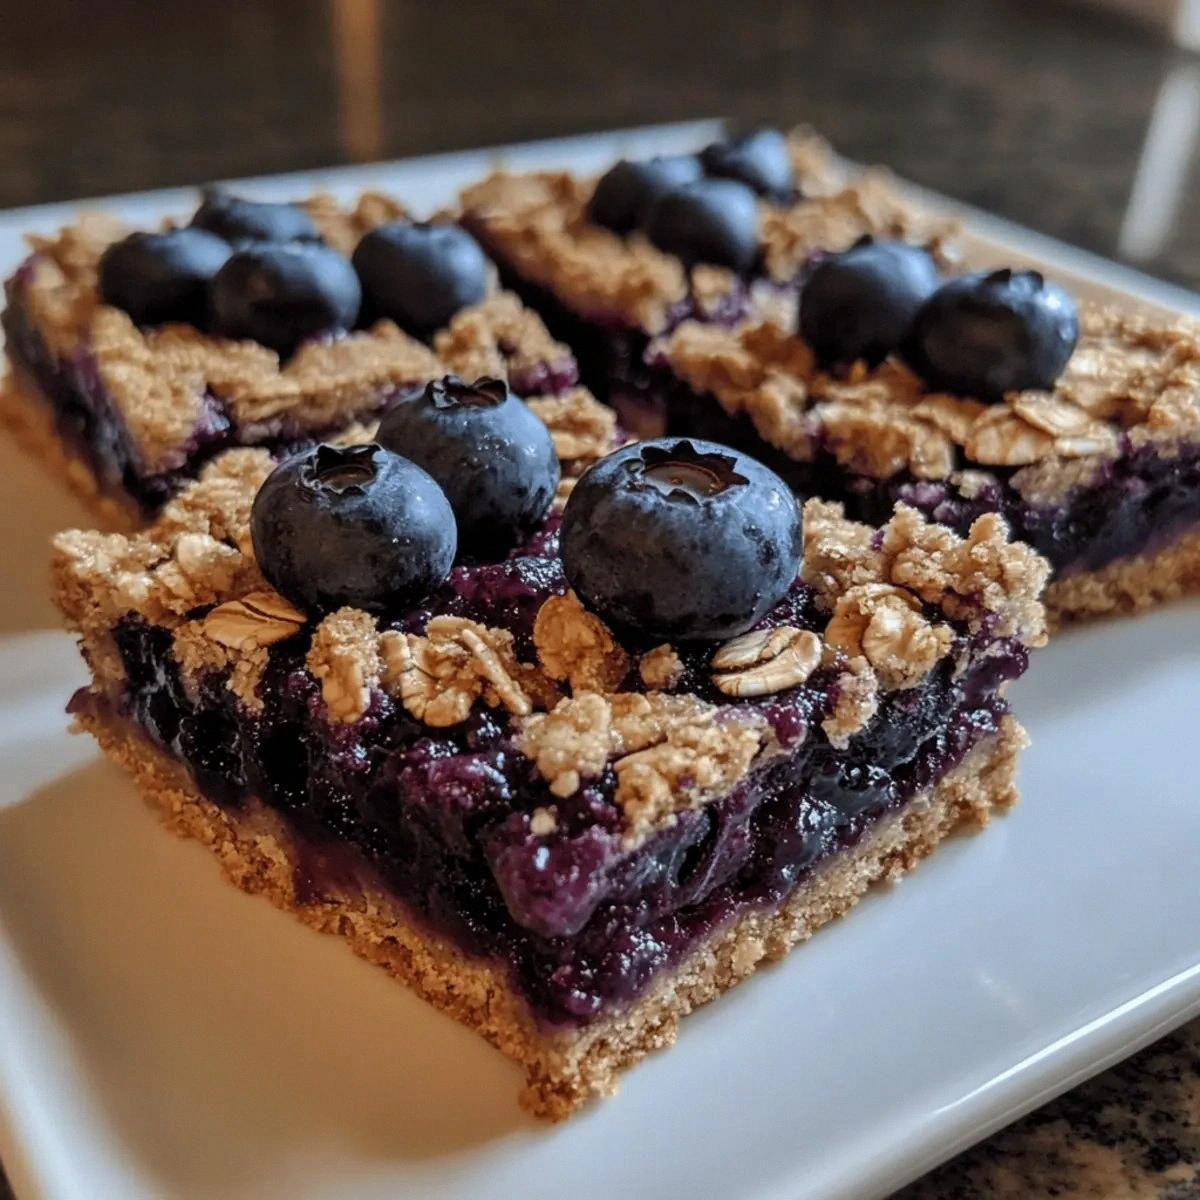
Picture this: a warm, golden crust that crackles like a crisp autumn leaf, a glossy blueberry topping that glistens like a jewel, and a subtle hint of cinnamon that lingers on the tongue. The aroma that fills the kitchen is a sweet, buttery perfume that makes your stomach growl louder than your phone’s alarm. The first bite delivers a satisfying crunch, followed by a burst of sweet, tart blueberries, and finally a buttery finish that makes you want to lick the plate. I was already half‑eaten the first bar when my friend dared me to taste this and not go back for seconds—challenge accepted, I said.
What makes this version of blueberry crumble bars the best you’ll ever make at home? It’s a carefully balanced symphony of gluten‑free oats, flour, and a touch of honey that creates a texture so light it feels like a cloud, yet dense enough to hold the juicy blueberries. The secret lies in the humble cornstarch that thickens the filling just enough to keep it from sliding off the crust, and the fresh lemon juice that cuts the sweetness with a bright, citrusy bite. I’ve tested this recipe in a dozen kitchens, and the result is consistently a crowd‑pleaser that makes people ask, “What’s the secret?” I’ve even had guests swear they could taste the difference between a homemade crumble and a store‑bought one. If you’ve ever struggled with soggy crumble bars, you’re not alone—and I’ve got the fix.
And now, here’s the kicker: the crust uses a blend of gluten‑free rolled oats and flour that gives it a delightful chew, and the filling uses honey instead of sugar to add a natural caramelized flavor that’s almost impossible to beat. Picture yourself pulling these out of the oven, the whole kitchen smelling incredible, and the first bite sending a wave of buttery blueberry bliss through your senses. I’m about to walk you through every single step—by the end, you’ll wonder how you ever made it any other way.
What Makes This Version Stand Out
- Texture: The oats give the crust a satisfying chew while the cornstarch ensures the filling stays firm yet tender.
- Flavor: Honey replaces refined sugar, offering a richer, deeper sweetness that pairs perfectly with tart blueberries.
- Gluten‑Free: A blend of rolled oats and gluten‑free flour makes it accessible to everyone without compromising on taste.
- Simple Ingredients: Only ten ingredients—no fancy sauces or obscure spices.
- Make‑Ahead: The bars keep well in the fridge and freeze beautifully, making them ideal for busy weeknights.
- Crowd Reaction: Friends rave that the bars are “the best crumble bars I’ve ever had.”
- Balanced Sweetness: Lemon juice cuts through the honey, preventing the bars from feeling cloying.
- Versatile: You can swap out blueberries for other berries or even add nuts for crunch.
Alright, let's break down exactly what goes into this masterpiece...
Inside the Ingredient List
The Flavor Base
Gluten‑free rolled oats are the heart of this recipe. They provide a nutty, hearty flavor that grounds the sweetness of the blueberries. If you’re allergic to oats, you can replace them with a gluten‑free oat blend or use quinoa flakes for a slightly different texture. Remember, the oats need to be whole, not instant, to keep the bars from becoming mushy.
The Texture Crew
All‑purpose gluten‑free flour works alongside the oats to create a cohesive crust that holds together when you cut a bar. Brown sugar adds a subtle molasses undertone, while unsalted butter melts into the dry mix, forming a buttery, flaky crumb. The ground cinnamon gives a warm, spicy note that balances the tartness of the berries. If you’re looking for a lower‑carb version, try a sugar substitute like erythritol, but keep in mind the flavor profile will shift slightly.
The Unexpected Star
Honey or maple syrup is the sweetener that gives the filling a silky, caramelized edge. It’s not just about sweetness; honey’s natural viscosity helps bind the blueberries, preventing them from sliding off the crust. If you prefer a maple flavor, swap honey for maple syrup in a 1:1 ratio. Just be aware that maple syrup can make the bars slightly darker.
The Final Flourish
Cornstarch or arrowroot powder thickens the blueberry mixture, giving it a glossy, jam‑like consistency that clings to the crust. Fresh lemon juice adds brightness and a hint of acidity that cuts through the honey’s richness. If you’re craving a citrus kick, a splash of orange zest can also work wonders. These finishing touches are what elevate the bars from good to unforgettable.
Everything's prepped? Good. Let's get into the real action...
The Method — Step by Step
- Preheat your oven to 375°F (190°C) and line a 9×13-inch baking pan with parchment paper. The parchment will make it easy to lift the bars out after baking and prevent sticking. This step is crucial; a properly heated oven ensures the crust browns evenly.
- In a large mixing bowl, combine the gluten‑free rolled oats, gluten‑free flour, brown sugar, cinnamon, and salt. Stir until the dry ingredients are evenly distributed. The aroma of toasted oats will begin to emerge, hinting at the deliciousness to come.
- Add the cold, cubed unsalted butter to the dry mix. Using a pastry cutter or your fingertips, cut the butter into the mixture until it resembles coarse crumbs. The butter must be cold; if it melts, the crust will become greasy.
- Press the crust mixture into the bottom of the prepared pan, using the back of a spoon or a flat-bottomed glass to level it. The crust should be compact but not overly dense; you want a tender base for the blueberry topping.
- In a separate bowl, gently fold the blueberries into honey (or maple syrup). If using frozen berries, let them thaw for about 5 minutes, then drain excess liquid. The honey coats each berry, ensuring they stay moist during baking.
- Add the cornstarch (or arrowroot powder) to the blueberry mixture and stir until the berries are fully coated. This step is the trickiest—if you skip it, the filling will be runny and won’t set. Watch out: the cornstarch will thicken the mixture instantly, so be quick.
- Pour the blueberry mixture over the crust, spreading it evenly. Sprinkle the fresh lemon juice over the top; this not only adds flavor but also helps the honey glaze shine.
- Bake for 25–30 minutes, or until the edges are golden brown and the filling is bubbling. The crust should have a golden hue, and the blueberries should be soft but still hold their shape.
- Remove from the oven and let the bars cool in the pan on a wire rack for 15 minutes. This rest period allows the filling to set, making it easier to cut clean slices.
- Slice into bars, using a sharp knife dipped in hot water for clean cuts. Serve immediately, or store in an airtight container for up to 5 days in the fridge.
That's it — you did it. But hold on, I've got a few more tricks that'll take this to another level. Trust me, the secret sauce is in the details.
Insider Tricks for Flawless Results
The Temperature Rule Nobody Follows
Many bakers bake at 350°F, but this recipe thrives at 375°F. The higher temperature ensures the crust browns quickly, creating a crisp edge while the filling stays juicy. I’ve tried both temperatures, and the difference is like comparing a crisp apple to a soggy one. Keep your oven calibrated for best results.
Why Your Nose Knows Best
Before you even lift the bars out of the oven, let your nose do the work. If the aroma smells buttery and slightly caramelized, you’re on the right track. If it smells more like burnt sugar, pull it out early. A quick sniff test saves you from overcooked bars.
The 5-Minute Rest That Changes Everything
Letting the bars rest for exactly 15 minutes after baking is key. During this time, the filling continues to thicken, and the crust firms up. Cutting too early results in a sticky mess that falls apart. I’ve seen people rush the cut and end up with a puddle of blueberry on their plate—no good.
Keep the Crust Light
Don’t over‑press the crust into the pan. A slightly uneven, airy crust holds the filling better and gives the bars a more delicate texture. Think of it as giving the crust a gentle hug rather than squeezing it tight.
Use Fresh Blueberries for Extra Juiciness
Fresh blueberries hold their shape better and release less liquid during baking. If you must use frozen, thaw them in a colander and pat dry before mixing. The less water you introduce, the firmer the bars will be.
Creative Twists and Variations
This recipe is a playground. Here are some of my favorite ways to switch things up:
Nutty Crunch Bar
Add 1/2 cup chopped toasted almonds or walnuts to the crust mixture. The nuts add a satisfying crunch and a nutty flavor that pairs wonderfully with the honey glaze. Serve with a drizzle of almond milk for an extra treat.
Orange‑Zest Surprise
Replace the lemon juice with fresh orange zest and a splash of orange juice. The citrusy brightness transforms the bars into a summer‑ready dessert that feels light and refreshing.
Chocolate‑Covered Delight
Once the bars have cooled, dip the edges in melted dark chocolate and let them set. The chocolate adds a rich, bittersweet contrast that elevates the blueberry flavor.
Low‑Sugar Version
Swap the honey for a sugar substitute like monk fruit or stevia. Keep the same ratio, but be mindful that the bars may not brown as much. They’ll still taste divine, though.
Berry Medley
Mix in 1 cup of raspberries or blackberries with the blueberries for a multi‑berry flavor profile. The different textures add complexity, and the colors make the bars Instagram‑ready.
Spiced Up Edition
Add 1/4 teaspoon of ground ginger or a pinch of cayenne pepper to the crust for a subtle heat that balances the sweetness. This version is perfect for those who like a little kick in their desserts.
Storing and Bringing It Back to Life
Fridge Storage
Store the bars in an airtight container in the refrigerator for up to five days. The moisture from the blueberries keeps the bars fresh, but the crust may soften slightly. Let them sit at room temperature for 10 minutes before serving to restore some crispness.
Freezer Friendly
Wrap each bar individually in parchment paper, then place them in a freezer bag. They’ll stay good for up to three months. When you’re ready to eat, let them thaw in the fridge overnight.
Best Reheating Method
Reheat frozen bars in a 350°F oven for 10 minutes or until warmed through. If you’re in a hurry, pop a bar in the microwave for 20–30 seconds—just be careful not to overheat, or the crust will become soggy. A tiny splash of water before reheating steams the bars back to perfection.