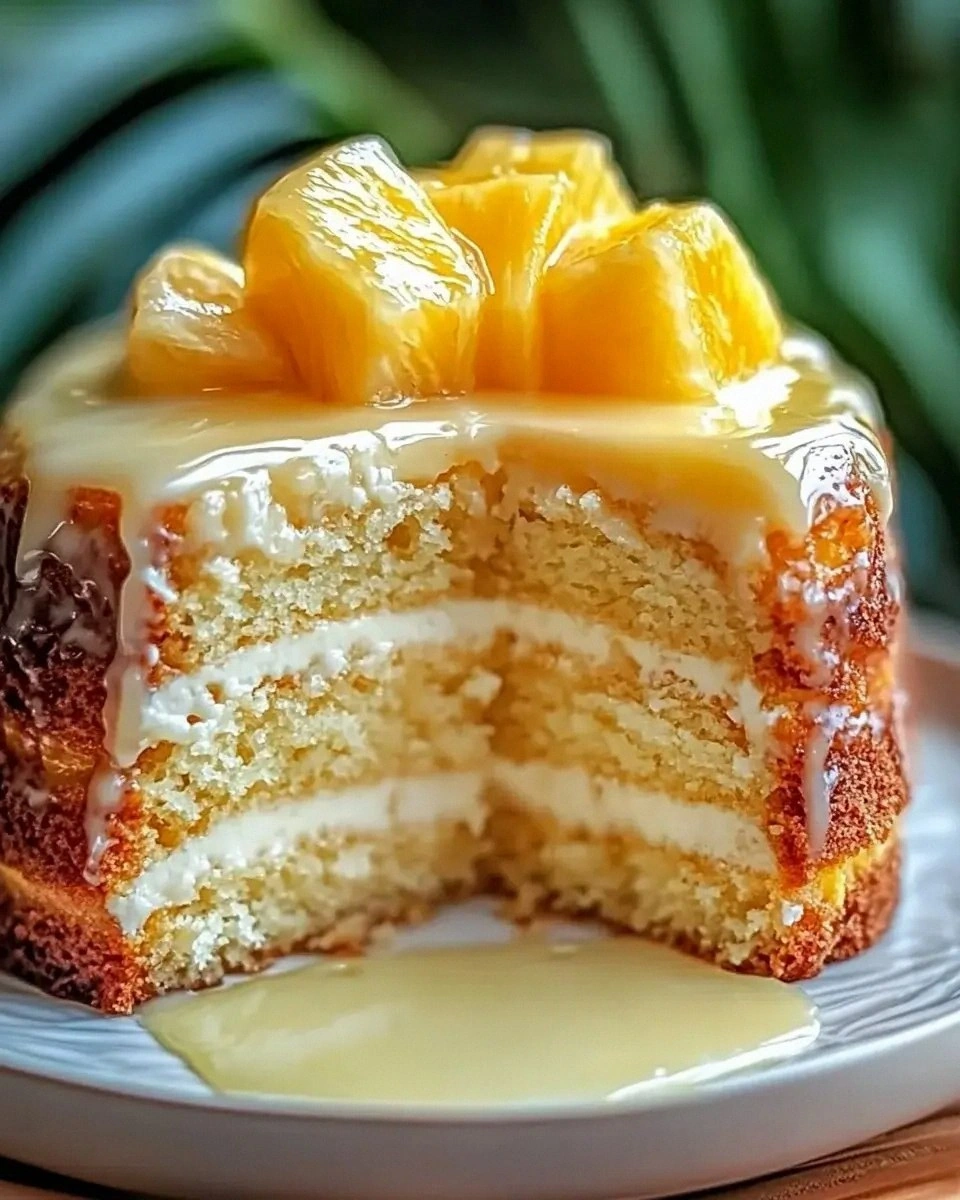
Brown Sugar Caramel Pound Cake
It started with a kitchen mishap that I’ll never forget—an over‑baked loaf that turned into a sticky, caramel‑covered slab of regret. I was staring at that dark, glossy surface, thinking, “This could be a dessert if only someone had the nerve to taste it.” That single moment of culinary curiosity sparked the creation of a pound cake that defies every expectation, turning a burnt mistake into a masterpiece.
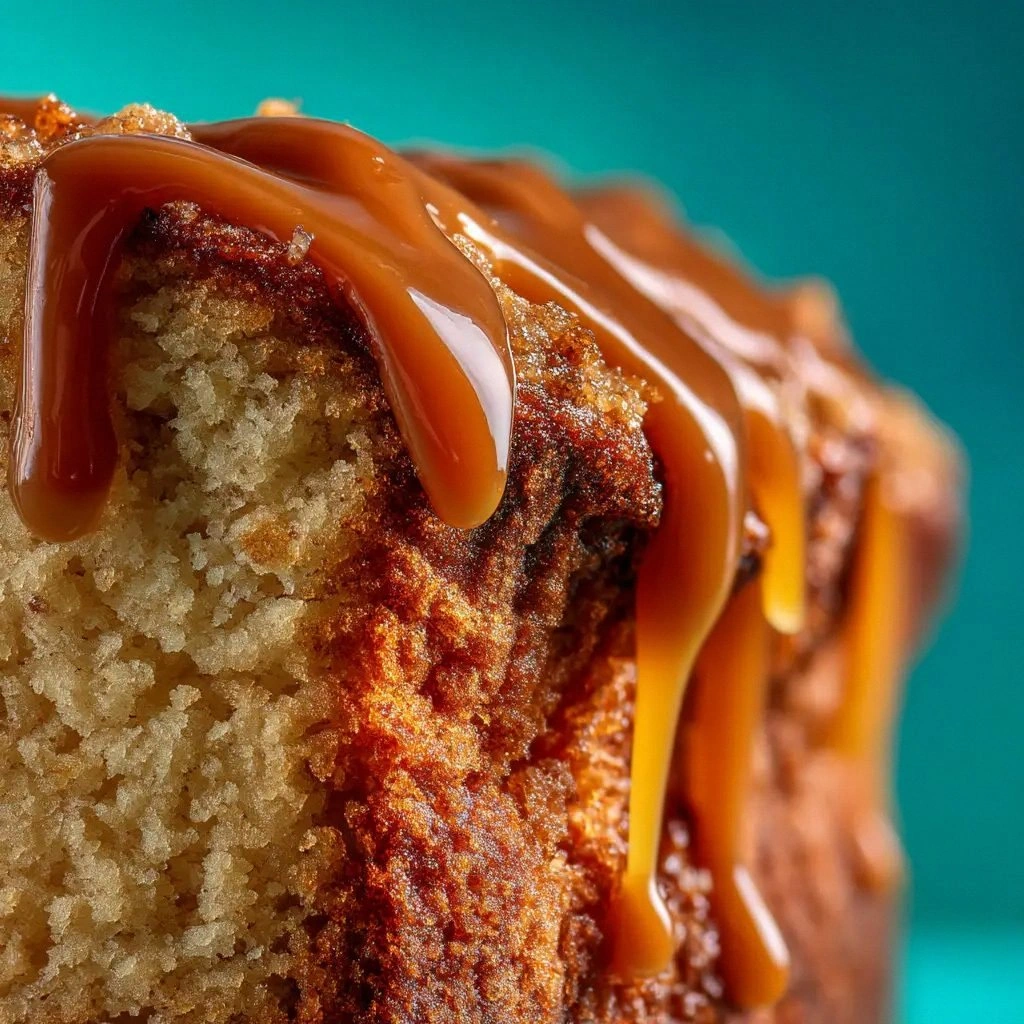
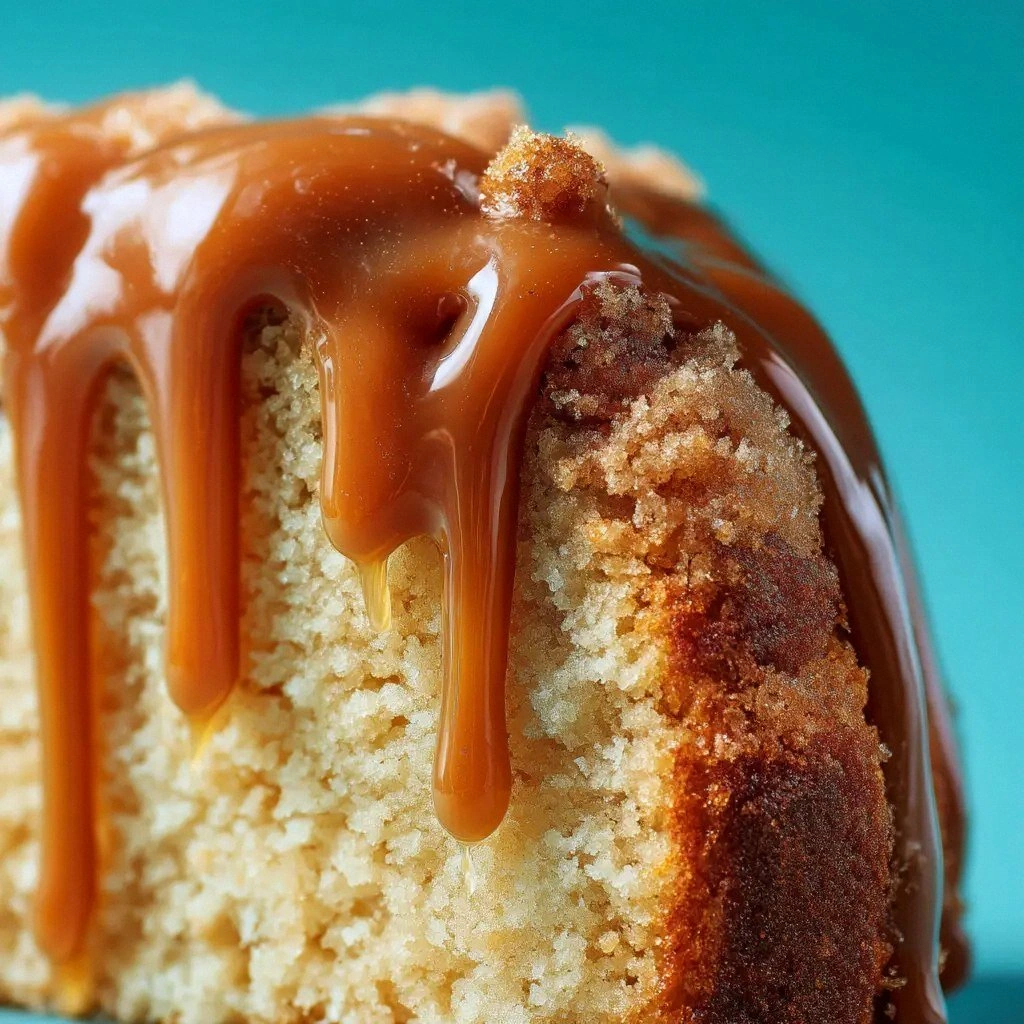
Imagine walking into your kitchen, the air thick with the sweet scent of browned sugar and melted butter. The oven door opens to reveal a golden slab that glistens like a freshly polished trophy. As you slice, the cake releases a rich, buttery aroma that mingles with a whisper of vanilla and the faintest hint of sea salt. The texture is a paradox—crunchy on the edges, silky in the center, with a caramel glaze that clings like velvet. If you’ve ever struggled with a cake that’s either too dry or too soggy, this version will change your perspective forever.
What sets this recipe apart is its deliberate layering of flavors and textures, a meticulous balance that most pound cakes miss. The batter is a harmonious blend of brown sugar and buttermilk that creates a tender crumb, while the caramel glaze adds a glossy, buttery finish that feels almost indulgent. I dare you to taste this and not go back for seconds; the first bite will leave you craving the second. This is hands down the best version you’ll ever make at home, and I’m here to walk you through every single step—by the end, you’ll wonder how you ever made it any other way.
There’s a twist you might not expect: a subtle splash of heavy cream in the caramel that gives it a silky sheen, and a dash of sea salt that cuts through the sweetness like a well‑timed punchline. Picture yourself pulling this out of the oven, the whole kitchen smelling incredible, and a crowd of friends gathering around the table, all eyes on that glossy slab of cake. Stay with me here—this is worth it.
What Makes This Version Stand Out
- Richness: The batter’s generous use of brown sugar and buttermilk creates a depth of flavor that feels like a caramel‑sugar hug in every bite.
- Texture: The crumb is soft and moist, yet the caramel glaze gives a satisfying snap that contrasts beautifully with the tender interior.
- Ease: With only a handful of pantry staples, this cake can be whipped up in under an hour—no fancy equipment required.
- Visual Appeal: The glossy caramel finish turns a simple pound cake into a showpiece that looks as good on a plate as it tastes.
- Make‑Ahead: Once baked, the cake keeps its moisture and caramel shine for up to a week when wrapped tightly, making it perfect for busy schedules.
- Flavor Layering: The subtle sea salt in the glaze balances the sweetness, while the vanilla extract adds a warm, aromatic undertone.
- Crowd Reaction: Friends who’ve tried other pound cakes often remark on how this one feels like a dessert and a comfort food rolled into one.
- Ingredient Quality: Using cake flour instead of all-purpose ensures a lighter crumb, while the heavy cream in the glaze gives it a silky mouthfeel.
Alright, let’s break down exactly what goes into this masterpiece…
Inside the Ingredient List
The Flavor Base
At the heart of this cake lies the batter, a symphony of 1.5 cups unsalted butter, 3 cups packed light brown sugar, and 5 large eggs. The butter is melted and cooled to room temperature, allowing it to blend seamlessly with the sugar, creating a rich, caramel‑laden foundation. The eggs act as the binder, providing structure while keeping the crumb moist. If you skip the eggs, the cake will collapse, turning your masterpiece into a soggy mess.
When choosing butter, opt for a high‑quality unsalted variety. The flavor profile of butter directly influences the final taste—premium butter will give your cake a deeper, more buttery note that pairs perfectly with the caramel glaze. A tip: chill the butter before melting; this prevents it from seizing and ensures a smoother batter.
The Texture Crew
The 3 cups of cake flour, paired with 1/2 teaspoon baking powder and 1/2 teaspoon salt, form the structural backbone of the cake. Cake flour has a lower protein content than all‑purpose flour, which translates to a lighter, more tender crumb. The baking powder ensures that the cake rises evenly, while the salt balances the sweetness, preventing the batter from tasting flat.
For those who prefer a gluten‑free option, you can substitute the cake flour with a gluten‑free blend that mimics its properties. Just be sure to add a pinch of xanthan gum if your blend doesn’t contain it. Skipping the baking powder will result in a dense, heavy cake that feels more like a bread than a dessert.
The Unexpected Star
Buttermilk is the secret sauce that brings everything together. Its acidity reacts with the baking powder, producing a lift that keeps the cake airy. The tanginess of buttermilk also cuts through the sweetness of the brown sugar, adding a subtle complexity that most pound cakes lack. If you can’t find buttermilk, use regular milk mixed with a tablespoon of white vinegar or lemon juice; let it sit for five minutes before adding.
Choosing full‑fat buttermilk is crucial—skim or low‑fat versions will leave the cake drier and less flavorful. The richness of the buttermilk also enhances the caramel glaze, giving it a silky sheen that’s impossible to resist.
The Final Flourish
The caramel glaze is where the cake truly shines. It’s made with 1/2 cup unsalted butter, 1 cup packed light brown sugar, 1/4 cup heavy cream, 1 teaspoon vanilla extract, and a pinch of salt. The butter melts into the sugar, creating a glossy base, while the heavy cream adds a silky texture that coats the cake’s surface. The vanilla extract gives it a warm, aromatic depth, and the salt provides a counterpoint that makes the sweetness pop.
When making the glaze, keep the heat low to prevent the sugar from burning. A slow, steady melt ensures a smooth, glossy finish. If you’re worried about the glaze drying out, you can brush a thin layer of warm milk over the cake after it cools; this keeps the glaze moist and enhances the caramel sheen.
Everything’s prepped? Good. Let’s get into the real action…
The Method — Step by Step
- Preheat the oven to 325°F (163°C) and grease a 9x5-inch loaf pan. While the oven warms, line the bottom of the pan with parchment paper to ensure easy release. The low temperature helps the cake rise evenly without drying out the exterior. As the oven heats, the aroma of butter begins to mingle with the sweet scent of brown sugar, signaling that the kitchen is about to transform into a bakery.
- Combine the butter, brown sugar, and eggs. Melt the 1.5 cups of butter in a saucepan over low heat until it’s just liquid. Remove from heat and let it cool slightly before whisking in the 3 cups of packed light brown sugar. Beat in the 5 eggs one at a time, ensuring each is fully incorporated before adding the next. This step is crucial for creating a smooth batter; a lumpy mixture will result in uneven crumb.
- Fold in the dry ingredients. Sift together 3 cups of cake flour, 1/2 teaspoon baking powder, and 1/2 teaspoon salt. Gently fold the dry mixture into the wet batter, being careful not to overmix. Overmixing can develop gluten, leading to a tough texture. The batter should be thick but pourable, like a thick pancake batter.
- Incorporate the buttermilk. Pour 1 cup of buttermilk into the batter and stir until the mixture is smooth and glossy. The acidity of the buttermilk will react with the baking powder, giving the cake a light lift. Keep an eye on the batter’s consistency; it should be thick enough to hold its shape but still fluid enough to pour.
- Pour the batter into the prepared pan. Tap the pan gently on the counter to release any air bubbles. The batter should spread evenly across the bottom. At this point, the cake is ready for its first test: the “toothpick test.” Insert a toothpick into the center; if it comes out clean, the batter is ready for baking.
- Bake for 30 minutes. Place the loaf in the preheated oven and bake until the top is golden brown and a toothpick inserted near the center comes out with a few moist crumbs. The internal temperature should reach 190°F (88°C). The cake should emit a caramelized scent that makes your mouth water.
- Cool and glaze. Remove the cake from the oven and let it cool in the pan for 10 minutes. While it cools, prepare the caramel glaze: melt 1/2 cup butter in a saucepan, add 1 cup packed light brown sugar, and stir until the mixture is smooth. Pour in 1/4 cup heavy cream and 1 teaspoon vanilla extract, then whisk until the glaze is glossy. Add a pinch of sea salt and stir to combine. Pour the glaze over the cooled cake, letting it soak in and coat the surface.
- Let the glaze set. Allow the cake to cool completely at room temperature. The glaze will firm up, creating a glossy, caramel‑coated surface that’s a visual and culinary treat. Slice carefully with a serrated knife to preserve the layers.
- Serve and enjoy. The cake is best served at room temperature, but you can also refrigerate it for up to a week. Before serving, let it sit at room temperature for 15 minutes to bring out the full flavor profile. The caramel glaze will melt slightly, revealing the buttery crumb underneath.
That’s it — you did it. But hold on, I’ve got a few more tricks that’ll take this to another level…
Insider Tricks for Flawless Results
The Temperature Rule Nobody Follows
Most bakers bake pound cakes at a higher temperature, hoping for a faster rise. I’ve discovered that keeping the oven at 325°F (163°C) ensures a slow, even bake that preserves moisture. The lower heat allows the caramel glaze to set properly without scorching. If you’re using a convection oven, reduce the temperature by 25°F to compensate for the fan’s effect.
Why Your Nose Knows Best
Before you even open the oven door, the scent of caramelized sugar should be unmistakable. If the aroma is faint, your batter may be too dry. The smell is a reliable indicator that the cake is baking correctly; it’s the olfactory version of a thermometer.
The 5‑Minute Rest That Changes Everything
After baking, let the cake rest in the pan for exactly five minutes before turning it out. This brief pause allows the steam to redistribute, preventing cracks on the surface. Many bakers skip this step, resulting in uneven crusts and a less polished appearance.
Keep the Glaze Flowing
When pouring the caramel glaze, keep the saucepan on low heat and stir continuously. This prevents the sugar from crystallizing and ensures a silky, glossy finish. A trick: add a splash of bourbon or rum to the glaze for an adult twist that adds depth without overpowering the sweetness.
Preventing a Sticky Mess
If the glaze starts to thicken too quickly, reduce the heat and add a teaspoon of warm water to re‑loosen it. This keeps the glaze smooth and allows it to coat the cake evenly. Remember, a thin glaze is more flavorful because it spreads across more surface area.
Reheating Without Drying Out
When you’re ready to serve a leftover slice, warm it in a low‑heat oven (250°F / 120°C) for five minutes. Before reheating, lightly brush the slice with warm milk; this creates steam that keeps the cake moist and the glaze glossy.
Creative Twists and Variations
This recipe is a playground. Here are some of my favorite ways to switch things up:
Almond Joy Edition
Swap half the brown sugar in the glaze for almond extract and add toasted shredded coconut to the batter. The result is a tropical, nutty cake that pairs wonderfully with a splash of coconut milk.
Chocolate Caramel Bomb
Fold in 1 cup of melted dark chocolate into the batter before baking. Top the glaze with a drizzle of chocolate sauce for a decadent double‑layered treat that feels like a dessert and a comfort food rolled into one.
Spiced Pumpkin Twist
Introduce 1/2 cup of pumpkin puree into the batter and add a pinch of cinnamon, nutmeg, and clove. The caramel glaze remains, but the pumpkin adds a subtle earthiness that makes this cake perfect for fall.
Salted Caramel Swirl
Stir in 2 tablespoons of sea salt into the glaze and swirl a pinch of flaky sea salt into the batter before baking. The result is a cake that’s both sweet and savory, with a crunchy salt crust on top.
Berry Burst
Fold fresh blueberries or raspberries into the batter after the buttermilk is added. The berries burst with each bite, adding a juicy, tart contrast to the rich caramel.
Vegan Version
Replace butter with coconut oil, use flaxseed eggs, and substitute buttermilk with soy milk. The caramel glaze can be made with coconut cream. This version stays true to the original’s flavor while being plant‑based.
Storing and Bringing It Back to Life
Fridge Storage
Wrap the cooled cake tightly in plastic wrap and store it in the refrigerator for up to five days. The glaze will firm up, but the cake remains moist. When you’re ready to serve, let it sit at room temperature for 15 minutes to bring out the full flavor.
Freezer Friendly
For longer storage, slice the cake and wrap each slice individually in freezer paper, then place them in a freezer bag. The cake will stay fresh for up to three months. Thaw in the fridge overnight and allow it to come to room temperature before serving.
Best Reheating Method
To revive a frozen slice, place it on a baking sheet and bake at 250°F (120°C) for five minutes. Brush a thin layer of warm milk over the top to keep the glaze moist. This method ensures the cake stays tender and the glaze stays glossy.