I dare you to taste this and not go back for seconds. The first time I attempted a pretzel, it turned out more like a rubber band that had been left out in the rain. I was ready to toss the dough and order a bag of store‑bought twists, when a sudden craving for something warm, sweet, and buttery hit me like a thunderclap. I grabbed the nearest cinnamon, sugar, and a handful of courage, and the rest is a story you’ll read in the steam‑filled kitchen air.
Picture yourself pulling a batch out of the oven, the whole kitchen smelling like a cozy bakery on a lazy Sunday morning. The golden crust cracks just enough to reveal a pillowy interior that practically melts in your mouth, while the cinnamon‑sugar coating clings like a sweet, crunchy hug. That sizzle when the pretzels hit the boiling soda bath? Absolute perfection. It’s the kind of sound that makes you pause, listen, and smile like a kid watching fireworks.
Most recipes get this completely wrong. They either skip the soda bath, over‑mix the dough, or forget the crucial butter melt that gives the pretzel its signature richness. Here’s what actually works: a precise balance of yeast activation, a gentle dough rest, and that final dip in a baking‑soda bath that creates the iconic chewy‑crisp contrast. The secret? A tiny dash of melted butter folded into the dough at just the right moment, and a generous dusting of cinnamon‑sugar that sticks like caramel on a summer peach.
Okay, ready for the game‑changer? I’m about to walk you through every single step — by the end, you’ll wonder how you ever made pretzels any other way. I’ll be honest — I ate half the batch before anyone else got to try it, but I promise you’ll have enough to share (or not). Let’s dive in and create the best version you’ll ever make at home.
What Makes This Version Stand Out
- Texture: The exterior is crisp from the soda bath, while the interior stays cloud‑soft, creating a mouthfeel that’s half‑soft pretzel, half‑cinnamon roll. It’s the kind of contrast that makes you close‑eyed and sigh with each bite.
- Flavor: A buttery dough base meets a caramel‑sweet cinnamon coating, delivering layers of taste that evolve from warm spice to sugary finish. The subtle salt in the dough amplifies the sweet without ever feeling cloying.
- Simplicity: Only ten ingredients, no fancy equipment, and a single bowl for the dough. Even a novice can master it, and the steps are laid out like a friendly road map.
- Uniqueness: Most soft pretzel recipes stick to plain salt; we flip the script with cinnamon‑sugar, turning a classic snack into a dessert‑worthy treat.
- Crowd Reaction: I’ve watched grown‑ups turn into giggling kids the moment they bite into one. The “melt‑in‑your‑mouth” moment is a guaranteed applause‑worthy finish.
- Ingredient Quality: Using real butter instead of oil, and fresh ground cinnamon, gives a depth that powdered mixes simply can’t match. Freshness is the silent hero here.
- Cooking Method: The soda‑bath dip is the secret weapon that creates that signature chew without sacrificing crispness. It’s a technique most store‑bought pretzels skip.
- Make‑Ahead Potential: Freeze the uncooked pretzels, bake them later, and reheat for instant indulgence. Perfect for busy mornings or surprise guests.
Inside the Ingredient List
The Flavor Base
Active dry yeast is the tiny powerhouse that gives the pretzels their lift. If the yeast is dead, you’ll end up with a dense, bread‑like brick that no amount of cinnamon can save. Always proof the yeast in warm water (about 110°F) with a pinch of sugar; you’ll see it foam like a tiny volcanic eruption, a sign that it’s alive and ready. For a gluten‑free twist, you can swap the all‑purpose flour for a 1:1 gluten‑free blend, but expect a slightly different texture.
The Texture Crew
All‑purpose flour provides the perfect balance of protein for structure and starch for softness. If you reach for cake flour, the pretzels will crumble; if you use bread flour, they’ll be too chewy. Unsalted butter, melted, enriches the dough and adds that melt‑in‑your‑mouth quality you crave. The butter also helps the cinnamon‑sugar coating adhere, turning each bite into a buttery, sugary crunch.
The Unexpected Star
Baking soda isn’t just for leavening; in this recipe it creates a quick‑acting alkaline bath that gives the pretzel its signature deep‑golden crust and a slight chew. The bath also neutralizes the acidity of the dough, allowing the cinnamon‑sugar to caramelize without burning. If you’re out of baking soda, you can substitute baking powder, but the texture will be less authentic.
The Final Flourish
Granulated sugar appears twice: once in the dough to feed the yeast and once for the coating that creates the sweet crust. The cinnamon, freshly ground, releases essential oils when mixed with sugar, forming a fragrant dust that clings to the pretzel’s surface like a sweet veil. If you love extra spice, add a pinch of nutmeg or cardamom to the coating for a subtle depth. Finally, the egg wash gives the pretzels a glossy finish that makes them look as good as they taste.
Everything's prepped? Good. Let’s get into the real action…
The Method — Step by Step
Start by activating the yeast. In a medium bowl, combine 1 cup of warm water (110°F), 1 tablespoon of granulated sugar, and 2 ¼ teaspoons of active dry yeast. Stir gently, then let it sit for 5‑7 minutes until it becomes foamy and smells like a sweet perfume. This is the moment of truth – if you don’t see bubbles, your yeast is dead and you’ll need fresh packets. Once it’s bubbly, set it aside; the aroma alone is enough to make you smile.
While the yeast is waking up, whisk together 3 ½ cups of all‑purpose flour, 1 teaspoon of salt, and the remaining 1 cup of granulated sugar in a large mixing bowl. The salt balances the sweetness and strengthens the gluten network, ensuring the pretzels hold their shape during the soda bath. Give the dry ingredients a quick stir to distribute the salt evenly; uneven salt can cause pockets of blandness.
Make a well in the center of the flour mixture and pour in the foamy yeast mixture along with 2 tablespoons of melted unsalted butter. Using a wooden spoon, combine everything until a shaggy dough forms. It will look a bit sticky, but that’s exactly what you want – the moisture will become the softness you’re after. If the dough feels too dry, splash in a tablespoon of warm water; if it’s too wet, dust the surface with a little extra flour.
Turn the dough onto a lightly floured surface and knead for about 8‑10 minutes. You’re looking for a smooth, elastic ball that springs back when pressed. The kneading process aligns the gluten strands, giving the pretzel its characteristic chew. This is where patience pays off; a rushed knead leads to a tough bite, while a thorough knead yields that melt‑in‑your‑mouth texture.
Place the kneaded dough in a lightly oiled bowl, cover with plastic wrap, and let it rise in a warm spot for 1 hour, or until doubled in size. The dough should puff up like a balloon, and you’ll notice a faint, sweet aroma filling the kitchen. If the rise seems slow, preheat your oven to its lowest setting for a few minutes, then turn it off; the residual warmth is perfect for yeast activity.
While the dough rises, pre‑heat your oven to 425°F (220°C) and line two baking sheets with parchment paper. In a large pot, bring 8 cups of water to a boil and carefully stir in ¼ cup of baking soda – it will bubble vigorously, creating an alkaline bath that’s essential for that golden crust. Set a timer for 30 seconds; you’ll need it for each pretzel.
Once the dough has risen, punch it down gently and divide it into 12 equal pieces. Roll each piece into a long rope, about 18‑20 inches, then form a classic pretzel shape by forming a U, crossing the ends, and pressing them onto the bottom of the U. This step may feel awkward at first, but practice makes perfect – think of it as sculpting edible art.
Bring the soda water back to a gentle boil. Using a slotted spoon, dip each pretzel into the bath for exactly 30 seconds. You’ll hear a faint sizzle as the dough surface reacts, and the pretzel will puff slightly. Remove and let excess water drip off before placing them onto the prepared baking sheets. This quick dip is pure magic – it creates that signature glossy, deep‑golden exterior.
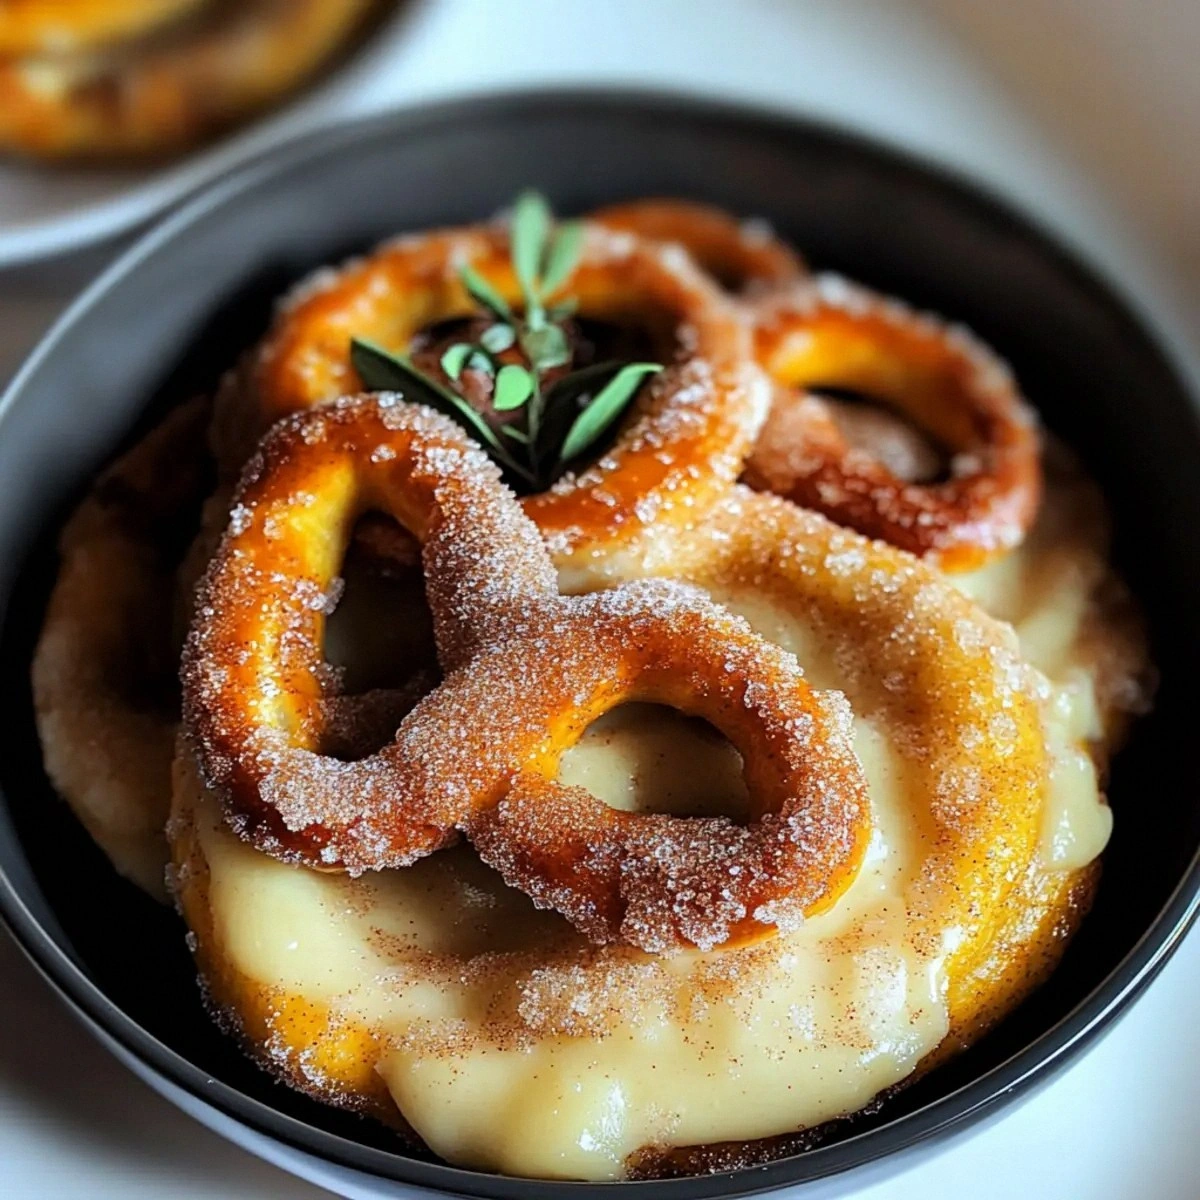
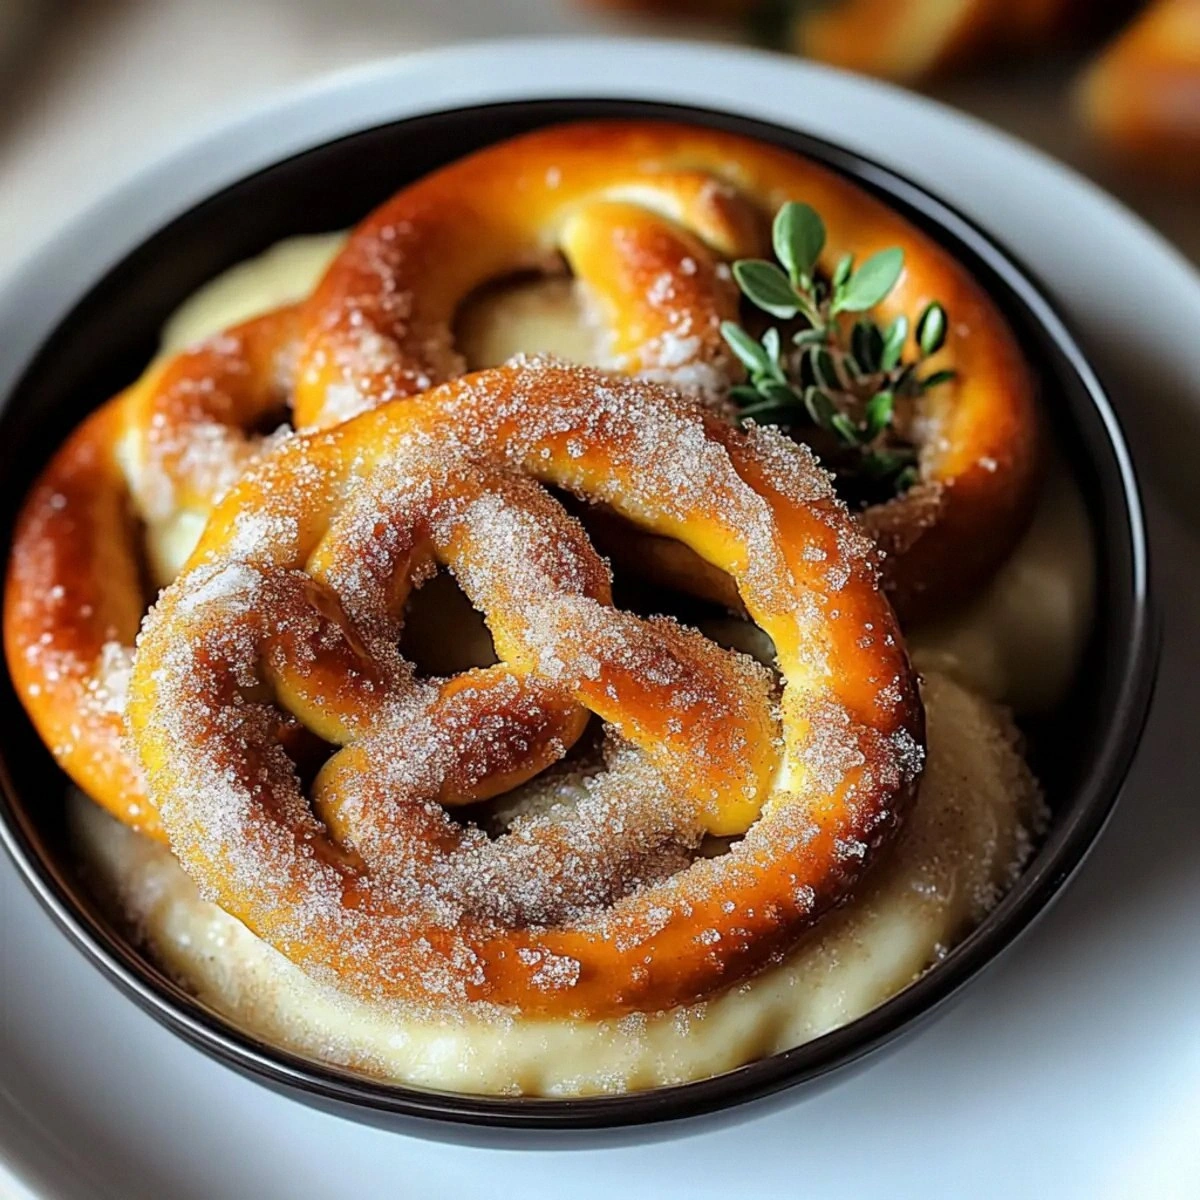
Brush each pretzel lightly with the beaten egg; this creates a beautiful sheen that catches the light. Then, in a shallow bowl, mix 1 cup of granulated sugar with 1 tablespoon of ground cinnamon. Generously roll each pretzel in the cinnamon‑sugar mixture, making sure every crevice is coated. The coating should cling like a sweet glaze, ready to caramelize in the oven.
Slide the baking sheets into the preheated oven and bake for 12‑15 minutes, or until the pretzels turn a deep amber and the edges start to pull away from the parchment. The scent at this point is intoxicating – you’ll hear neighbors knocking, begging for a taste. When they’re done, remove them and let them cool on a wire rack for a few minutes; the cooling process lets the interior stay soft while the crust remains crisp.
That's it — you did it. But hold on, I've got a few more tricks that'll take this to another level…
Insider Tricks for Flawless Results
The Temperature Rule Nobody Follows
Never let the water for the soda bath dip below a gentle simmer. If the temperature drops, the pretzel surface won’t set quickly enough, resulting in a soggy crust. Keep the pot on low heat and watch the bubbles – a steady, low boil is the sweet spot. I once let the water cool, and the pretzels came out pale and gummy; lesson learned, keep that heat consistent.
Why Your Nose Knows Best
Your sense of smell is a better indicator of doneness than a timer. When the pretzels start to exude a nutty, caramel aroma, they’re nearly ready. Trust that nose cue; the golden color will follow naturally. A friend tried to bake them for exactly 12 minutes every time and ended up with under‑cooked interiors – the nose never lies.
The 5‑Minute Rest That Changes Everything
After shaping, let the pretzels rest on the baking sheet for five minutes before the soda dip. This short rest relaxes the gluten, preventing the pretzels from snapping back during the bath. It also allows the surface to dry slightly, which improves the sugar coating’s adherence. Skipping this step leads to a coating that slides off like a bad haircut.
Egg Wash Perfection
For the ultimate glossy finish, whisk the egg with a tablespoon of milk. The milk adds a subtle richness and helps the glaze set evenly. Brush the pretzels just before the final bake, and you’ll see a beautiful sheen that makes them look bakery‑ready. If you’re avoiding raw egg, a light coating of melted butter works as a substitute, though you’ll lose a bit of that golden sparkle.
Freezing for Future Cravings
Shape the pretzels, give them a quick 30‑second soda dip, then place them on a parchment‑lined tray and freeze solid. Once frozen, transfer them to a zip‑top bag. When you’re ready, bake them straight from the freezer at 425°F for 15‑18 minutes; they’ll rise beautifully and retain that melt‑in‑your‑mouth texture.
Creative Twists and Variations
This recipe is a playground. Here are some of my favorite ways to switch things up:
Maple‑Brown Sugar Glaze
Swap the cinnamon‑sugar coating for a mixture of brown sugar, maple syrup, and a pinch of sea salt. Brush it on after baking for a sticky, caramel‑like finish that pairs beautifully with the buttery interior.
Chocolate‑Drizzle Pretzels
Once the pretzels have cooled, drizzle them with melted dark chocolate and sprinkle a few crushed pretzel bits for crunch. The bitter chocolate contrasts the sweet cinnamon, creating a sophisticated snack for grown‑ups.
Savory Herb Twist
Replace the cinnamon‑sugar with a blend of dried rosemary, thyme, and grated Parmesan. Brush with olive oil before baking for a salty, herbaceous version that works great as an appetizer.
Pumpkin Spice Delight
Add 1 teaspoon of pumpkin spice to the cinnamon‑sugar mix and a splash of pumpkin puree to the dough. The result is a seasonal treat that smells like autumn in a bite.
Nutty Crunch Variation
Fold finely chopped toasted pecans or almonds into the cinnamon‑sugar coating. The nuts add a delightful crunch and a buttery depth that elevates the pretzel to a gourmet level.
Storing and Bringing It Back to Life
Fridge Storage
Place cooled pretzels in an airtight container lined with a paper towel to absorb excess moisture. They’ll stay soft for up to three days. If you notice the crust losing its crunch, pop them in a 350°F oven for 5 minutes to revive the golden exterior.
Freezer Friendly
Freeze uncooked, shaped pretzels after the soda dip. Transfer to a zip‑top bag and store for up to two months. When you’re ready, bake them straight from frozen; they’ll puff up beautifully and retain that melt‑in‑your‑mouth texture.
Best Reheating Method
To reheat, preheat your oven to 300°F, place pretzels on a parchment sheet, and add a tiny splash of water (about a teaspoon) to the tray. Cover loosely with foil and heat for 8‑10 minutes. The steam generated revives the interior softness while the foil prevents the crust from over‑drying.