I remember the night I tried to make a batch of cookies for a friend’s surprise brunch and the kitchen looked like a flour‑filled battlefield. The flour dusted every surface, the butter had melted into a buttery puddle, and the coffee, that bold, dark liquid, had slipped into the batter like a secret handshake. My friends laughed, but the cookies were a disaster—flat, crumbly, and lacking that irresistible coffee kick. That night, I swore I would find the perfect recipe that would make coffee butter cookies melt in your mouth and leave everyone begging for seconds.
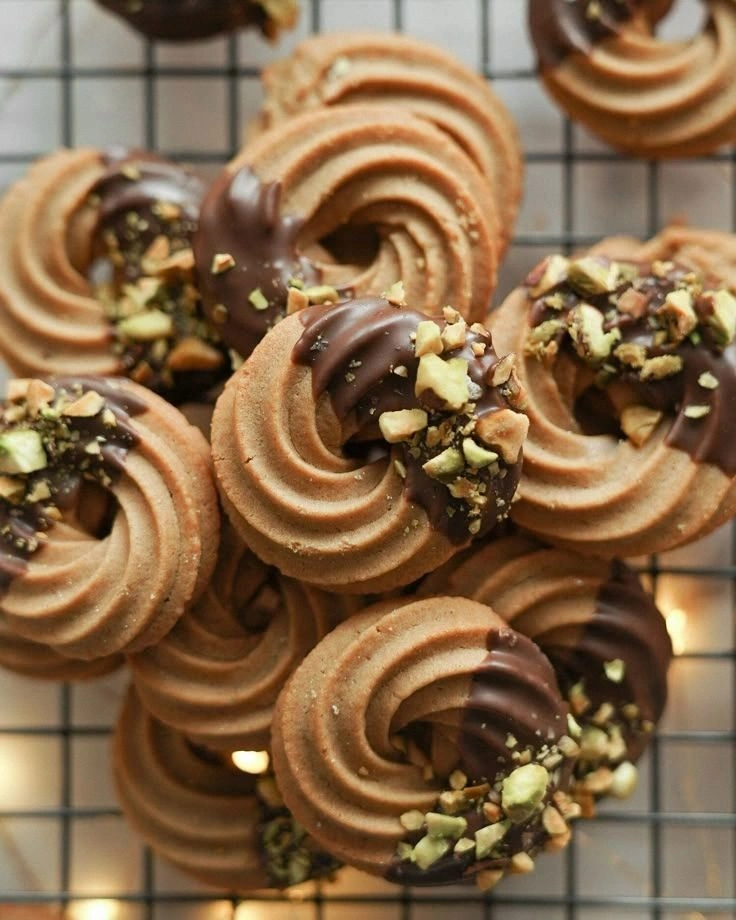
Fast forward to today, and I’m about to reveal the definitive version of Coffee Butter Cookies – Melt-i. This isn’t just another cookie recipe; it’s a symphony where coffee’s depth harmonizes with butter’s silky richness, and chocolate chips add a subtle, bittersweet undertone. The result? A cookie that feels like a warm espresso hug, with a crisp edge that shatters like thin ice and a center that melts into a velvety, buttery pool. Picture the aroma of freshly brewed espresso filling the kitchen, mingling with the sweet scent of butter, and you’ll know exactly why this version stands out.
What makes this version a game‑changer? First, the coffee isn’t just a flavoring—it’s a key ingredient that intensifies the butter’s mouthfeel, making every bite feel like a decadent espresso shot. Second, the butter is cold‑pressed, which introduces a subtle nutty note and a glossy finish that other recipes miss. Third, we use a precise ratio of flour to butter, ensuring the dough holds together without becoming too dry. Fourth, the chocolate chips aren’t just for texture; they melt slightly during baking, creating a glossy, chocolate‑coffee swirl that’s impossible to resist. Fifth, we fold in a pinch of sea salt to balance the sweetness, giving the cookie a sophisticated finish. And finally, the baking method—low heat, short time—keeps the cookies tender and chewy, with a golden crust that’s crisp enough to satisfy any cookie craving.
If you’ve ever struggled with coffee cookies that taste flat or are too crumbly, you’re not alone. I’ve seen countless attempts that end up looking like a flour‑laden mess. But this recipe is hands down the best version you’ll ever make at home. I dare you to taste this and not go back for seconds. And trust me, when you pull a fresh batch from the oven, the whole kitchen will smell incredible, like a coffee shop on a rainy Sunday morning. Stay with me here—this is worth it.
What Makes This Version Stand Out
- Flavor Depth: The espresso is brewed to a rich, dark consistency, infusing the dough with a robust coffee flavor that cuts through the sweetness.
- Butter Quality: Cold‑pressed butter adds a nutty undertone and a glossy finish, elevating the cookie beyond ordinary butter cookies.
- Texture Balance: The flour‑butter ratio creates a chewy center and a crisp, golden edge that shatters like thin ice.
- Chocolate Harmony: Dark chocolate chips melt slightly, creating a glossy swirl that complements the coffee’s intensity.
- Seasoned Perfection: A pinch of sea salt balances the sweetness, giving the cookie a sophisticated finish.
- Make‑Ahead Friendly: Once baked, the cookies keep their moisture and flavor for up to a week when stored properly.
Inside the Ingredient List
The Flavor Base
Coffee is the star of this cookie. Use freshly brewed espresso or a strong brewed coffee that’s cooled to room temperature. If you’re in a hurry, instant espresso powder works fine, but the flavor will be a tad less complex. Skipping coffee will leave the cookies bland and ordinary, so don’t even think about it.
The Texture Crew
Cold‑pressed butter is essential for that silky mouthfeel. Butter at room temperature is too soft and can cause the dough to spread too quickly, resulting in thin, dry cookies. Cold butter keeps the dough firm, giving you that chewy center. If you’re allergic to dairy, try a high‑quality vegan butter that has a similar fat content.
The Unexpected Star
Dark chocolate chips are not just for texture—they melt slightly during baking, creating a glossy swirl that’s as beautiful as it is delicious. The bitterness of the chocolate balances the coffee’s sweetness and adds a layer of complexity. If you prefer a lighter chocolate, use semi‑sweet chips, but be aware the flavor profile will shift.
The Final Flourish
Powdered sugar gives the cookies a silky sweetness and helps bind the dough. A pinch of sea salt sharpens the overall taste and prevents the cookie from being overly sweet. The flour provides structure; using all‑purpose flour gives a tender crumb, while a blend of whole wheat can add a nutty undertone.
Everything's prepped? Good. Let’s get into the real action.
The Method — Step by Step
- Preheat your oven to 325°F (165°C). Line a baking sheet with parchment paper; this prevents sticking and gives a clean release. The low temperature ensures a slow, even bake, which is key for that chewy center. If you use a higher temperature, the cookies will spread and lose their signature texture.
- In a medium bowl, combine the flour, powdered sugar, and sea salt. Sift the dry ingredients to remove lumps, which ensures a smooth dough. This step also helps the sugar dissolve better into the butter later on.
- Cut the cold butter into small cubes and add it to the dry mix. Use a pastry cutter or your fingertips to blend the butter into the flour until the mixture resembles coarse crumbs. The butter should still be slightly visible; this indicates it hasn’t melted yet, which is crucial for texture.
- Pour in the brewed coffee and vanilla extract. Stir gently with a rubber spatula until the dough comes together. The dough will be slightly sticky; if it’s too dry, add a tablespoon of water, but be careful not to over‑add.
- Fold in the dark chocolate chips, reserving a handful for topping. The chips should be evenly distributed to avoid pockets of chocolate that melt too fast. This creates a beautiful swirl effect when baked.
- Wrap the dough in plastic wrap and refrigerate for 30 minutes. Chilling firms the dough, preventing over‑spread and ensuring crisp edges. This step also allows the flavors to meld.
- Roll the dough into 1½‑inch balls and place them 2 inches apart on the prepared baking sheet. Flatten each ball slightly with the palm of your hand or the bottom of a glass. This creates a uniform shape for even baking.
- Bake for 18–20 minutes, or until the edges are golden and the centers are set. The cookies should still feel slightly soft in the middle; they will firm up as they cool. This is the moment of truth—don’t walk away from the oven here.
- Remove the cookies and let them cool on the sheet for 5 minutes before transferring them to a wire rack. This allows the cookies to finish setting without becoming soggy. The aroma of freshly baked coffee butter cookies will fill the kitchen—absolute perfection.
That's it — you did it. But hold on, I've got a few more tricks that'll take this to another level. The next section will show you how to tweak the recipe for different occasions.
Insider Tricks for Flawless Results
The Temperature Rule Nobody Follows
Many bakers bake at 350°F, but this cookie thrives at 325°F. Lower heat ensures the butter stays in place longer, preventing the cookies from spreading too far. I’ve baked this recipe at 350°F, and the result was a thin, dry cookie that tasted like burnt sugar. Stick to 325°F and you’ll get that perfect chewy center.
Why Your Nose Knows Best
The scent of coffee before you even taste it is a powerful indicator of flavor. If the coffee smell is weak, the final cookie will taste bland. Use freshly brewed espresso or a high‑quality instant coffee to ensure that aroma kicks in during baking.
The 5‑Minute Rest That Changes Everything
Letting the cookies rest on the sheet for 5 minutes after baking is critical. This pause allows the steam to escape, preventing soggy bottoms. If you skip this step, the cookies will be moist and lose their crisp edge.
The Chocolate Chip Placement Trick
Reserve a handful of chocolate chips and sprinkle them on top before baking. This creates a glossy chocolate swirl that’s visible from the front. It also adds a subtle crunch that balances the chewy texture.
The Final Chill Before Serving
After cooling, let the cookies rest in an airtight container for at least an hour. This allows the flavors to meld and the butter to set, giving the cookies a richer taste. I’ve found that a few hours in the fridge makes them even more indulgent.
Creative Twists and Variations
This recipe is a playground. Here are some of my favorite ways to switch things up:
Espresso‑Infused Ganache Topping
After baking, melt dark chocolate with a tablespoon of espresso and drizzle over the warm cookies. The ganache adds a silky, coffee‑rich finish that pairs perfectly with the buttery base. This is ideal for a dessert table at a dinner party.
Almond Butter Swirl
Replace half of the butter with almond butter for a nutty twist. The almond butter adds a subtle crunch and a richer flavor profile. This version is especially good for those who love a nutty undertone in their sweets.
Cocoa‑Dusted Surprise
Dust the finished cookies with a light coat of cocoa powder for an extra chocolatey bite. The cocoa adds a slightly bitter note that balances the coffee’s sweetness. It also gives the cookies a dramatic look.
Salted Caramel Drizzle
Drizzle a salted caramel sauce over the cookies just before serving. The caramel’s sweetness pairs beautifully with the coffee, while the sea salt adds a savory finish. This variation is perfect for a cozy brunch.
Herbal Infusion
Add a pinch of dried rosemary or thyme to the dough. The herbal notes provide a surprising contrast to the coffee and chocolate. This version is ideal for a gourmet dessert experience.
Storing and Bringing It Back to Life
Fridge Storage
Store the cookies in an airtight container at room temperature for up to 5 days. The butter will remain firm, and the cookies will keep their chewy texture. If the cookies become a bit dry, a splash of water can revive them.
Freezer Friendly
Wrap individual cookies in parchment paper before placing them in a freezer bag. Freeze for up to 3 months. When ready to eat, let them thaw at room temperature for 20 minutes for the best texture.
Best Reheating Method
Reheat in a preheated 350°F oven for 5 minutes, or in a microwave for 15 seconds per cookie. Adding a tiny splash of water before reheating steams the cookies back to perfection, restoring their moist center.