Ever had a kitchen disaster that turned into a culinary revelation? Last night I was scrambling to rescue a batch of overcooked spaghetti that had turned into a soggy, flavorless mess, and I thought, “Why not turn this into a creamy, comforting pasta that actually tastes good?” I grabbed a pot, a handful of garlic, and a splash of heavy cream, and the kitchen filled with the buttery, garlicky aroma that made my mouth water. The moment the sauce hit the pasta, it coated each ditalini like velvet, turning the plain into a luxurious, melt‑in‑your‑mouth experience. I dare you to taste this and not go back for seconds.
Picture yourself pulling this out of the pot, the whole kitchen smelling incredible, and the first bite sending a wave of creamy richness across your palate. The sauce is thick enough to cling to the tiny tubes of ditalini, yet light enough to glide across your tongue like a silk scarf. My friend who’s never been a fan of pasta tried it and said, “I never knew pasta could feel this indulgent.” That moment? Pure magic. And if you’ve ever struggled with bland sauces, you’re not alone—and I’ve got the fix.
What makes this version stand out is not just the ingredients; it’s the technique, the timing, and the attention to detail that elevates it from ordinary to unforgettable. I’ve spent hours tweaking the ratio of cream to butter, the amount of garlic, and the finish with Parmesan and parsley to create a sauce that is both silky and flavorful. It’s the kind of dish that feels like a hug on a plate, but with a sophisticated twist that will impress even the most discerning foodie. And the best part? It’s simple enough to make on a weeknight, yet so elegant that it could be the centerpiece of a dinner party.
Let me walk you through every single step—by the end, you’ll wonder how you ever made it any other way. This isn’t just another recipe; it’s a confidence booster for anyone who’s ever felt stuck in the kitchen. It’s the kind of comfort food that feels like home, but with a gourmet flair that will make your friends ask for the secret. Ready? Let’s dive in.
What Makes This Version Stand Out
- Richness: The combination of heavy cream and butter creates a sauce that is luxuriously thick without being heavy.
- Flavor: Freshly minced garlic brings depth, while Parmesan adds a sharp, nutty finish.
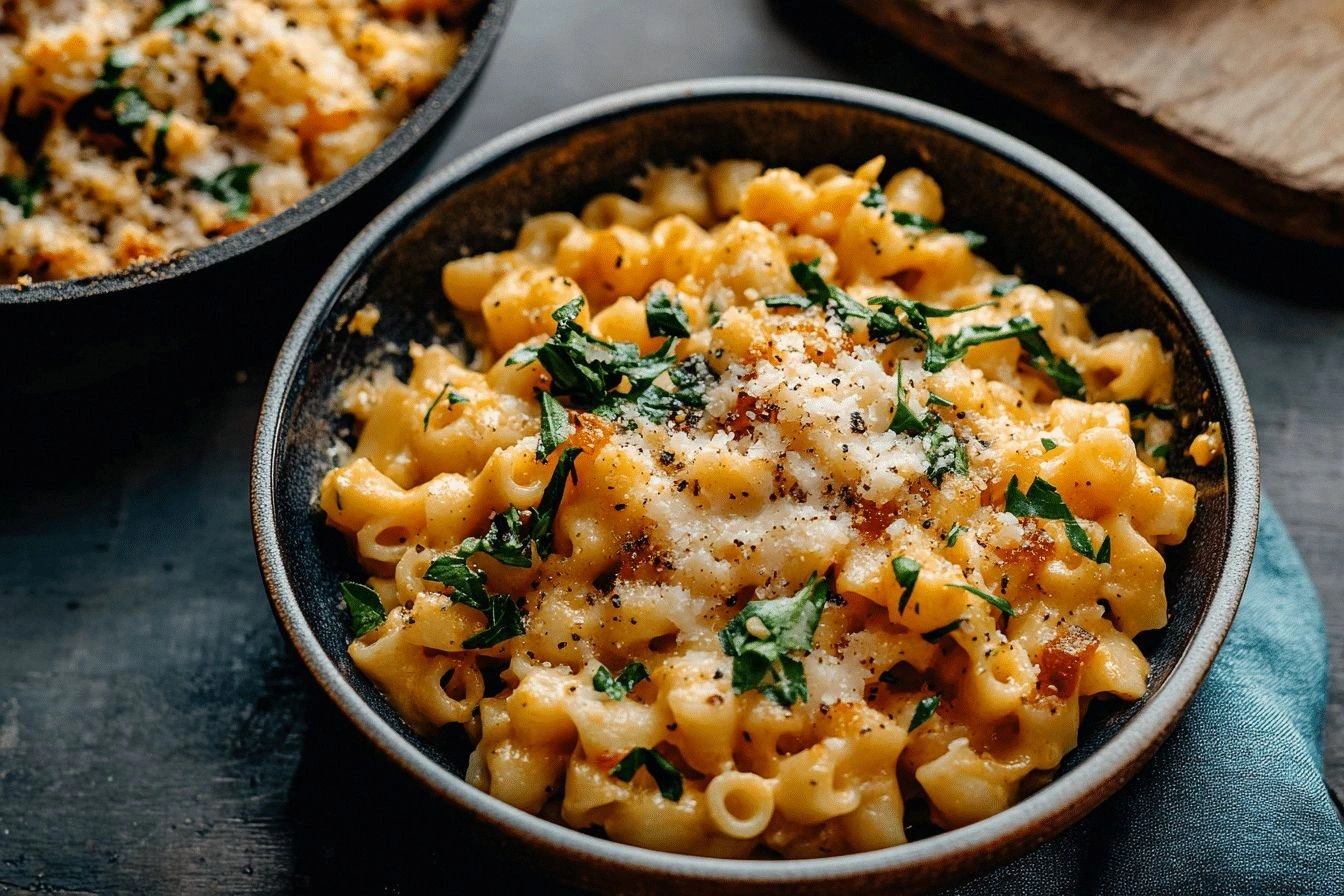
- Texture: Ditalini’s tubular shape traps sauce, delivering a bite that is both chewy and silky.
- Simplicity: Only seven ingredients, but each plays a pivotal role in the final dish.
- Versatility: Works as a main course or a hearty side, and it pairs wonderfully with roasted chicken or grilled veggies.
- Make‑ahead: The sauce can be prepared ahead of time and reheated without losing its creamy quality.
- Visual Appeal: A bright splash of parsley adds color, making the dish Instagram‑worthy.
- Audience: From picky eaters to gourmet lovers, this dish wins them all.
Alright, let’s break down exactly what goes into this masterpiece. This next part? Pure magic.
Inside the Ingredient List
The Flavor Base
Ditalini pasta is the star of the show, and it’s chosen for its perfect balance of size and texture. It holds sauce beautifully, ensuring every bite is coated with that buttery, garlicky richness. If you skip the pasta, you’re left with a sauce that’s great, but it needs something to anchor it. For the best results, choose a high‑quality brand that’s not too thin or too thick—think of it as the canvas for your masterpiece. And if you’re feeling adventurous, try a small batch of whole‑wheat ditalini for a nuttier flavor.
The Creamy Core
Heavy cream or half‑and‑half is the backbone of the sauce, adding that silky, velvety texture that melts in your mouth. The key is to use a fat content of at least 30% to avoid curdling when heated. If you’re looking for a lighter version, half‑and‑half works, but the sauce will be slightly less rich. A common swap is coconut milk for a dairy‑free option, though it will alter the flavor profile. The trick? Warm the cream gently to avoid scorching.
The Savory Star
Freshly minced garlic cloves bring a punch of aromatic depth that cuts through the richness. The garlic should be minced finely so it distributes evenly, creating a uniform flavor. If you’re allergic or simply don’t like garlic, a pinch of garlic powder can substitute, but the freshness will be lost. The garlic’s role is to add warmth, so don’t overcook it—just enough to release its oils. A fun fact: the first recorded use of garlic in pasta sauce dates back to 18th‑century Italy.
The Final Flourish
Parmesan cheese melts into the sauce, giving it a sharp, nutty undertone that balances the cream’s sweetness. Use freshly grated parmesan for the best melt and flavor. If you’re vegan, nutritional yeast or a vegan parmesan substitute will work, but the taste will differ slightly. A pinch of freshly ground black pepper adds a subtle heat that ties the dish together. And the optional parsley? It adds a pop of color and a fresh, herbaceous finish that lifts the entire plate.
Everything's prepped? Good. Let's get into the real action.
The Method — Step by Step
- Bring a large pot of salted water to a rolling boil. Add the ditalini pasta and cook until al dente—about 8 to 10 minutes, depending on the brand. Reserve a cup of pasta water before draining to help adjust sauce consistency later. Keep the pot on the stove while you move to the next step. The pasta should still have a slight bite to it.
- While the pasta cooks, melt the butter in a large skillet over medium heat. Add the minced garlic and sauté until fragrant—about 1 minute. Watch the garlic so it doesn’t brown; we’re aiming for a mellow, buttery aroma, not burnt.
- Reduce the heat to low and pour in the heavy cream. Stir constantly to blend the butter and cream into a smooth base. The sauce should thicken slightly, but not reach a boil. This step is critical; if the heat is too high, the cream will split.
- Add the grated parmesan cheese to the skillet, stirring until it melts into the sauce. The cheese will thicken the mixture and add a nutty depth. Keep stirring until the cheese is fully incorporated and the sauce is silky smooth.
- Season the sauce with salt and freshly ground black pepper. Taste first; you want the sauce to be bright, not bland. If it’s too thick, add a splash of reserved pasta water to reach your desired consistency. The water should be warm, not cold, to maintain the sauce temperature.
- Add the drained pasta directly to the skillet, tossing gently to coat each tube with the sauce. Let the pasta simmer in the sauce for 1–2 minutes, allowing the flavors to marry. The pasta should be fully coated and heated through.
- If you prefer a slightly thicker sauce, let the mixture reduce for an additional minute. If you like it lighter, add a bit more pasta water. The goal is a sauce that clings to the pasta without weighing it down.
- Finish with a handful of chopped fresh parsley, tossing once more for a burst of color and freshness. Plate immediately for the best texture. The parsley adds a subtle herbal note that brightens the dish.
- Serve hot with a side of crusty bread or a light salad. The bread will soak up the remaining sauce, making each bite a delight.
- Enjoy the creamy, comforting hug that is this ditalini pasta. Remember, the secret lies in the balance of cream, butter, and cheese—each step is a piece of the puzzle.
Insider Tricks for Flawless Results
The Temperature Rule Nobody Follows
Many cooks think the sauce needs a vigorous simmer, but a gentle low heat preserves the cream’s integrity. Keep the skillet at a steady low temperature throughout the process. This prevents the fat from separating and maintains a silky texture. A friend once tried a high heat and ended up with a curdled sauce—let's just say it didn’t end well. The trick is patience; the sauce will thicken naturally as the pasta releases starch.
Why Your Nose Knows Best
Trust your nose during the cooking process. When the sauce smells toasty and buttery, you’re at the right point. If it starts to smell sour or off, it’s too hot. This sensory checkpoint saves you from overcooking. I always keep a small spoon nearby to test the aroma; it’s a simple but effective tool.
The 5‑Minute Rest That Changes Everything
After you finish cooking, let the pasta rest in the sauce for five minutes off the heat. This allows the pasta to finish absorbing the sauce and for the flavors to meld. The result? A silky, cohesive dish that feels like a single, unified experience. Skipping this step may leave the sauce thin and the pasta feeling dry.
Use Pasta Water Wisely
The starchy pasta water is a secret weapon. Adding a splash can thicken the sauce and help it cling to the pasta. Keep the water warm and add it gradually; you’ll get the perfect consistency without diluting the flavor. I’ve found that a tablespoon is enough for a 4‑serving batch.
Cheese Matters
Use freshly grated parmesan for the best melt and flavor. Pre‑grated cheese often contains anti‑caking agents that prevent it from dissolving properly. If you’re in a pinch, a small block of parmesan will do the trick, but grate it yourself for maximum freshness.
Season at the End
Save the final seasoning for the last step. Salt and pepper should be added after the pasta is combined with the sauce to avoid drawing out moisture too early. This ensures the sauce remains silky and the pasta stays al dente. I’ve learned that seasoning at the end keeps the dish from becoming watery.
Creative Twists and Variations
This recipe is a playground. Here are some of my favorite ways to switch things up:
Spinach & Mushroom Upgrade
Add sautéed spinach and mushrooms to the sauce for a hearty, earthy twist. The greens bring a fresh bite, while the mushrooms add umami depth. This version pairs perfectly with a grilled steak or a roasted chicken breast.
Spicy Kick
Introduce a pinch of red pepper flakes or a splash of hot sauce to give the dish a fiery edge. The heat balances the richness of the cream and makes the dish exciting for spice lovers.
Vegetarian Delight
Replace the cream with a cashew‑based sauce for a dairy‑free, creamy texture. Soak cashews overnight, blend with water, and mix into the skillet. The result is a velvety sauce that’s entirely plant‑based.
Protein Punch
Stir in cooked chicken, shrimp, or bacon for a protein boost. The savory protein complements the creamy sauce and turns the dish into a complete meal.
Herb Explosion
Swap parsley for basil or thyme for a different herbal profile. Each herb brings its own character, turning the dish into a new experience every time.
Gluten‑Free Twist
Use gluten‑free ditalini or a small amount of quinoa to keep the dish gluten‑free. The texture changes slightly, but the creamy sauce still holds up beautifully.
Storing and Bringing It Back to Life
Fridge Storage
Store leftovers in an airtight container in the refrigerator for up to 3 days. Before reheating, stir in a splash of milk or cream to revive the sauce’s silkiness. The pasta should stay firm; it will soften slightly upon reheating.
Freezer Friendly
Freeze the cooked pasta in a freezer‑safe container for up to 2 months. When ready to eat, thaw in the refrigerator overnight. Reheat gently on the stove with a splash of water or broth to keep it from drying out.
Best Reheating Method
Reheat over low heat, stirring constantly. Add a tablespoon of pasta water or a splash of cream to restore moisture. Keep the temperature low to avoid scorching the sauce.