Picture this: you’re in the middle of a late‑night baking marathon, the kitchen lights flickering like a campfire, and you’re staring at a pot that has just gone from a bubbling mess to a glossy, caramel‑scented dream. The moment you taste that first bite, you’re hit with a wave of nostalgia—sweetness, creaminess, and a hint of chocolate that feels like a warm hug. That’s the flavor profile I’m about to unveil in this version of Creamy Marshmallow Swirl Fudge, a dessert that’s as indulgent as it is deceptively simple.
I remember the first time I tried a homemade fudge recipe from a friend’s blog. I followed the instructions to the letter, only to end up with a hard, chalky block that tasted like cardboard. That disaster sparked a personal quest: to create a fudge that melts in your mouth, not in your hands. After countless trials, I discovered that the secret lies in the combination of sweetened condensed milk and marshmallow fluff, which together create a silky, airy texture that coats the chocolate like velvet. The result is a fudge that’s buttery, caramel‑sweet, and with a subtle crunch from the marshmallow pieces—each bite a mini celebration.
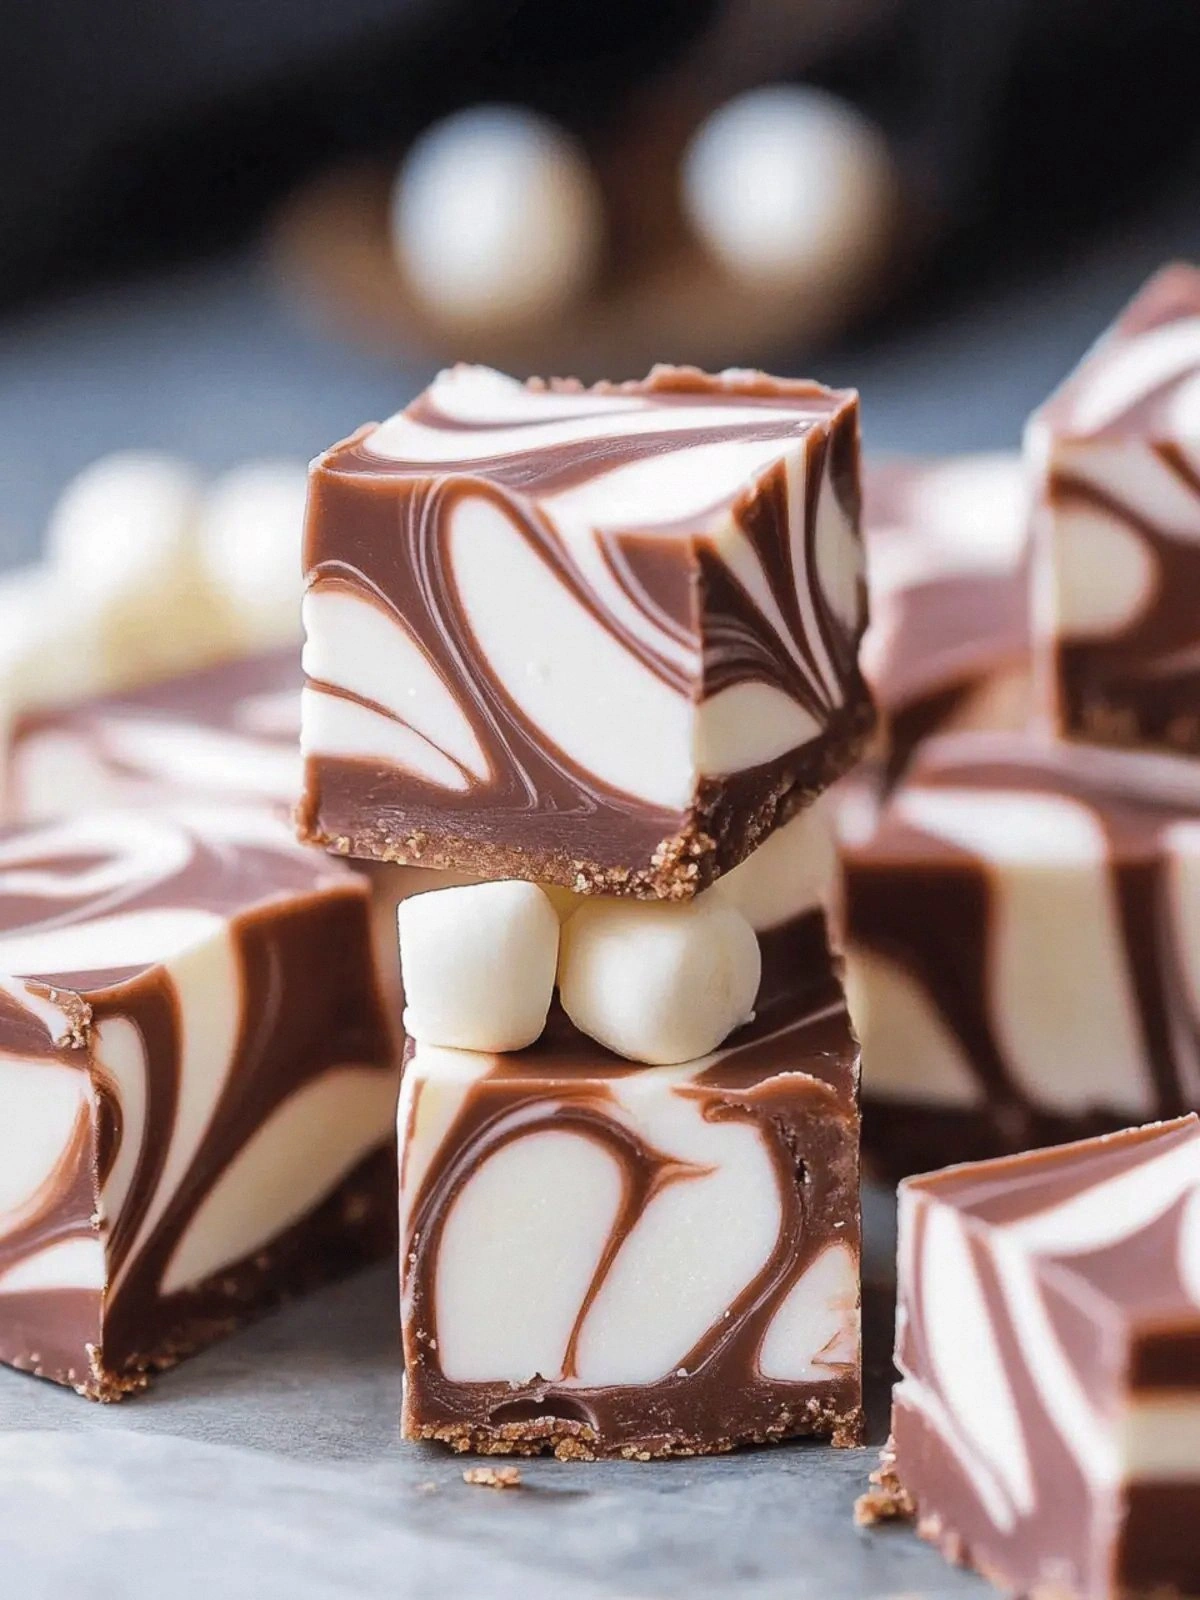
What makes this version stand out is not just the ingredients, but the technique. I dared myself to add a swirl of marshmallow fluff at the very end, creating a visual and textural contrast that turns every piece into a work of art. It’s a recipe that’s hands down the best version you’ll ever make at home, because it balances richness and lightness, sweetness and a faint salt kick that awakens the palate. I’ll be honest—before you even taste the first piece, you’ll be tempted to scoop up a second. But I dare you to taste this and not go back for seconds. The challenge? Try to resist the urge to double up on your fork.
If you’ve ever struggled with fudge that turns out too hard or too sticky, you’re not alone. Most recipes get this completely wrong, either by using the wrong ratio of milk to chocolate or by overheating the mixture. Here’s what actually works: a gentle simmer, precise measurements, and a final swirl of marshmallow that locks in the perfect texture. Picture yourself pulling this out of the pan, the whole kitchen smelling incredible, the fudge cooling into a glossy slab that invites you to cut it into squares that melt instantly. Stay with me here—this is worth it.
What Makes This Version Stand Out
- Taste: The combination of semi‑sweet chocolate chips and sweetened condensed milk creates a deep, caramelized flavor profile that feels like a chocolate‑butter‑sugar hybrid. The marshmallow fluff adds a light, airy sweetness that balances the richness, making each bite feel indulgent without being cloying.
- Texture: The swirl technique creates a contrast between a smooth, silky center and a lightly crisp marshmallow rim. This dual texture feels like a chocolate dream that snaps pleasantly before dissolving.
- Ingredient Quality: Using high‑quality chocolate chips and a reputable brand of marshmallow fluff elevates the fudge from ordinary to extraordinary. The butter is unsalted, allowing precise control over the salt content.
- Simplicity: The recipe requires no special equipment—just a saucepan, a silicone spatula, and a baking dish. Every step is straightforward, making it approachable for beginners and satisfying for seasoned bakers.
- Make‑Ahead Potential: Once set, this fudge can be stored in the fridge for up to a week or frozen for longer periods, making it perfect for parties or last‑minute dessert needs.
- Visual Appeal: The final swirl of marshmallow creates a striking, almost painterly effect that makes the fudge look as good as it tastes. The glossy sheen is irresistible.
Inside the Ingredient List
The Flavor Base
The foundation of any great fudge is the chocolate. I use 1 cup of semi‑sweet chocolate chips, which provide a deep cocoa flavor without overwhelming bitterness. The chips melt into a smooth sauce that coats the other ingredients, creating a cohesive taste profile. If you’re a chocolate purist, you can substitute dark chocolate chips with a higher cacao percentage, but the result will be slightly less sweet.
The Sweetener
Sweetened condensed milk is the secret to that luscious, caramel‑like consistency. The can contains about 1,300 calories, but it also delivers a thick, velvety texture that binds the fudge together. Skipping this ingredient will leave the mixture too thin and result in a chewy, rather than creamy, dessert. For a slightly lighter version, you can replace half of the condensed milk with evaporated milk, but the fudge will be less rich.
The Butter & Salt
Half a cup of unsalted butter adds buttery richness and helps the fudge set properly. The butter also balances the sweetness, giving the dessert a luxurious mouthfeel. Salt, though only 1/4 teaspoon, is crucial for enhancing the chocolate’s depth and balancing the sweetness. A pinch of salt can make or break the flavor profile, so be precise.
The Marshmallow Fluff
Marshmallow fluff is the star that transforms the fudge into a dreamy, airy treat. It’s not just a sweet topping; it’s a textural element that swirls through the chocolate, creating pockets of lightness. If you’re allergic to dairy, you can look for a dairy‑free marshmallow fluff, but the texture may differ slightly. The fluff also adds a hint of vanilla, which complements the chocolate beautifully.
Everything’s prepped? Good. Let’s get into the real action.
The Method — Step by Step
- In a medium saucepan, melt the butter over medium heat until it’s fully liquid and slightly foamy. Add the chocolate chips, stirring constantly with a silicone spatula until the mixture is completely smooth. The chocolate should be glossy and free of lumps—if you see any, keep stirring until they dissolve. This step is crucial; a lumpy base will ruin the texture.
- Pour in the entire can of sweetened condensed milk, then add the vanilla extract. Stir vigorously to combine, making sure the mixture thickens and turns a deep amber color. The aroma at this point is unmistakably caramelized, and it should smell like a cozy bakery. Keep the heat low to avoid scorching.
- Lower the heat to a gentle simmer and let the mixture cook for about 10 minutes, stirring every 2 minutes. You’re looking for a thick, glossy sauce that coats the back of a spoon. Do not let it boil; a rolling boil will cause the milk to separate and the fudge to become grainy.
- Remove the saucepan from the heat and let the mixture cool for 5 minutes. During this cooling period, the chocolate will set slightly, making it easier to handle. If you’re in a hurry, you can place the pan in a bowl of ice water, but be careful not to splash the hot mixture.
- Pour the mixture into a greased 8‑inch square baking dish, spreading it evenly with a spatula. The surface should be flat and smooth; any unevenness will translate into an uneven final product.
- Using a piping bag or a plastic bag with a tiny hole, pipe swirls of marshmallow fluff across the surface of the chocolate. The swirls should be about 1/2 inch thick and spaced evenly. The contrast between the glossy chocolate and the pale marshmallow will create a striking visual effect.
- Return the dish to the stove over low heat and gently warm the marshmallow swirls until they melt slightly and blend with the chocolate. Keep the heat very low—just enough to soften the marshmallow without melting the entire batch. This step creates the “swirled” effect that is the hallmark of this recipe.
- Let the fudge cool to room temperature, then refrigerate for at least 4 hours or until it’s firm enough to cut. When the fudge is ready, cut it into 1‑inch squares and serve immediately or store in an airtight container.
That’s it—you did it. But hold on, I’ve got a few more tricks that’ll take this to another level.
Insider Tricks for Flawless Results
The Temperature Rule Nobody Follows
The key to perfect fudge is maintaining the mixture between 120°F and 125°F during the simmer. A kitchen thermometer is a worthwhile investment, as it ensures the mixture doesn’t scorch or under‑cook. If you’re in a pinch, use the “spoon test”: dip a spoon into the mixture, lift it, and watch the syrup drip slowly. That’s the sweet spot.
Why Your Nose Knows Best
Trust your senses. The moment the mixture starts to turn a deep amber color, the aroma will shift from raw chocolate to caramelized sweetness. This visual and olfactory cue is more reliable than a timer, especially if you’re juggling multiple dishes. If the aroma feels too “raw,” give it a minute longer.
The 5‑Minute Rest That Changes Everything
After removing the saucepan from heat, let the mixture sit for exactly five minutes before pouring it into the dish. This pause allows the chocolate to set just enough to hold its shape when you pour, preventing the mixture from sliding off the sides of the pan. I once skipped this step and ended up with a lumpy, uneven surface that was a nightmare to cut.
The Quick Chill Trick
If you’re short on time, place the baking dish in a shallow pan of ice water for 10 minutes after pouring the mixture. The rapid cooling will set the fudge faster and help preserve the swirl pattern. Just be careful not to let the dish sit in the water for too long, or you risk water seeping into the fudge.
The Marshmallow Mix‑In
For an extra layer of texture, fold in a handful of mini marshmallows after the mixture has cooled slightly but before it sets completely. The mini marshmallows will pop when you bite into the fudge, adding a delightful surprise. Make sure to stir gently to keep the swirls intact.
Creative Twists and Variations
This recipe is a playground. Here are some of my favorite ways to switch things up:
Nutty Swirl Fudge
Add 1/2 cup chopped pecans or almonds to the marshmallow swirls for a crunchy, nutty bite. The nuts pair beautifully with the caramelized flavor, creating a dessert that’s both sweet and savory.
Citrus‑Infused Fudge
Incorporate 1 tablespoon of orange zest into the chocolate mixture before adding the marshmallow. The citrus brightens the chocolate’s richness and adds a subtle, zesty undertone that feels fresh.
Espresso‑Rich Fudge
Stir in 1 teaspoon of instant espresso powder into the chocolate base. The espresso deepens the chocolate flavor and adds a slight bitterness that balances the sweetness.
Salted Caramel Fudge
Swap the marshmallow fluff for a swirl of salted caramel sauce. This variation adds a gooey, buttery caramel flavor with a touch of sea salt that elevates the overall taste.
Vegan Fudge
Replace the butter with coconut oil, use a dairy‑free marshmallow fluff, and choose a plant‑based chocolate chip. The texture will be slightly different but still creamy and indulgent.
Mini Fudge Bites
Instead of cutting squares, use a melon baller to create bite‑size spheres. The spherical shape holds the marshmallow swirl beautifully and makes for a perfect party treat.
Storing and Bringing It Back to Life
Fridge Storage
Store the fudge in an airtight container at room temperature for up to a week. The fudge will stay firm and maintain its texture. If you notice any condensation, wrap the container in parchment paper to absorb moisture.
Freezer Friendly
For longer storage, place the fudge in a freezer‑safe zip‑lock bag, removing as much air as possible. Freeze for up to 3 months. When ready to enjoy, thaw in the refrigerator for 4–6 hours. The texture will be just as good as fresh.
Best Reheating Method
To revive a slightly hardened fudge, sprinkle a tiny splash of water on top and microwave on low for 10–15 seconds. The water steams the fudge, restoring its silky texture. Alternatively, warm a small portion in a double boiler for a minute, then stir until smooth.