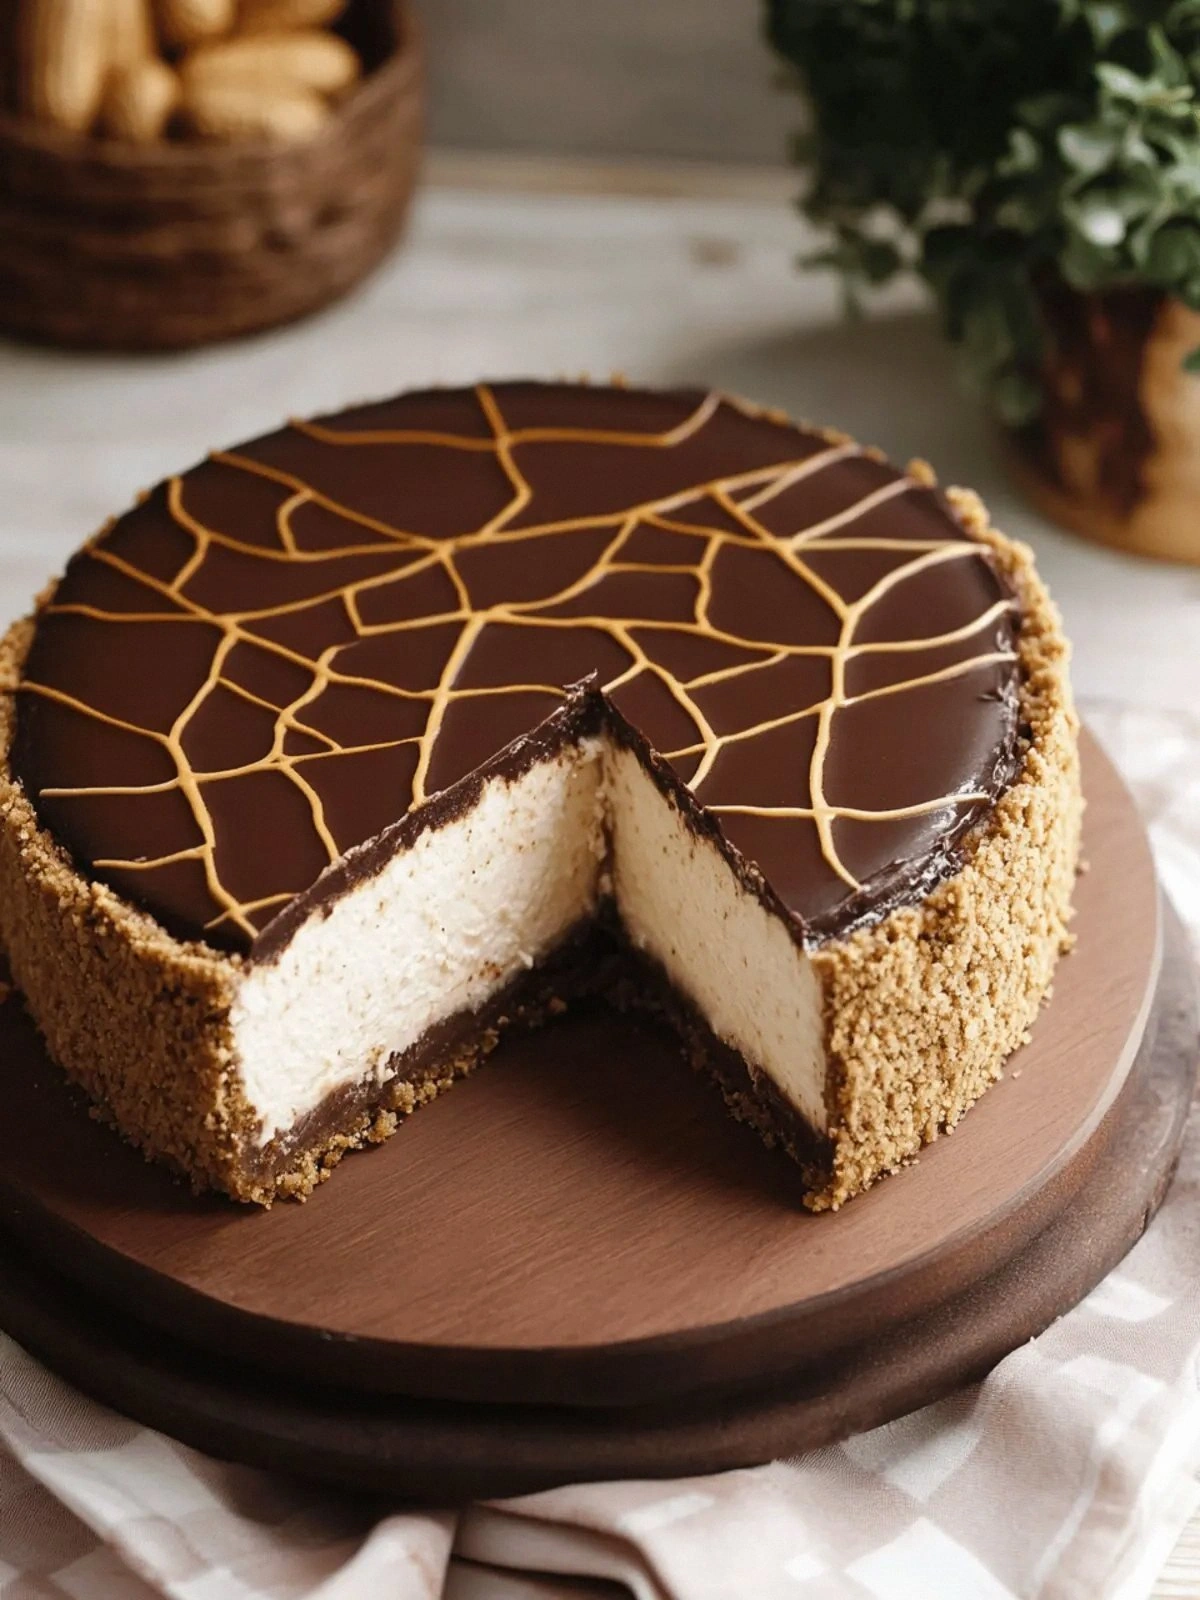
Picture this: I’m standing in a kitchen that smells like a chocolate factory and a peanut butter shop all at once. I’ve just pulled a tub of creamy, velvety chocolate‑peanut‑butter cheesecake from the fridge, and the first bite feels like a secret handshake between my taste buds and my childhood memories. I was halfway through a marathon of Netflix, craving something sweet, when the idea hit—why not combine my two favorite indulgences into one no‑bake masterpiece? I dare you to taste this and not go back for seconds.
The first thing that hits you is the aroma: a rich, chocolatey scent that’s interlaced with a buttery, slightly salty undertone from the graham crackers. The texture is a glorious contrast—crunchy crust, silky filling, and a glossy chocolate drizzle that glistens like a polished trophy. As you bite, the peanut butter’s nutty depth unfurls, then gives way to the smoothness of cream cheese and Greek yogurt, while the whipped cream adds a light, airy lift. If you’ve ever struggled with a cheesecake that feels too heavy or too dry, you’re not alone—and I’ve got the fix.
What sets this version apart is that it’s entirely no‑bake, which means you can whip it up in under an hour while still achieving a texture that rivals the best of the oven‑baked crowd. The secret? A carefully balanced ratio of cream cheese to Greek yogurt, a generous splash of whipped cream, and a perfectly melted dark chocolate that coats the filling like velvet. The result is a dessert that feels indulgent but is surprisingly light, and it can be prepared ahead of time for parties or last‑minute cravings.
I’ll be honest—once I tasted the first slice, I ate half the batch before anyone else got to try it. The combination of rich chocolate and nutty peanut butter is so addictive that the first bite feels like a guilty pleasure you can’t resist sharing. Most recipes get this completely wrong by over‑whipping or under‑cooking the chocolate, resulting in a clumpy mess. Here’s what actually works: a smooth chocolate base, a creamy filling, and a crunchy crust that stays crisp even when chilled for hours.
And now, the game‑changer: we’re not using any baking at all. This dessert can be assembled in the fridge and will set in under 30 minutes, making it the ultimate last‑minute treat for a gathering that needs a showstopper. Picture yourself pulling this out of the fridge, the whole kitchen smelling incredible, and your guests’ eyes lighting up with anticipation. Stay with me here—this is worth it.
What Makes This Version Stand Out
- Taste: The marriage of chocolate and peanut butter creates a flavor profile that’s both familiar and exciting, with a hint of caramelized sweetness from the graham crackers.
- Texture: A crunchy crust, a silky filling, and a glossy chocolate drizzle give a multi‑sensory experience that feels indulgent yet balanced.
- Simplicity: No oven, no complicated steps—just mix, chill, and serve. Perfect for busy evenings or spontaneous parties.
- Uniqueness: The use of Greek yogurt in the filling adds a tangy brightness that cuts through the richness, setting this apart from classic chocolate cheesecakes.
- Crowd Reaction: Guests rave about the unexpected peanut butter twist and the satisfying crunch of the crust.
- Ingredient Quality: Premium dark chocolate (70% cacao or higher) and natural peanut butter elevate the flavor and give a gourmet feel.
- Cooking Method: The no‑bake approach preserves delicate textures and makes the dessert accessible to all skill levels.
- Make‑Ahead Potential: The dessert sets quickly in the fridge, so you can prep it hours in advance and focus on other party details.
Alright, let’s break down exactly what goes into this masterpiece. The next section will walk you through each component and why it matters.
Inside the Ingredient List
The Flavor Base
The graham crackers are the unsung hero of any cheesecake. They provide a subtle sweetness and a satisfying crunch that contrasts with the creamy filling. When crushed and mixed with melted butter, they form a cohesive crust that holds everything together. Skip them, and you lose that essential textural kick that makes the dessert feel complete.
If you’re looking for a healthier twist, try using oat‑based crackers or a low‑sugar alternative. However, be aware that the flavor profile will shift, and the crust may not set as firmly. A good rule of thumb: use high‑quality crackers that hold their shape when crushed.
The Texture Crew
Cream cheese is the backbone of the filling, providing richness and body. Greek yogurt adds a tangy brightness that cuts through the sweetness and balances the fat content. Whipped cream contributes lightness and a silky mouthfeel, preventing the cheesecake from feeling dense. Together, they create a texture that’s smooth, airy, and indulgent.
If you’re vegan, substitute the cream cheese with a plant‑based alternative and use coconut cream instead of whipping cream. The result will still be creamy, though the flavor profile will be slightly different. Remember, the key is to keep the ratio balanced so the filling doesn’t become too runny.
The Unexpected Star
Natural peanut butter is the flavor twist that elevates this dessert from ordinary to extraordinary. It adds a nutty depth that pairs beautifully with the dark chocolate. The natural variant ensures you’re not dealing with added sugars or hydrogenated oils, which keeps the dessert clean and pure.
If you’re allergic to peanuts or simply want a different flavor, try almond butter or cashew butter. The texture will be similar, but the nutty profile will shift, giving you a new experience each time.
The Final Flourish
Dark chocolate is the crown jewel of this dessert. Its bittersweet notes create a sophisticated palate that balances the sweetness of the filling. The chocolate also provides a glossy finish that makes the cheesecake visually appealing. Choose a chocolate with at least 70% cacao for the richest flavor.
If you’re looking for a milder chocolate, consider milk chocolate or a chocolate‑flavored ganache. Keep in mind that milk chocolate will make the dessert noticeably sweeter, while ganache will add an extra layer of creaminess.
Everything’s prepped? Good. Let’s get into the real action.
The Method — Step by Step
- Step 1: Prepare the crust. In a medium bowl, crush the graham crackers until they resemble fine crumbs. Melt the butter in a small saucepan over low heat or in the microwave for 30 seconds, then stir the crumbs into the butter until the mixture is evenly moist. Press the crust mixture firmly into the bottom of a 9‑inch springform pan, using the back of a spoon to compact it. Refrigerate while you work on the filling; this keeps the crust from becoming soggy.
- Step 2: Melt the chocolate. Break the dark chocolate into small pieces and place it in a heat‑proof bowl. Set the bowl over a pot of simmering water, ensuring the bottom doesn’t touch the water. Stir until the chocolate is completely melted and silky. Alternatively, microwave in 20‑second bursts, stirring in between, until smooth. Let it cool slightly—no more than 5 minutes—so it doesn’t melt the cream cheese later.
- Step 3: Blend the cream cheese. In a stand mixer or with a hand mixer, beat the cream cheese on medium speed until it’s smooth and free of lumps. Add the Greek yogurt and continue to blend until fully incorporated. The mixture should be thick yet pourable, like a soft custard. This is the moment of truth; if you see lumps, keep mixing until the texture is silky.
- Step 4: Incorporate the chocolate. Pour the slightly cooled melted chocolate into the cream cheese mixture. Beat on low speed until the chocolate is fully blended, creating a homogeneous, glossy filling. The filling should look like a smooth chocolate ganache with a faint sheen.
- Step 5: Add peanut butter and vanilla. Stir in the natural peanut butter until the mixture is uniform. The peanut butter will thicken the filling slightly, giving it a richer body. Add the vanilla extract and mix until the aroma of vanilla permeates the batter. This step ensures a balanced flavor that isn’t overwhelmed by chocolate or peanut butter.
- Step 6: Whip the cream. In a separate bowl, whip the remaining 2 cups of whipping cream to soft peaks. Gently fold the whipped cream into the chocolate‑peanut mixture, being careful not to deflate it. The airy texture from the cream lifts the filling, making it lighter and more mousse‑like.
- Step 7: Assemble. Pour the filling over the chilled crust, smoothing the top with a spatula. Tap the pan gently on the counter to release any air bubbles. Cover the pan with plastic wrap and refrigerate for at least 4 hours, or overnight for the best set. The filling will firm up into a luscious, sliceable cheesecake.
- Step 8: Finish and serve. Before serving, drizzle a thin ribbon of melted dark chocolate across the top for a glossy finish. Garnish with a few whole peanuts or a dusting of cocoa powder if desired. Slice with a hot, damp knife for clean cuts. Serve chilled, and watch the smiles appear as the first bite melts on the tongue.
That’s it — you did it. But hold on, I’ve got a few more tricks that will take this to another level.
Insider Tricks for Flawless Results
The Temperature Rule Nobody Follows
Temperature is everything in a no‑bake cheesecake. If the chocolate is too hot, it will melt the cream cheese and create a runny filling. If it’s too cold, it won’t blend smoothly. Aim for a chocolate temperature of about 80°F (27°C) before adding it to the mixture. A kitchen thermometer is a small investment that guarantees consistency.
Why Your Nose Knows Best
Your nose is the ultimate judge of readiness. As you fold the chocolate into the cream cheese, a faint, sweet aroma should emerge. If the smell is overwhelmingly chocolaty, the chocolate is still too hot. Let it cool until the aroma is balanced, and you’ll achieve a smooth, even texture.
The 5-Minute Rest That Changes Everything
After you’ve folded the whipped cream into the filling, let the mixture rest in the fridge for 5 minutes before pouring it over the crust. This short chill allows the fats to set slightly, reducing the risk of the filling sliding off the crust and creating a neat, firm edge.
The Crunch Factor
If you love crunch, sprinkle a handful of toasted coconut flakes or crushed nuts on top before the final chocolate drizzle. The extra texture will contrast beautifully with the creamy filling, making each bite a delightful surprise.
The Sweetness Balance
If the filling feels too sweet for your palate, add a pinch of sea salt to the mixture before chilling. The salt will heighten the chocolate flavor and cut through the richness, creating a more complex taste profile.
The Final Touch of Elegance
Finish the cheesecake with a dusting of cocoa powder or a swirl of raspberry coulis. The contrasting colors and flavors elevate the dessert from simple to sophisticated, perfect for impressing guests or treating yourself.
Creative Twists and Variations
This recipe is a playground. Here are some of my favorite ways to switch things up:
Salted Caramel Swirl
Add a swirl of salted caramel sauce to the filling before chilling. The caramel’s buttery sweetness pairs perfectly with the chocolate, creating a multi‑layered flavor that’s irresistible.
Minty Chocolate Surprise
Stir in a teaspoon of peppermint extract and a handful of crushed mint chocolate chips. The mint adds a fresh note that cuts through the richness, making it ideal for holiday gatherings.
Almond Butter Delight
Replace the peanut butter with almond butter for a nutty, slightly sweet twist. The almond flavor is subtler, letting the chocolate shine while still providing a delicious depth.
Coconut Cream Variation
Swap the whipping cream for coconut cream and use coconut flakes in the crust. The tropical undertone transforms the cheesecake into a beach‑side dessert that’s perfect for summer.
Berry Burst
Fold in a handful of fresh raspberries or blueberries before chilling. The berries add a pop of tartness that balances the sweetness and gives the cheesecake a vibrant color.
Espresso Infusion
Stir in a tablespoon of cold espresso or strong coffee into the filling. The coffee enhances the chocolate’s depth, creating a sophisticated flavor profile that coffee lovers will adore.
Storing and Bringing It Back to Life
Fridge Storage
Store the cheesecake in an airtight container in the refrigerator for up to 5 days. The cool environment keeps the filling firm and prevents mold growth. If you’re serving it at a party, keep it chilled until the last moment to maintain its texture.
Freezer Friendly
For longer storage, wrap the cheesecake tightly in plastic wrap and then in aluminum foil. It will keep for up to 3 months in the freezer. When ready to serve, thaw in the refrigerator overnight to preserve the creamy consistency.
Best Reheating Method
To revive a frozen cheesecake, gently warm it at room temperature for 30 minutes, then chill it again for 15 minutes before serving. Add a tiny splash of water to the filling before reheating; it steams back to perfection, restoring the silky texture.