Picture this: you’re standing in a kitchen that smells like a candy shop after a thunderstorm, the countertop littered with glossy chocolate shavings, and a bowl of peanut butter glistening like liquid gold. I was halfway through a marathon of Netflix binge‑watching when a sudden craving for something both crunchy and melt‑in‑your‑mouth hit me like a plot twist. I rummaged through the pantry, found a half‑forgotten bag of Oreo crumbs, a stick of butter that was practically melting in my hand, and an empty caramel sauce jar that whispered, “I’m ready for a comeback.” That night, I set out to create the ultimate bite‑size indulgence, and after a few trial runs (and a few honest confessions about eating half the batch before anyone else got a taste), I finally nailed a recipe that makes every other chocolate‑peanut‑butter treat feel like a bland understudy.
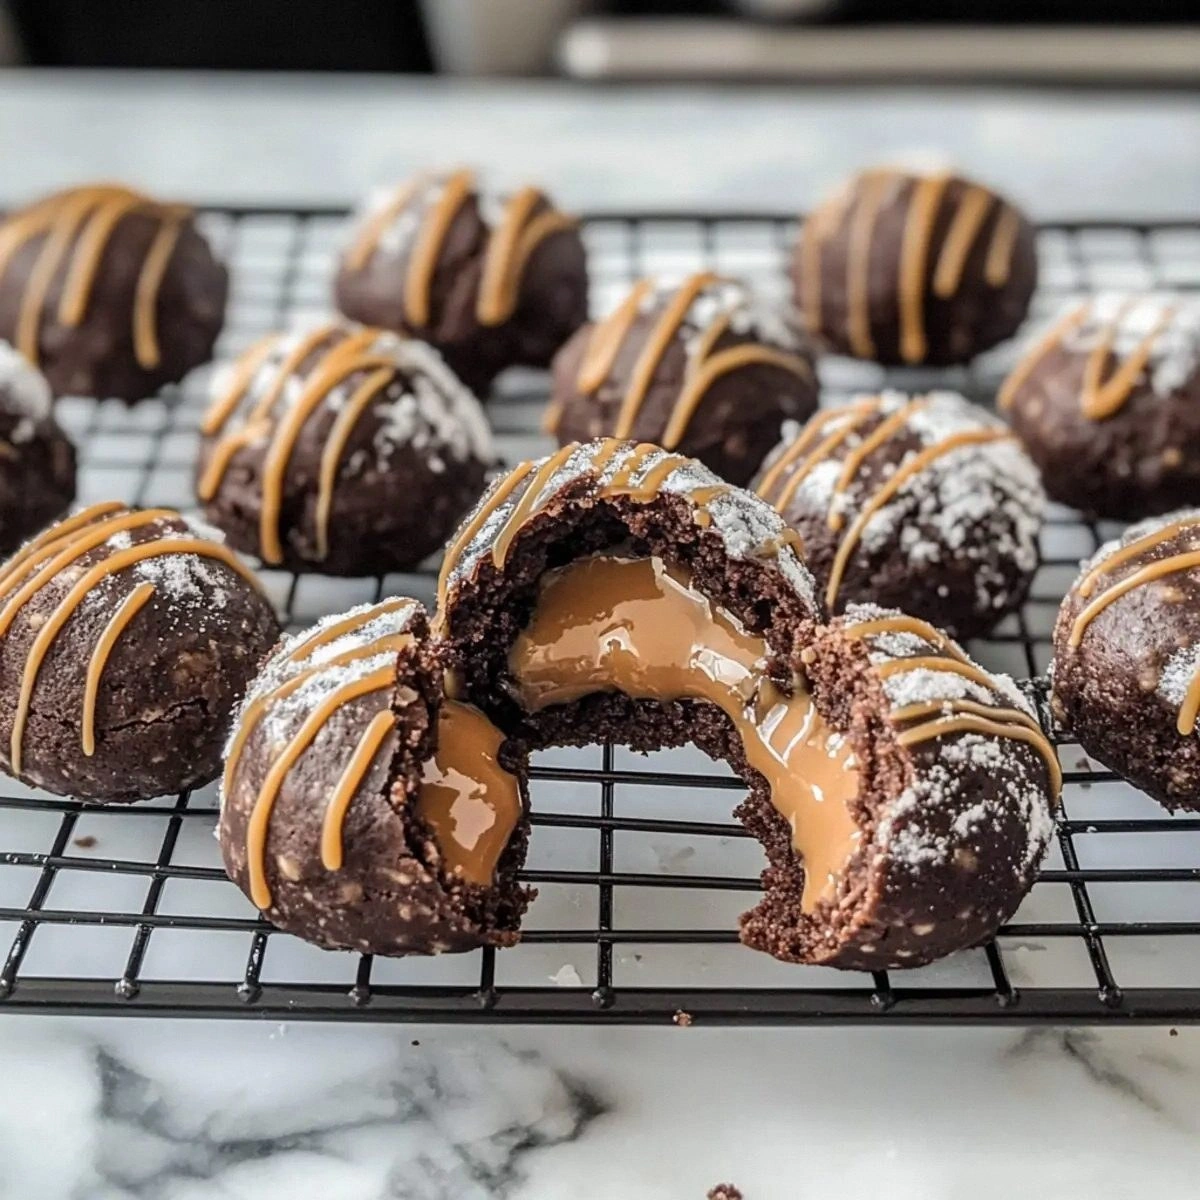
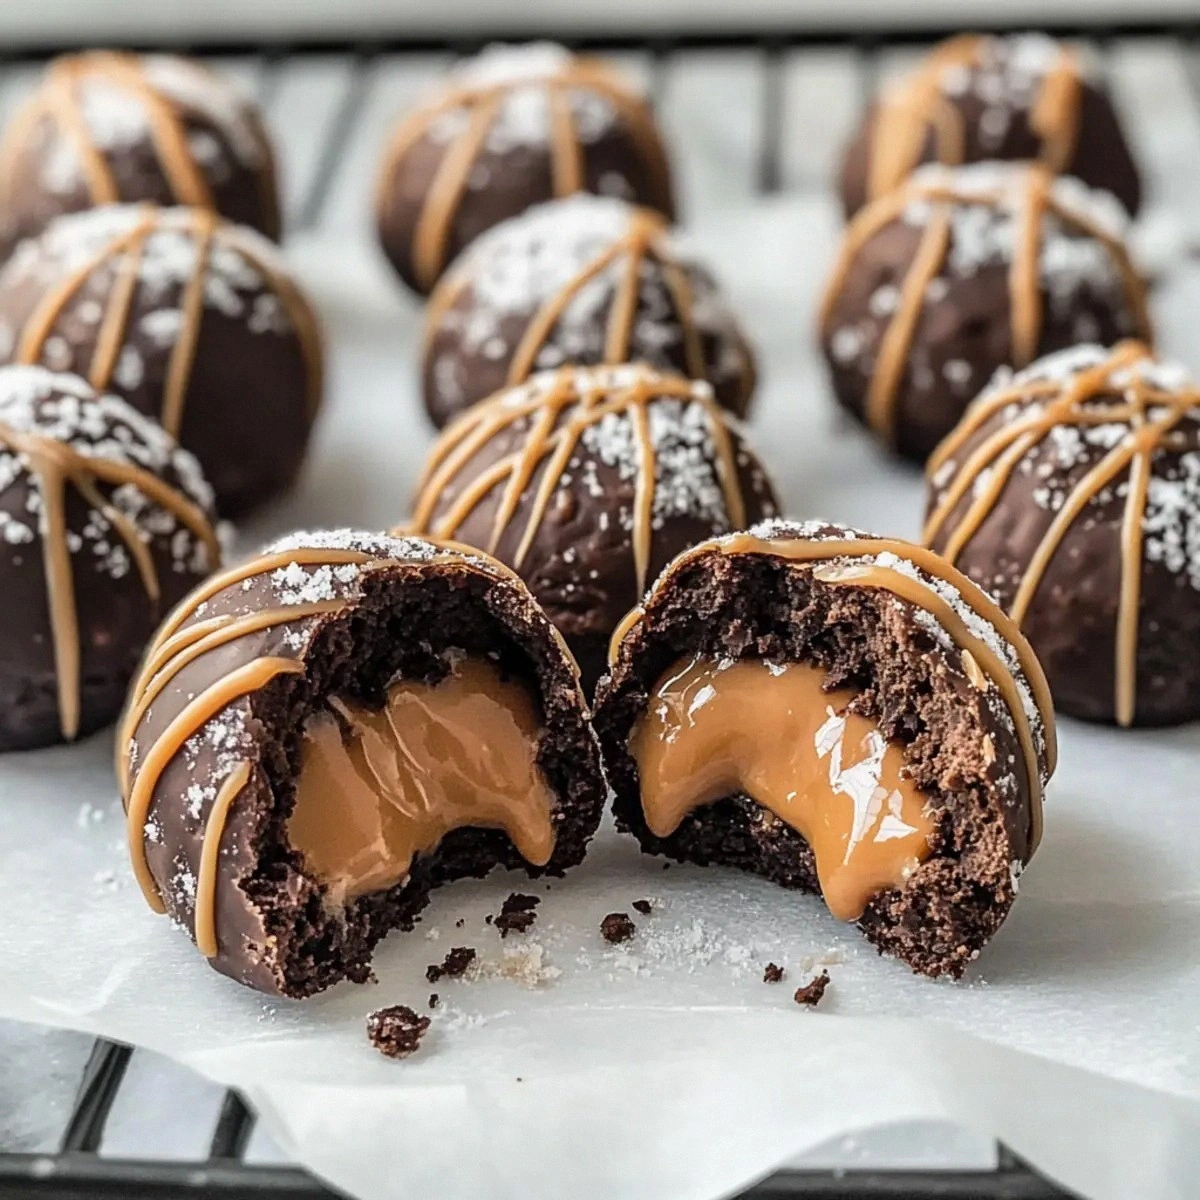
The moment the first snowball hit the plate, I swear the kitchen lights dimmed just a tad, as if the universe recognized the birth of something spectacular. The aroma was a head‑on collision of roasted peanuts, toasted graham crackers, and caramel that sang a low, buttery hum. When you bite into one, the outer shell cracks with a satisfying snap—think thin ice under a boot—while the interior gives way to a silky, fudgy core that coats your tongue like velvet. It’s sweet, it’s salty, it’s a little nutty, and the caramel drizzle adds that glossy finish you only see in high‑end patisseries.
Most recipes for chocolate peanut butter snowballs either drown the peanut butter in chocolate or forget the crucial textural contrast that makes them unforgettable. I’ve tried versions that left the cookies soggy, others that were so dry they could double as paperweights. This version, however, balances the richness of the butter and peanut butter with the lightness of powdered sugar, while the caramel drizzle provides that final glossy kiss. The secret? A tiny splash of vegetable oil that keeps the chocolate coating glossy and prevents it from turning into a brittle shell that cracks too early.
And now, the game‑changer: I’m going to walk you through every single step, from the precise moment you melt the butter to the exact temperature you should watch for when the chocolate chips melt. By the end, you’ll wonder how you ever made snowballs any other way, and I dare you to taste this and not go back for seconds. Okay, ready for the game‑changer? Let’s dive in.
What Makes This Version Stand Out
- Flavor Fusion: The combination of creamy peanut butter with a dark chocolate coating creates a depth that’s both earthy and luxurious, while the caramel drizzle adds a buttery sweetness that ties everything together.
- Texture Symphony: A crisp outer shell, a soft, melt‑in‑your‑mouth interior, and a surprise crunch from the Oreo crumbs—each bite is a multi‑layered experience.
- Simplicity: No fancy equipment needed; a mixing bowl, a microwave, and a spoon are all you require to achieve professional‑grade results.
- Ingredient Quality: Using high‑quality dark chocolate and a truly creamy peanut butter makes the difference between a good treat and a legendary one.
- Crowd Reaction: These snowballs disappear faster than a magician’s rabbit, and they’re the perfect conversation starter at any gathering.
- Make‑Ahead Magic: You can prep the base and freeze the balls, then drizzle caramel right before serving for maximum freshness.
- Versatile Base: The graham cracker crumbs act as a neutral canvas, letting the peanut butter and chocolate shine without overwhelming the palate.
- Visual Appeal: The glossy caramel drizzle creates a glossy finish that looks as good on Instagram as it tastes on your tongue.
Inside the Ingredient List
The Flavor Base
Creamy Peanut Butter (1 cup): This is the heart of the snowball, delivering that rich, nutty flavor that makes every bite instantly recognizable. It also adds moisture, keeping the interior from drying out. If you skip it, you’ll end up with a bland, crumbly core that feels more like a cookie than a snowball. For a smoother texture, opt for a natural, unsweetened peanut butter with no added oil.
Unsalted Butter (½ cup): Butter provides the fat needed to bind the powdered sugar and graham cracker crumbs into a pliable dough. It also contributes a buttery aroma that elevates the overall flavor profile. Using salted butter can throw off the delicate balance, making the final product overly salty.
Powdered Sugar (3 cups): This is the sweetening agent that also acts as a dusting to keep the mixture from sticking to your hands. Too much sugar can make the dough dry; too little and the snowballs won’t hold their shape. If you’re looking for a slightly less sweet version, you can substitute half the powdered sugar with a blend of powdered erythritol.
The Texture Crew
Graham Cracker Crumbs (1 cup): These crumbs introduce a subtle honey‑sweetness and a light crunch that contrasts beautifully with the creamy interior. If you substitute with crushed pretzels, you’ll get a salty twist, but the original recipe relies on the delicate crumb structure of graham crackers.
Milk/Dark Chocolate Chips (1 cup): Dark chocolate provides a bittersweet depth that balances the sweet peanut butter, while milk chocolate offers a creamier melt. I prefer a 70% cacao blend for the perfect balance. Skipping the chocolate or using low‑quality chips results in a waxy coating that lacks shine.
White Chocolate Chips (½ cup): White chocolate adds a buttery sweetness and a pale contrast to the dark coating, creating visual interest when you drizzle caramel over the top. It also helps the glaze set faster.
The Unexpected Star
Vegetable Oil (1 tsp): A tiny amount of oil keeps the chocolate glaze glossy and prevents it from becoming grainy. It’s the secret that turns a good glaze into a professional‑grade finish. Without it, the caramel drizzle can seize and become clumpy.
Caramel Sauce (½ cup): The caramel drizzle is the final flourish that adds a buttery, caramelized flavor and a glossy sheen. It’s the element that makes these snowballs feel like a dessert from a five‑star bakery. If you’re feeling adventurous, swirl in a pinch of sea salt for a salted caramel twist.
The Final Flourish
Chocolate Sandwich Cookie Crumbs (½ cup): These add an extra crunch and a chocolatey undertone that deepens the flavor profile. They also create a subtle speckled appearance in the interior, making each bite a surprise.
Melted Unsalted Butter (2 tbsp): This butter is folded into the chocolate coating to give it a smooth, velvety texture that sets with a subtle sheen. It also helps the caramel adhere better to the surface.
Everything's prepped? Good. Let’s get into the real action…
The Method — Step by Step
Start by softening the ½ cup of unsalted butter. Cut it into small cubes and let it sit at room temperature for about 10 minutes. When it’s pliable but not melted, combine it with the 1 cup of creamy peanut butter in a large mixing bowl. Use a wooden spoon to blend until the mixture is smooth and glossy. This is the moment of truth—if you can feel the mixture coming together without lumps, you’re on the right track.
Kitchen Hack: Warm the bowl slightly in a water bath for 20 seconds to make mixing easier; the butter will melt just enough to combine without becoming oily.Gradually sift in the 3 cups of powdered sugar, a little at a time, to avoid a cloud of sugar in the kitchen. Stir gently after each addition. The mixture will become thick and start to pull away from the sides of the bowl. If it feels too dry, add a splash of milk (no more than a tablespoon) to keep it workable. The scent of sugar should be sweet but not overpowering.
Fold in the 1 cup of graham cracker crumbs and the ½ cup of chocolate sandwich cookie crumbs. The crumbs should distribute evenly, creating speckles throughout the dough. At this point, the texture should feel like a pliable cookie dough—soft enough to roll but firm enough to hold its shape. If it feels sticky, dust your hands with a tiny pinch of powdered sugar.
Cover the bowl with plastic wrap and chill the mixture in the refrigerator for 30 minutes. This firming step is crucial; it prevents the snowballs from spreading when you roll them. While you wait, preheat your oven to 350°F (175°C) and line a baking sheet with parchment paper—this is for the optional baking step that gives a slightly toasted edge.
Remove the chilled dough and, using a tablespoon or a small ice‑cream scoop, portion out the mixture into uniform balls. Roll each ball between your palms, applying gentle pressure until they are smooth and about the size of a walnut. This is where the “snowball” shape truly forms. If the dough cracks, let it sit a few minutes longer; it will soften slightly.
Place the rolled balls onto the prepared baking sheet and bake for 8‑10 minutes. This brief bake sets the exterior, giving it a subtle crust that will hold the chocolate coating better. You’ll hear a faint crackle as the edges begin to turn golden—listen for that, it’s the sound of perfection.
Watch Out: Do not over‑bake; the snowballs should be lightly golden, not dark. Over‑baking makes the interior dry.While the snowballs are cooling, melt the 1 cup of milk/dark chocolate chips and the ½ cup of white chocolate chips together. Use a microwave in 20‑second bursts, stirring after each burst until smooth. Once melted, stir in the 2 tablespoons of melted unsalted butter and the 1 teaspoon of vegetable oil. The oil is the secret that keeps the glaze glossy and prevents it from setting too hard.
Kitchen Hack: Add a pinch of sea salt to the melted chocolate for a subtle flavor boost that makes the sweet notes pop.Dip each cooled snowball into the chocolate glaze, turning gently to coat all sides. Let any excess drip back into the bowl—this ensures a thin, even layer rather than a thick, clumpy coating. Place the coated snowballs back onto the parchment paper, and while the chocolate is still tacky, drizzle the ½ cup of caramel sauce over each one using a spoon or a squeeze bottle. The caramel should pool in little rivulets, creating a glossy finish.
Allow the chocolate and caramel to set completely. This can be done at room temperature for about 20 minutes, or you can speed up the process by placing the tray in the refrigerator for 10 minutes. Once set, the snowballs will have a firm outer shell that snaps cleanly, while the interior remains soft and melt‑in‑your‑mouth. Store them in an airtight container, and they’ll stay fresh for up to a week.
That's it — you did it. But hold on, I've got a few more tricks that'll take this to another level...
Insider Tricks for Flawless Results
The Temperature Rule Nobody Follows
Never dip the snowballs into chocolate that’s hotter than 115°F (46°C). If the chocolate is too hot, it will melt the interior, causing a soggy center. Keep a candy thermometer handy and aim for a glossy, fluid glaze that sets quickly. I once tried using melted chocolate straight from the microwave at full power; the result was a rubbery shell that cracked like old vinyl.
Why Your Nose Knows Best
Trust the aroma. When the butter and peanut butter combine, you should smell a warm, roasted nutty scent. When the chocolate melts, a subtle cocoa perfume should fill the kitchen. If you don’t detect these cues, the flavors haven’t fully developed, and you might need a few more seconds of melting.
The 5‑Minute Rest That Changes Everything
After mixing the dough, give it a 5‑minute rest before shaping. This allows the powdered sugar to fully hydrate, resulting in a smoother texture. Skipping this pause often leads to a crumbly dough that falls apart when you roll it.
Butter Boost for a Shiny Finish
Adding a tablespoon of melted butter to the chocolate glaze not only improves shine but also gives the coating a buttery depth that pairs beautifully with the caramel. This tiny addition can turn a good glaze into a show‑stopping one.
Caramel Consistency Check
If your caramel sauce is too thick, gently warm it in a saucepan over low heat until it becomes pourable. Too thin, and it will run off the snowballs, making a mess. The ideal consistency is thick enough to cling but fluid enough to create glossy rivulets.
Creative Twists and Variations
This recipe is a playground. Here are some of my favorite ways to switch things up:
Salted Caramel Crunch
Swap the regular caramel sauce for a homemade salted caramel and sprinkle flaky sea salt on top just before the glaze sets. The salty‑sweet contrast elevates the flavor profile to a gourmet level.
Spicy Peanut
Add a pinch of cayenne pepper to the peanut butter mixture. The subtle heat pairs surprisingly well with the chocolate and caramel, creating a flavor adventure for spice lovers.
Matcha Green Tea
Replace half of the dark chocolate chips with white chocolate chips infused with matcha powder. The earthy green tea notes add a fresh twist and a beautiful pastel hue.
Nutty Delight
Mix chopped toasted almonds or hazelnuts into the dough for extra crunch. The nuts add a buttery richness that complements the peanut butter perfectly.
Miniature Bites
Form the snowballs into bite‑size truffles (about ½ inch in diameter) and dip them in white chocolate only. These make perfect party favors or a decadent topping for ice cream.
Storing and Bringing It Back to Life
Fridge Storage
Place the snowballs in an airtight container lined with parchment paper. They will stay fresh for up to 7 days. The cool environment keeps the chocolate firm and prevents the caramel from becoming sticky.
Freezer Friendly
For longer storage, arrange the snowballs on a tray, freeze for 2 hours, then transfer to a zip‑top bag. They can be frozen for up to 3 months. When you’re ready to serve, let them thaw in the refrigerator for 30 minutes.
Best Reheating Method
To revive the melt‑in‑your‑mouth interior, place the snowballs on a microwave‑safe plate, sprinkle a tiny splash of water (about a teaspoon) around them, and microwave for 10‑15 seconds. The steam will gently soften the interior without melting the chocolate shell.