I was standing in my tiny kitchen, staring at a pan that had just turned a sad shade of charcoal because I’d forgotten to turn the heat down. The smoke alarm wailed like a banshee, and my roommate burst in, eyes wide, demanding to know if I was attempting to make a new form of charcoal art. In the chaos, I tossed a handful of fresh squid into the pan, added a splash of olive oil, and whispered a frantic prayer to whatever culinary deity was listening. The moment those rings of squid hit the sizzling surface, a scent so intoxicating rose that even the smoke alarm seemed to sigh in relief. That accidental rescue mission birthed what I now swear is the most addictive tapa you’ll ever meet.
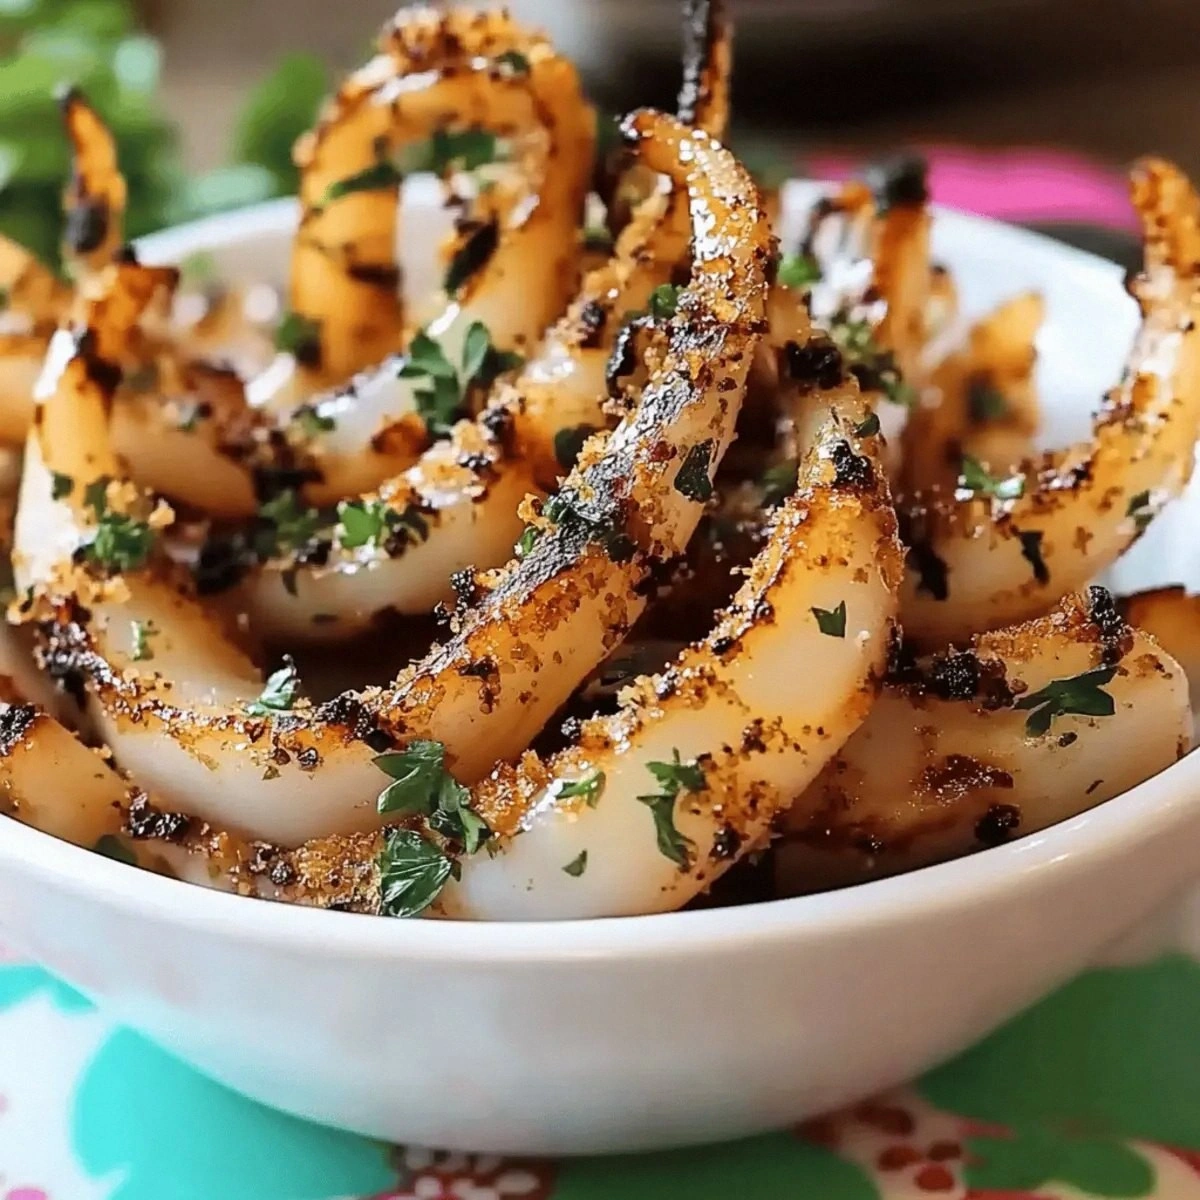
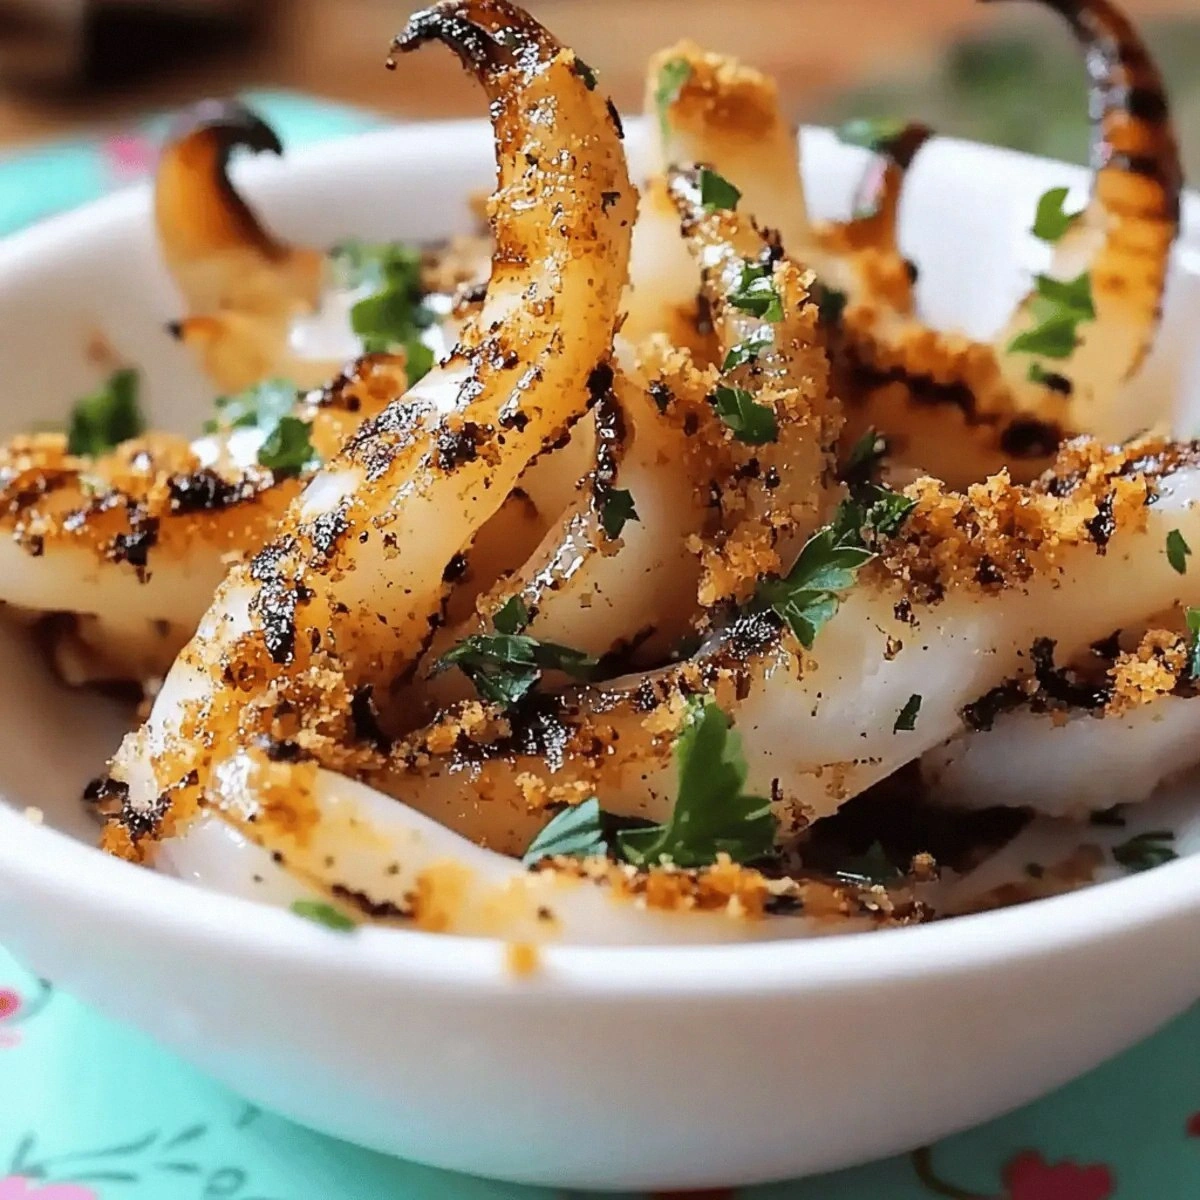
Picture this: a plate of tender, slightly charred squid rings, each one cloaked in a glossy garlic‑parsley glaze that clings like a lover’s embrace, while a dusting of Espelette pepper adds a whisper of heat that dances on the tongue. The crunch of breadcrumbs gives the bite a satisfying snap, a textural surprise that makes you pause mid‑chew to marvel at the contrast. The aroma is a heady mix of briny sea, fresh herbs, and a faint tang of vinegar that makes your nose do a happy little jig. When you finally take that first bite, the flavors explode in a chorus that sings of Mediterranean breezes and late‑night bar vibes, all while you’re still at home in your pajamas.
Most recipes for grilled squid either over‑cook the delicate flesh, leaving it rubbery, or they skimp on the seasoning, resulting in a bland, watery mess. I’ve tried every “quick” method on the internet, and they all missed the mark—until I discovered the secret of a quick sear followed by a brief finish on a hot grill, paired with a parsley‑garlic butter that never loses its vibrancy. This version stands out because it balances three things that most tapas fail to achieve simultaneously: flavor depth, textural intrigue, and a finish that looks as good as it tastes. I dare you to taste this and not go back for seconds; you’ll be begging for the recipe before the plate is even cleared.
Now, I’m about to spill the beans on the one technique that makes all the difference: a rapid, high‑heat sear that locks in moisture, followed by a short grill that adds those coveted char lines without turning the squid into a rubber band. You’ll also meet an unexpected hero—Espelette pepper, a smoky Basque spice that adds a nuanced heat without overwhelming the delicate seafood. Okay, ready for the game‑changer? Let me walk you through every single step — by the end, you’ll wonder how you ever made it any other way.
What Makes This Version Stand Out
- Flavor Explosion: The marriage of garlic, parsley, and a splash of vinegar creates a bright, aromatic glaze that lifts the natural brininess of the squid to new heights.
- Texture Symphony: A light coating of breadcrumbs gives each ring a crisp edge that shatters like thin ice, while the interior stays buttery soft.
- Simplicity at Its Core: Only ten ingredients, all pantry‑friendly, mean you can throw this together on a weeknight without a grocery run.
- Unique Heat Profile: Espelette pepper provides a gentle, smoky heat that’s far more sophisticated than plain chili flakes.
- Crowd Magnet: Serve these at a party and watch the crowd gravitate like moths to a flame—no one can resist the sizzle and aroma.
- Ingredient Quality: Fresh, wild‑caught squid and a handful of bright green parsley are the stars; they’re inexpensive but make a massive impact.
- Grill‑Friendly Method: The two‑stage cooking (pan sear then grill) guarantees perfect doneness every single time.
- Make‑Ahead Potential: You can prep the garlic‑parsley mixture up to a day ahead, storing it in the fridge for a flavor boost.
Alright, let's break down exactly what goes into this masterpiece...
Inside the Ingredient List
The Flavor Base
Garlic is the undisputed champion of flavor, and in this recipe it’s minced fine enough to dissolve into the oil, creating a fragrant foundation that coats every piece of squid. If you skip the garlic, you’ll lose that buttery, aromatic depth that makes the dish unforgettable. A good substitute is roasted garlic puree, but expect a milder profile.
Parsley brings a fresh, grassy brightness that cuts through the richness of the oil and breadcrumbs. Freshly chopped parsley is essential; dried parsley will wilt into a bland green speck. If parsley is out of season, flat‑leaf cilantro can add a different, citrusy twist.
The Texture Crew
Breadcrumbs are the secret to that delightful crunch. I use panko for an ultra‑light, airy crust, but regular breadcrumbs work just as well. Skipping them results in a soggy bite that feels like chewing on seaweed—no good.
Olive oil is the cooking medium that carries the flavors and helps the breadcrumbs brown evenly. Use a robust, extra‑virgin olive oil for a peppery note; a light oil will make the dish taste flat.
The Unexpected Star
Espelette pepper, a Basque specialty, adds a subtle smoky heat that’s more nuanced than standard chili flakes. Its bright red hue also gives the dish a visual pop that makes the plate look restaurant‑ready. If you can’t find it, try smoked paprika with a pinch of cayenne.
Vinegar (preferably sherry or white wine) introduces a tang that lifts the entire flavor profile, preventing the dish from feeling heavy. A splash of lemon juice works in a pinch, but the acidity of vinegar is more rounded.
The Final Flourish
Thyme adds an earthy, slightly floral note that rounds out the bright parsley and garlic. It’s a subtle herb, but when combined with the other aromatics it creates a layered perfume that lingers in the kitchen long after you’ve finished cooking. If you’re allergic to thyme, a pinch of oregano will keep the herbaceous balance.
Salt and pepper are the classic seasoning duo; they enhance the natural flavors of the squid and bring the entire dish into harmony. Use sea salt for a delicate crunch, and freshly cracked black pepper for a fragrant bite.
Everything's prepped? Good. Let's get into the real action...
The Method — Step by Step
Start by patting the squid dry with paper towels; moisture is the enemy of a good sear. I like to slice each body into ½‑inch rings, keeping the tentacles whole for visual drama. Toss the rings in a bowl with 1 tablespoon of olive oil, ensuring each piece is lightly coated—this thin film will help the breadcrumbs adhere later.
This is the moment of truth: if the squid is still wet, you’ll end up with steaming rather than sizzling, and nobody wants soggy tapas.
In a separate shallow dish, combine the breadcrumbs, 1 teaspoon of salt, 1 teaspoon of pepper, and the Espelette pepper. Give it a quick stir so the spices are evenly distributed. The breadcrumbs should look like a golden sandstorm ready to hug the squid.
Watch Out: Over‑seasoning the breadcrumb mix can make the crust too salty, masking the delicate seafood flavor.
Now, roll each squid ring in the breadcrumb mixture, pressing gently so the coating sticks. It should cling like a second skin—if it falls off, add a splash more olive oil to the squid and try again.
Heat a large cast‑iron skillet over medium‑high heat until it’s smoking hot—think the surface of a summer sidewalk. Add the remaining tablespoon of olive oil, swirling to coat. When the oil shimmers, lay the coated squid rings in a single layer, making sure they don’t touch.
That sizzle when it hits the pan? Absolute perfection. Let them cook undisturbed for 1‑2 minutes until the edges turn a deep amber.
Flip the rings gently using tongs and sear the other side for another 1‑2 minutes. The breadcrumbs should be crisp, and the squid should be just opaque in the center—no more than 3 minutes total per side, or you’ll end up with rubber bands.
While the squid finishes, whisk together 2 tablespoons of olive oil, 4 minced garlic cloves, 1 cup of finely chopped parsley, 1 tablespoon of vinegar, and 1 teaspoon of thyme in a small bowl. The mixture should look glossy and vibrant green—this is your flavor bomb.
Kitchen Hack: Let the garlic‑parsley oil rest for 10 minutes before using; the flavors meld and become more aromatic.Preheat an outdoor grill or a grill pan to high heat. Once hot, arrange the seared squid rings directly on the grill grates, spacing them out so they can char evenly. Grill for just 30 seconds per side—this quick flash creates those coveted grill marks without overcooking.
You’ll hear a faint crackle as the sugars in the breadcrumbs caramelize, and the scent will fill the patio like a summer soirée.
Immediately after removing the squid from the grill, drizzle the warm garlic‑parsley oil over the rings, tossing gently to coat every bite. The oil should sizzle on contact, sealing in the flavor and giving the dish a glossy finish.
And now the fun part: arrange the tapas on a rustic wooden board, sprinkle a pinch of extra Espelette pepper for color, and serve with lemon wedges on the side.
Taste test time! That first bite should deliver a crisp bite, a buttery interior, and a burst of herbaceous brightness that makes your palate sing. I dare you to stop at one—most people end up devouring the whole platter in minutes.
That's it — you did it. But hold on, I've got a few more tricks that'll take this to another level...
Insider Tricks for Flawless Results
The Temperature Rule Nobody Follows
Never, ever let your pan cool down between flips. A consistent high heat creates a rapid Maillard reaction, giving you that golden crust without drying the squid. If the pan cools, the breadcrumbs will absorb oil and become soggy. I once tried cooking over medium heat; the result was a sad, limp mess that no one wanted to touch.
Why Your Nose Knows Best
The moment you smell the garlic turning golden is the cue to add the parsley‑oil. Your nose can detect the subtle shift from raw garlic to nutty aromatics faster than any timer. Trust it. If you wait too long, the garlic will burn and give the dish a bitter edge.
The 5‑Minute Rest That Changes Everything
After grilling, let the squid rest for exactly five minutes before serving. This short pause allows the juices to redistribute, preventing them from spilling out when you bite. A friend tried to serve immediately and ended up with a soggy plate—let the rest happen.
Seasoning Layering Mastery
Season the breadcrumb mix, then season the squid again after searing, and finish with a final sprinkle of salt after drizzling the herb oil. Each layer builds depth, ensuring every bite is balanced. Skipping any layer makes the dish feel flat.
Grill Mark Perfection
For those perfect grill lines, oil the grill grates lightly before heating. This prevents sticking and creates those iconic char stripes that make the tapa look Instagram‑ready. If you forget, the squid will tear and lose its coating.
Creative Twists and Variations
This recipe is a playground. Here are some of my favorite ways to switch things up:
Smoky Chipotle Kick
Swap the Espelette pepper for an equal amount of chipotle powder and add a dash of smoked paprika. The result is a deeper, smoky heat that pairs beautifully with the bright parsley.
Citrus‑Infused Bliss
Add the zest of one lemon to the garlic‑parsley oil and finish the dish with a squeeze of fresh lemon juice. The citrus brightens the seafood and cuts through the richness.
Mediterranean Olive Medley
Stir in a handful of chopped Kalamata olives into the herb oil. The briny olives introduce a salty pop that complements the squid’s natural sea flavor.
Spicy Harissa Fusion
Replace the Espelette pepper with a teaspoon of harissa paste and a pinch of cumin. This North‑African twist brings a warm, earthy heat that’s perfect for cooler evenings.
Herb‑Crazy Crunch
Mix finely chopped rosemary and sage into the breadcrumb coating for an herbaceous crunch that adds piney notes and a fragrant aroma.
Storing and Bringing It Back to Life
Fridge Storage
Place the cooked squid in an airtight container, drizzle a thin layer of olive oil on top to prevent drying, and store for up to 2 days. Reheat gently in a skillet over low heat, adding a splash of water to revive the crust.
Freezer Friendly
Cool the squid completely, then spread it on a baking sheet and freeze for 1 hour before transferring to a zip‑top bag. It will keep for up to 3 months. When ready, thaw in the fridge overnight and finish on the grill for a fresh‑out‑of‑the‑freezer crunch.
Best Reheating Method
For the ultimate reheated bite, preheat a broiler to high, arrange the squid on a foil‑lined tray, and broil for 2‑3 minutes, watching closely. Add a tiny splash of water or a drizzle of the garlic‑parsley oil before broiling to steam the interior back to tenderness while the breadcrumbs crisp up again.