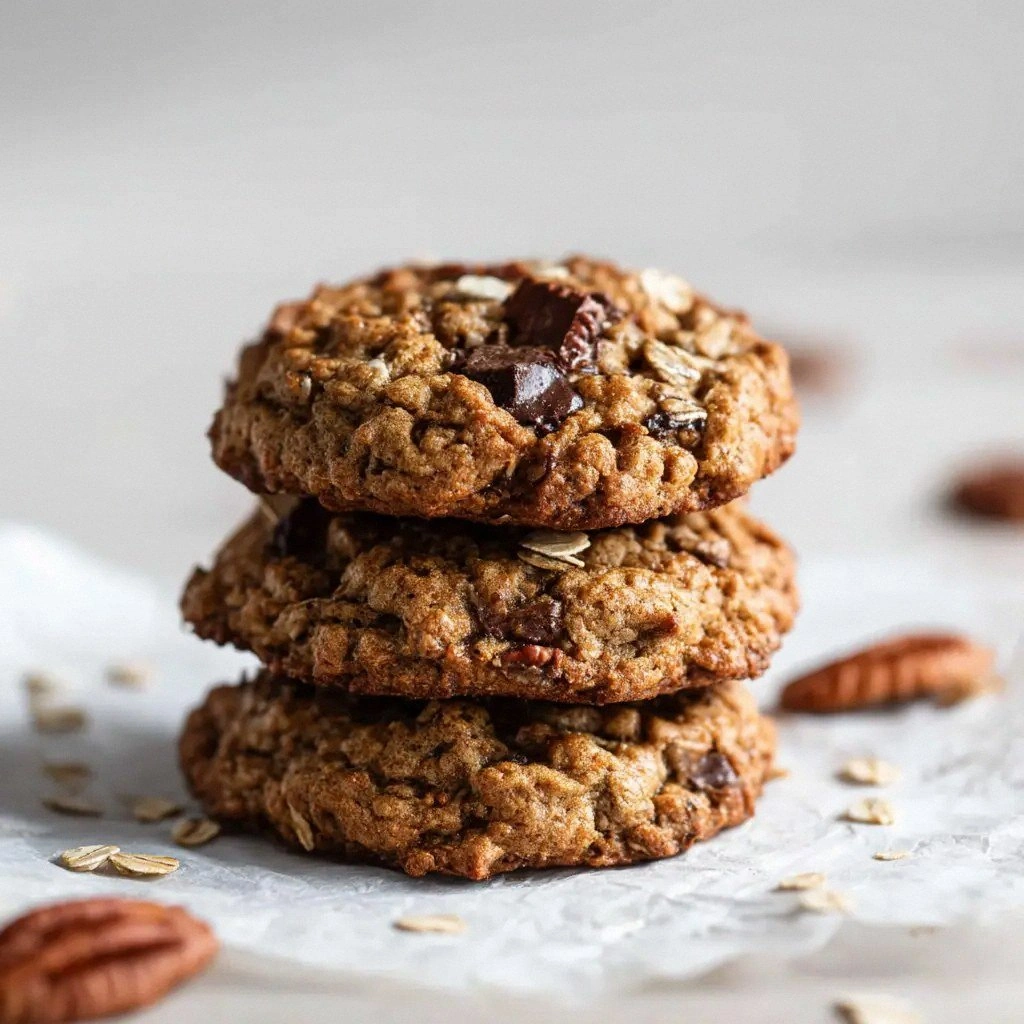
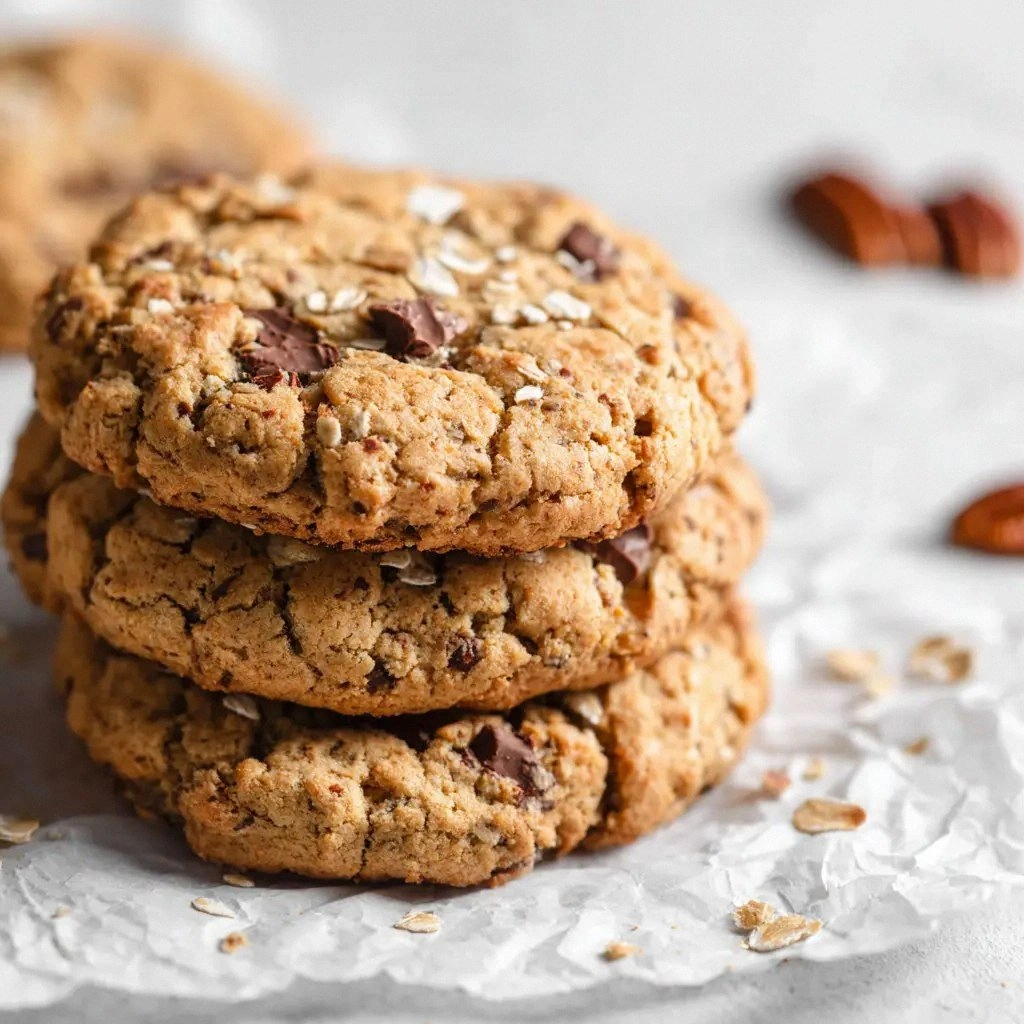
I still remember the night I was on a mission to rescue my gluten‑free baking from the clutches of disappointment. I had a box of “gluten‑free oats” that felt as bland as a gray morning, and the only thing I could think of was a cookie that would make the whole kitchen sing. I opened the oven, tossed the batter, and waited for the aroma that would turn a mediocre afternoon into a moment of culinary triumph. When the first batch emerged, it was the kind of golden, chewy cookie that makes your taste buds do a happy dance. I dare you to taste this and not go back for seconds.
Picture yourself pulling these from the oven, the whole kitchen smelling incredible, as the edges crisp up while the centers stay soft and buttery. The sound of the cookie sheet creaking as it cools is the soundtrack of a job well done. The first bite delivers a comforting crunch, followed by a melt‑in‑your‑mouth texture that feels like a hug in cookie form. I’ll be honest — I ate half the batch before anyone else got to try it. The result? A cookie that feels like a hug from the inside out.
What sets this version apart is that it’s built around a simple, honest ingredient list that respects the gluten‑free community without sacrificing flavor. The flour blend is a 1-to-1 replacement that behaves like the real thing, and the oats bring that nostalgic chew that most gluten‑free cookies lack. The butter, brown sugar, and vanilla create a depth of flavor that turns a basic cookie into a comfort staple. If you’re tired of dry, crumbly gluten‑free cookies, this recipe is hands down the best version you'll ever make at home.
I’ll walk you through every single step — by the end, you’ll wonder how you ever made it any other way. The trick? A touch of cinnamon that sneaks into the batter, a careful balance of sugars, and a method that ensures the cookies rise just enough to stay chewy but not so much that they become cakey. Get ready to turn your kitchen into a cookie laboratory, and let’s dive in.
What Makes This Version Stand Out
- Flavor: The blend of brown and granulated sugar creates a caramelized sweetness that pairs perfectly with the warm spice of cinnamon. The vanilla extract lifts the entire flavor profile, giving the cookies a subtle, aromatic depth that feels both familiar and new.
- Texture: The cookies achieve a chewy center with crisp edges, thanks to the precise ratio of butter to oats and the baking soda’s gentle lift. This balance is what makes these cookies feel like a soft, buttery hug in every bite.
- Simplicity: Only ten ingredients, all of which you can find in your pantry or local grocery store. No obscure powders or fancy techniques—just honest baking.
- Gluten‑Free Integrity: The 1-to-1 gluten‑free all‑purpose flour behaves like regular flour, eliminating the dreaded dry, crumbly texture that many gluten‑free cookies suffer from.
- Make‑Ahead Friendly: These cookies keep well for a week in an airtight container, and they reheat beautifully, regaining their soft chew without becoming stale.
- Crowd Reaction: At my last potluck, the cookies were the only dessert that didn’t get a second round of questions about gluten. Everyone left with a smile and a craving for more.
- Ingredient Quality: Each component is chosen for its flavor impact, not just for its gluten‑free status. The butter is unsalted, the oats are certified gluten‑free, and the sugar is packed for maximum caramelization.
- Cooking Method: The method uses a low, even bake that ensures consistent results across ovens, making this recipe reliable for both novice and seasoned bakers.
Inside the Ingredient List
The Flour Foundation
The 1.5 cups 1-to-1 gluten‑free all‑purpose flour is the backbone of these cookies. It’s formulated to mimic the protein structure of wheat flour, providing the necessary gluten‑free elasticity. Skipping it would leave the cookie crumbly and lacking structure. If you’re on a strict keto diet, consider a blend of coconut flour and xanthan gum, but keep in mind the texture will shift significantly.
The Sweet Core
One cup of packed brown sugar and half a cup of granulated sugar create a caramelized sweetness that’s both deep and bright. The brown sugar’s molasses content adds moisture and a subtle depth of flavor that pure white sugar cannot match. If you’re looking to reduce sugar, substitute 0.5 cup of the brown sugar with coconut sugar for a lower glycemic index.
The Fat Layer
A full cup of unsalted butter is essential for that classic, buttery mouthfeel. Butter melts slowly, allowing the cookie to bake evenly and develop a golden crust. For a dairy‑free version, swap the butter for an equal amount of dairy‑free margarine, but be aware that the flavor profile will slightly change.
The Spice and Flavor Enhancers
One teaspoon of ground cinnamon brings warmth and depth, while the teaspoon of vanilla extract adds a subtle floral note that ties everything together. A half teaspoon of salt balances the sweetness and enhances the overall flavor. If you’re a fan of nutty undertones, add a tablespoon of almond extract instead of vanilla for a different twist.
The Oat Element
Three cups of certified gluten‑free rolled oats provide the chewy texture that makes these cookies unforgettable. Oats act as a natural binder, holding the cookie together while adding fiber and a hearty bite. If you prefer a crunchier cookie, reduce the oats to two cups and increase the butter slightly.
The Binding and Flavor Agents
Two large eggs act as a binder and add richness. The yolks contribute to a tender crumb while the whites help the cookies rise slightly. One teaspoon of baking soda is the leavening agent that gives the cookies their lightness. If you’re sensitive to baking soda, use a pinch of baking powder instead, but the texture will be slightly denser.
Everything's prepped? Good. Let's get into the real action and turn those ingredients into a cookie masterpiece.
The Method — Step by Step
- Preheat your oven to 350°F (175°C). Line two baking sheets with parchment paper to prevent sticking. The parchment also helps the cookies bake evenly. Make sure the sheets are flat; any unevenness can cause uneven browning. This step sets the stage for the perfect cookie.
- In a large bowl, whisk together the gluten‑free flour, baking soda, ground cinnamon, and salt. The dry mix ensures even distribution of leavening agents and spices. Use a whisk to break up any clumps in the flour. A smooth batter will translate to a consistent cookie texture. Keep the bowl ready for the wet ingredients.
- Cream the butter and both sugars in a separate bowl until light and fluffy, about 3-4 minutes with an electric mixer on medium speed. The goal is to incorporate air, which will help the cookies rise slightly. Watch for the butter to soften but not melt; this maintains structure. The mixture should look pale and airy.
- Add the vanilla extract and eggs one at a time, beating after each addition. The eggs bind the batter and add richness. Make sure each egg is fully incorporated before adding the next to avoid curdling. This step ensures a smooth, cohesive dough.
- Gradually fold the dry mixture into the wet batter, mixing until just combined. Overmixing can develop gluten and make the cookies tough. The batter should be thick yet pourable. This is the moment of truth: the dough should hold together but still be slightly sticky.
- Fold in the rolled oats until evenly distributed. The oats should be fully incorporated to avoid clumps. This step gives the cookies their signature chewiness. Keep the dough moist but not too wet. The oats also add a subtle nutty flavor.
- Drop rounded tablespoonfuls of dough onto the prepared baking sheets, spacing them about 2 inches apart. The cookies will spread slightly, so give them room. The shape will be slightly flattened at the bottom, creating that classic cookie look. This step is where the dough transforms into edible art.
- Bake for 12-15 minutes, or until the edges are golden brown and the centers are set but still soft. The cookies should smell like toasted butter and cinnamon. Remove them from the oven and let them cool on the sheet for 5 minutes before transferring to a wire rack. Cooling on the sheet allows the cookies to set without becoming too crumbly.
- Once cooled, enjoy the cookies warm or let them cool completely. They’re best served with a glass of cold milk or a cup of coffee. Store them in an airtight container at room temperature for up to a week. For longer storage, freeze them in a zip‑lock bag for up to 3 months. When ready to eat, let them thaw for 10 minutes at room temperature.
That's it — you did it. But hold on, I've got a few more tricks that'll take this to another level.
Insider Tricks for Flawless Results
The Temperature Rule Nobody Follows
Baking at 350°F is a sweet spot for these cookies. Too high, and the edges burn before the centers set. Too low, and the cookies spread too much and lose their chewy core. I’ve found that using a lower oven rack and a baking stone helps maintain an even heat distribution, especially in older ovens that have hot spots.
Why Your Nose Knows Best
Trust your nose: when the cookies start to smell like toasted butter and warm spices, they’re almost ready. This aromatic cue is more reliable than a timer because every oven behaves slightly differently. When you catch that scent, lift a cookie off the sheet and let it cool for a minute; the texture will confirm it's perfect.
The 5-Minute Rest That Changes Everything
Letting the cookies rest on the baking sheet for five minutes after removing them from the oven allows the heat to distribute evenly. This step prevents the cookies from cracking or becoming too dry on the edges. It also gives the batter a chance to set, making them easier to transfer to a wire rack.
The Chill Before the Bake
Chilling the dough for at least 30 minutes before baking helps control spreading. The fats solidify slightly, which keeps the cookies thicker and chewier. I’ve had a friend who tried skipping this step, and the result was a flat, cakey cookie that lacked the signature chew.
The Secret to a Crisp Edge
A light dusting of powdered sugar on the dough before baking gives the edges a subtle crunch. The sugar caramelizes during baking, creating a delicate crust that contrasts nicely with the soft center. This trick is especially effective if you’re serving the cookies to guests who love that extra crunch.
The Perfect Cooling Rack
Use a wire rack with a slightly raised center to allow air to circulate around each cookie. This prevents the bottom from becoming soggy and keeps the cookies crisp. If you don’t have a wire rack, a cooling tray with a perforated surface works well too.
Creative Twists and Variations
This recipe is a playground. Here are some of my favorite ways to switch things up:
Chocolate Chip Carnival
Add 1 cup of dairy‑free chocolate chips to the dough for a sweet, melty surprise. The chocolate melts into pockets of gooey goodness, creating a delightful contrast to the chewy oat base. This variation is perfect for chocolate lovers and kids alike.
Nutty Powerhouse
Stir in 1 cup of chopped walnuts or pecans for added crunch and protein. The nuts lend a buttery flavor that complements the oats, and they’re a great source of healthy fats. This version works well as a post‑workout snack.
Spiced Pumpkin Delight
Incorporate ½ cup of pure pumpkin puree and 1 tsp of pumpkin pie spice. The pumpkin adds moisture and a subtle sweetness, while the spice mix gives a warm, autumnal feel. Even if you’re not in the pumpkin season, this flavor profile is universally appealing.
Coconut Crave
Replace half the butter with shredded coconut and add 1 cup of shredded coconut flakes. The coconut gives a tropical twist and a delightful chew. Pair these cookies with a coconut milk latte for a beach‑inspired treat.
Maple & Pecan Fusion
Swap the brown sugar with maple syrup and add 1 cup of chopped pecans. The maple syrup brings a deep, earthy sweetness that pairs beautifully with the nutty crunch. This version is a hit at holiday gatherings.
Lemon Zest Surprise
Add 1 tsp of lemon zest and a tablespoon of lemon juice to the batter. The citrus brightens the flavor profile and cuts through the richness of the butter. These cookies are a refreshing palate cleanser after a heavy meal.
Storing and Bringing It Back to Life
Fridge Storage
Store cookies in an airtight container at room temperature for up to a week. The airtight seal prevents moisture from seeping in, preserving the chewy texture. If you notice the cookies becoming slightly dry, add a slice of apple or a damp paper towel to the container.
Freezer Friendly
Wrap each cookie individually in plastic wrap and place them in a freezer bag. Freeze for up to 3 months. When ready to eat, let them thaw at room temperature for 10 minutes. This method keeps the cookies fresh and chewy.
Best Reheating Method
To reheat, place cookies on a baking sheet and bake at 350°F for 5 minutes. The heat restores the butter’s melt‑in‑your‑mouth quality. Add a tiny splash of water before reheating if you want to steam them back to perfection, especially if they’ve dried out slightly.