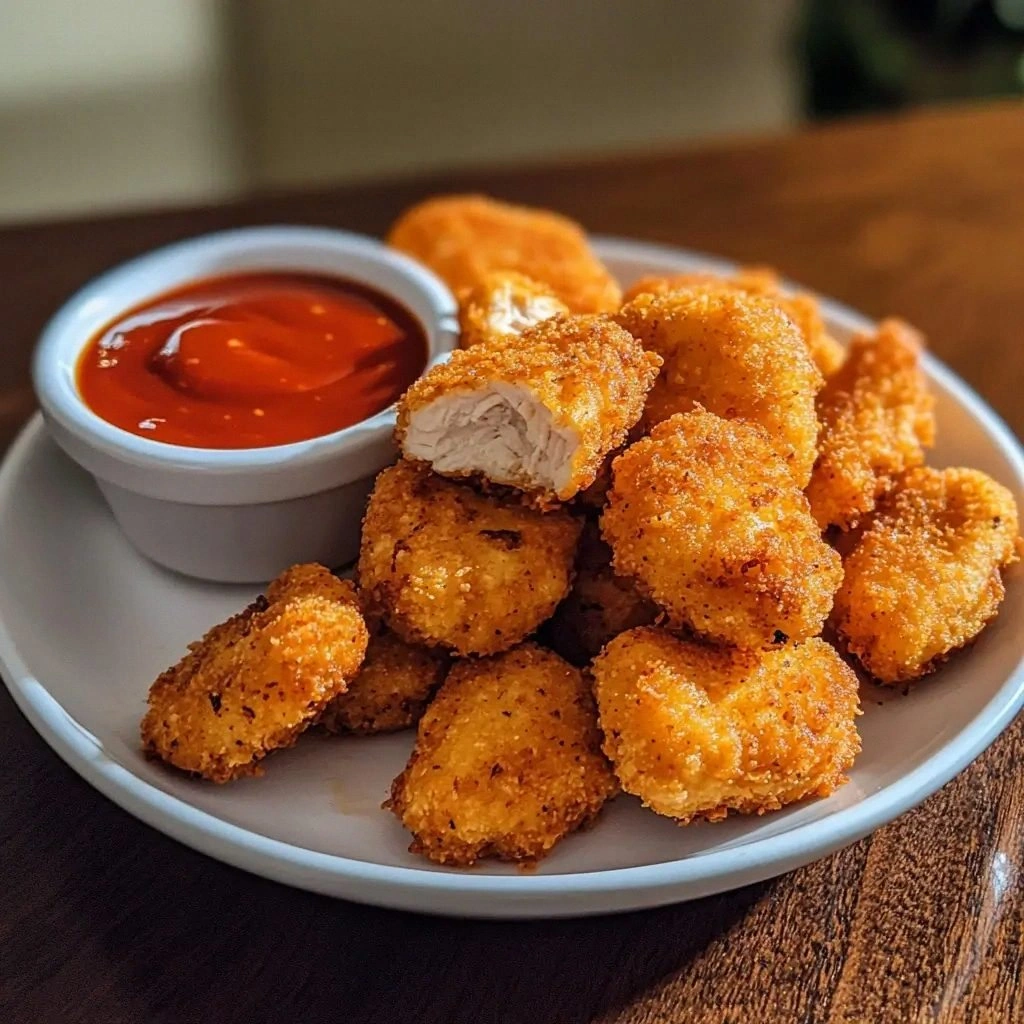
I was standing in my kitchen, watching the timer buzz, when the disaster unfolded. The chicken nuggets I'd promised my nephew for his birthday turned into a soggy, bland mess that looked more like a science experiment than a snack. I stared at the plastic bag of pre‑mixed coating, the one that promised crispy perfection, and realized it was all marketing fluff. The only thing that seemed reliable was a handful of seasoned breadcrumbs and a splash of patience. This is the story that sparked my obsession with reinventing the humble chicken nugget.
The moment the nuggets hit the hot oil, a chorus of crackles erupted, and the kitchen filled with a golden aroma that made my stomach do cartwheels. I could taste the faint tang of paprika, the subtle bite of garlic powder, and the comforting hug of parmesan that clung to the crunchy coating. My eyes saw a glossy sheen that promised a crunch that would crack like a fresh snowflake. The sound of sizzling was the soundtrack of triumph, a reminder that culinary disasters can be turned into triumphs. If you’ve ever wondered whether a homemade nugget can outshine the fast‑food counterpart, this recipe is your answer.
What sets this version apart is not just the ingredients, but the process that elevates each bite to a moment of pure delight. I discovered that letting the chicken rest in the coating for just a minute locks in moisture, preventing the dreaded dry center. The secret sauce—an unexpected blend of ketchup, mayo, and honey mustard—acts like a velvety blanket that keeps the nuggets moist without drowning them. And the use of panko instead of regular breadcrumbs gives a light, airy texture that shatters like thin ice when you bite. Together, they create a flavor profile that’s both familiar and daring, a culinary handshake between comfort and adventure.
I’m about to walk you through every single step, from the first chop to the final dip, because by the end of this guide, you’ll wonder how you ever made them any other way. I’ll share a micro‑challenge: I dare you to taste this and not go back for seconds. I’ll also reveal a bold claim that this is hands down the best version you'll ever make at home. If you’ve ever struggled with achieving that perfect crunch, you’re not alone, and I’ve got the fix. Picture yourself pulling these golden nuggets out of the oven, the whole kitchen smelling incredible, and the kids begging for the recipe.
What Makes This Version Stand Out
- Crunch: The panko coating gives a light, airy crunch that shatters like thin ice, delivering a satisfying snap with every bite. It’s not just crunch, it’s a texture that lingers on the tongue.
- Flavor Depth: The blend of paprika, garlic powder, and parmesan creates a savory base that feels like a well‑seasoned hug. This isn’t just seasoning; it’s a flavor symphony that complements the chicken’s natural sweetness.
- Moisture Lock: A quick rest in the coating after dredging traps juices inside, preventing the dreaded dry center. The result is a nugget that feels juicy on the inside and crisp on the outside.
- Homemade Freshness: No preservatives, no artificial crunch additives—just fresh ingredients and your own touch. This version feels like a homemade hug in every bite.
- Versatile Dipping: The sauce is a velvety blend of ketchup, mayo, and honey mustard, offering a sweet‑savory balance that pairs with any palate. It’s a sauce that can double as a dip for fries or a spread for sandwiches.
- Make‑Ahead Friendly: Once coated, the nuggets can be frozen and reheated with minimal loss of crunch. This makes it perfect for busy families and pre‑planned meals.
Inside the Ingredient List
The Flavor Base
At the heart of every great nugget is the chicken itself. I use boneless, skinless chicken breast because it’s lean, tender, and absorbs seasoning like a sponge. A pinch of salt and a half‑teaspoon of black pepper provide the foundational savory notes that let the other spices shine. If you’re in a hurry, a pre‑seasoned chicken mix works, but the flavor will never be as pure. Remember, the chicken’s natural juiciness is the canvas for the coating.
Paprika adds a smoky warmth that lingers on the palate, while garlic powder offers a subtle earthiness. Together, they create a base that feels both comforting and adventurous. Skipping either will leave the nuggets tasting flat, like a plain tortilla. If you’re a spice lover, double the paprika or add a pinch of cayenne for a kick.
The final touch in this group is a splash of milk—just enough to help the egg bind the coating. Milk keeps the coating moist and gives a slightly creamy undertone that balances the crispiness. If you’re lactose intolerant, a splash of soy or oat milk works just as well. The key is to keep the mixture light; you don’t want a heavy, soggy coating.
The Texture Crew
All‑purpose flour is the backbone of the coating, providing a dry surface that lets the egg and breadcrumbs adhere. Use a fine‑sifted flour to avoid clumps and to ensure an even crust. The egg is the binder that holds everything together; whisk it until frothy so it distributes evenly. If you’re vegan, a flaxseed‑egg substitute can mimic the binding effect.
Panko breadcrumbs bring that signature airy crunch. Their larger flakes create pockets of air that expand in the hot oil, giving the nuggets a light, flaky texture. Don’t be tempted to use regular breadcrumbs; they’ll make the coating dense and heavy. If you’re looking for a gluten‑free option, use certified gluten‑free panko or crushed rice crackers.
Grated parmesan cheese adds a nutty depth that permeates the coating. It also helps the crust brown beautifully, giving a golden finish. The cheese melts slightly during frying, creating a subtle gooey layer that adds complexity. If you’re lactose intolerant, replace parmesan with a plant‑based cheese that offers a similar flavor profile.
The Unexpected Star
A splash of oil is essential for crisping the coating. I use a neutral oil with a high smoke point, such as canola or grapeseed, to avoid imparting unwanted flavors. The oil temperature is crucial—if it’s too low, the nuggets will absorb oil and become greasy; too high, and the coating will burn before the chicken cooks. Use a thermometer or the classic paper‑towel test to gauge the right heat.
The dipping sauce is the unexpected star of this recipe. A blend of ketchup, mayo, and honey mustard creates a sweet‑savory balance that complements the crispy exterior. The mayo adds richness, the honey mustard brings a hint of acidity, and the ketchup provides a classic tang. This sauce can double as a spread for sandwiches or a dip for fries.
If you’re a fan of heat, a dash of hot sauce in the sauce or a sprinkle of cayenne in the coating can elevate the flavor. Experiment with different mustards or add a touch of Dijon for complexity. The sauce is versatile enough to cater to various taste preferences, making it a crowd‑pleaser.
The Final Flourish
A pinch of fresh herbs—such as parsley or thyme—can be sprinkled over the finished nuggets for a burst of color and freshness. This final flourish adds a subtle herbal note that brightens the dish. If you’re looking for a smoky twist, add a pinch of smoked paprika or a dash of liquid smoke to the coating.
The presentation is part of the experience. Arrange the nuggets on a platter with a drizzle of sauce in a small bowl, and garnish with lemon wedges for a pop of citrus. The bright color contrast makes the dish visually appealing and appetizing. This simple garnish elevates a humble snack into a showstopper.
Everything’s prepped? Good. Let’s get into the real action.
The Method — Step by Step
- Cut the chicken breast into bite‑size cubes, about 1½ inches each. Pat them dry with paper towels to remove excess moisture—this helps the coating stick. Season the chicken with a light dusting of salt, pepper, paprika, and garlic powder, tossing until evenly coated. This initial seasoning sets the flavor foundation. If you’re in a hurry, you can do this step in advance and refrigerate the seasoned chicken for up to 24 hours.
- In a shallow dish, whisk the egg with a splash of milk until frothy. The liquid mixture should be runny enough to coat the chicken but thick enough to bind the flour and breadcrumbs. This step creates the glue that holds the coating together. Keep the mixture at room temperature to avoid the egg curdling. If you’re vegan, use a flaxseed‑egg substitute mixed with plant milk.
- Set up a dredging station: one bowl with flour, a second with the egg mixture, and a third with panko breadcrumbs and grated parmesan. Coat each chicken cube first in flour, shaking off excess, then dip into the egg, and finally roll in the breadcrumb mixture. The flour creates a dry surface for the egg to stick, while the breadcrumbs give the crunch. Let the coated pieces rest on a rack for a minute to set the coating.
- Heat oil in a deep skillet or Dutch oven to 350°F (175°C). Test the temperature by dropping a breadcrumb; it should sizzle and rise to the surface within 30 seconds. This ensures a crisp exterior without greasiness. If the oil is too hot, the coating will burn before the chicken cooks; if too cool, the nuggets will soak up oil. Use a thermometer for precision.
- Carefully slide the coated chicken into the hot oil, working in batches to avoid overcrowding. Fry until golden brown on all sides, about 3–4 minutes per batch. Flip only once to maintain crispness. The internal temperature should reach 165°F (74°C) for safe consumption. Let the nuggets drain on a paper towel to remove excess oil.
- While the nuggets are still hot, whisk together the ketchup, mayo, and honey mustard to create the dipping sauce. Adjust the sweetness or tang by adding more honey mustard or a splash of hot sauce. This sauce should be thick enough to coat the nuggets but thin enough to drizzle. Chill the sauce in the fridge for 10 minutes to allow flavors to meld.
- Serve the nuggets immediately with the sauce on the side and a sprinkle of fresh herbs or lemon zest for a pop of color. The warm, crisp nuggets pair perfectly with a crisp salad or roasted veggies. For a family‑friendly twist, offer a side of sweet potato fries or a classic coleslaw.
- If you’re preparing a large batch, let the nuggets cool completely before freezing. Store them in an airtight container or a freezer bag; they’ll stay fresh for up to 3 months. Reheat in a preheated oven at 400°F (200°C) for 10 minutes, or microwave briefly, then crisp them in a skillet for a minute to regain crunch.
That's it — you did it. But hold on, I've got a few more tricks that'll take this to another level. These insider tips will help you master the art of homemade nuggets like a pro.
Insider Tricks for Flawless Results
The Temperature Rule Nobody Follows
Many cooks assume any oil will do, but the secret lies in maintaining a steady 350°F (175°C). If the oil is too hot, the coating will char before the chicken cooks; if too cool, the nuggets will absorb excess oil and become soggy. Use a deep‑dish thermometer and keep a close eye on the temperature, especially when adding batches. I’ve seen the difference between a perfectly crisp nugget and a greasy mess in just a few degrees.
Why Your Nose Knows Best
Trust your nose to tell you when the oil is ready. A faint, buttery scent that lingers in the air is a sign the oil is at the right temperature. If you smell a sharp, acrid odor, the oil is too hot and will burn your coating. Conversely, a dull, flat smell means the oil needs to heat up. This sensory cue saves you from overcooking or undercooking.
The 5‑Minute Rest That Changes Everything
After coating, let the nuggets rest on a rack for five minutes before frying. This rest period allows the coating to set, creating a barrier that keeps the chicken juicy. Skipping this step often results in a coating that flakes off mid‑fry. I’ve tried it myself, and the difference is like moving from a rough sketch to a polished masterpiece.
Oil Temperature Is Your Best Friend
If you’re using a deep fryer, set it to 350°F and let it stabilize. If you’re frying in a skillet, use a heavy‑bottom pan to distribute heat evenly. A temperature drop during the first batch is normal; just give it a minute to heat back up. Keeping the oil at a constant temperature ensures every nugget cooks evenly.
Keep It Crispy Without Frying
For a healthier version, bake the nuggets on a parchment‑lined sheet at 400°F (200°C) for 15 minutes, flipping halfway. The result is still crisp, though slightly less golden. If you prefer a crunchier finish, finish them in a hot skillet for a minute. This hybrid method gives you the best of both worlds.
Creative Twists and Variations
Spicy Sriracha Crunch
Add a tablespoon of sriracha to the breadcrumb mixture for a fiery kick. The heat pairs beautifully with the sweet sauce, creating a balanced flavor profile. Kids who love spicy will adore this version. Pair with a cool yogurt dip to mellow the heat.
Herbed Parmesan Delight
Mix dried oregano and thyme into the flour before coating. The herbs infuse the coating with a Mediterranean vibe. Serve with a lemon‑yogurt sauce for a fresh twist. This variation is perfect for a summer barbecue.
Cheesy Gouda Melt
Replace parmesan with shredded gouda for a richer, meltier coating. Gouda adds a buttery depth that complements the chicken’s natural flavor. This version is great for a cozy night in. Pair with a creamy tomato soup for a comforting combo.
Citrus‑Zest Explosion
Grate a lemon or orange zest into the breadcrumb mixture. The citrus adds a bright, aromatic note that lifts the entire dish. Serve with a honey‑mustard sauce for a sweet‑tart contrast. This variation is ideal for a brunch gathering.
Vegan Chickpea Nugget
Replace chicken with seasoned chickpeas for a plant‑based alternative. Use chickpea flour and a flaxseed‑egg binder to mimic the coating’s texture. The result is a crispy, protein‑rich snack that satisfies both vegans and non‑vegans alike. Pair with a tahini dip for extra flavor.
Asian‑Inspired Sesame
Add toasted sesame seeds to the breadcrumb mix and drizzle with a soy‑ginger glaze. The sesame gives a nutty crunch while the glaze adds a sweet umami burst. This version works wonders for an Asian‑themed dinner. Serve with steamed rice for a complete meal.
Storing and Bringing It Back to Life
Fridge Storage
Store leftover nuggets in an airtight container in the refrigerator for up to 3 days. Keep them on a paper towel to absorb excess moisture. When ready to eat, reheat in a toaster oven at 375°F (190°C) for 5 minutes until crisp. This method preserves the crunch without drying out the chicken.
Freezer Friendly
Freeze the nuggets in a single layer on a parchment‑lined tray before transferring them to a freezer bag. This prevents sticking and makes portioning easy. They’ll stay fresh for up to 3 months. When you’re ready, pop them straight from the freezer into a preheated oven at 400°F (200°C) for 12 minutes.
Best Reheating Method
The key to reheat nuggets without losing crunch is to use a hot skillet. Heat a tablespoon of oil over medium heat and add the nuggets; cook for 2 minutes on each side until golden. If you’re short on time, a quick microwave burst (30 seconds) followed by a skillet finish works well. Add a splash of water before microwaving to create steam and keep the interior moist.