What Makes This Version Stand Out
- Flavor: The combination of honey, vanilla, and lemon zest creates a layered taste that feels both sweet and bright. The yogurt's natural tang provides a counterbalance that keeps each bite from feeling cloying. This harmony makes the snack versatile for any time of day.
- Texture: Chia seeds add a subtle crunch that contrasts with the silky yogurt base. The careful temperature control ensures the mixture sets into a firm yet creamy tube. The result is a snack that feels indulgent but light.
- Ease: The recipe requires minimal equipment: a silicone mold, a saucepan, and a thermometer. No fancy gadgets are needed, so anyone can replicate it at home. The process is straightforward, with clear steps and no hidden tricks.
- Freshness: Using fresh berries or fruit puree adds natural sweetness and a burst of color. The fruit also contributes antioxidants and natural pectin that help the yogurt set. This keeps the snack both nutritious and visually appealing.
- Customization: You can swap vanilla for almond or coconut for a different flavor profile. Adding cocoa powder turns it into a chocolatey treat. This flexibility makes the recipe a playground for creativity.
- Health: The yogurt provides probiotics, while chia seeds add omega‑3 fatty acids and fiber. The recipe is low in refined sugar, especially if you use natural sweeteners. It’s a guilt‑free snack that still feels indulgent.
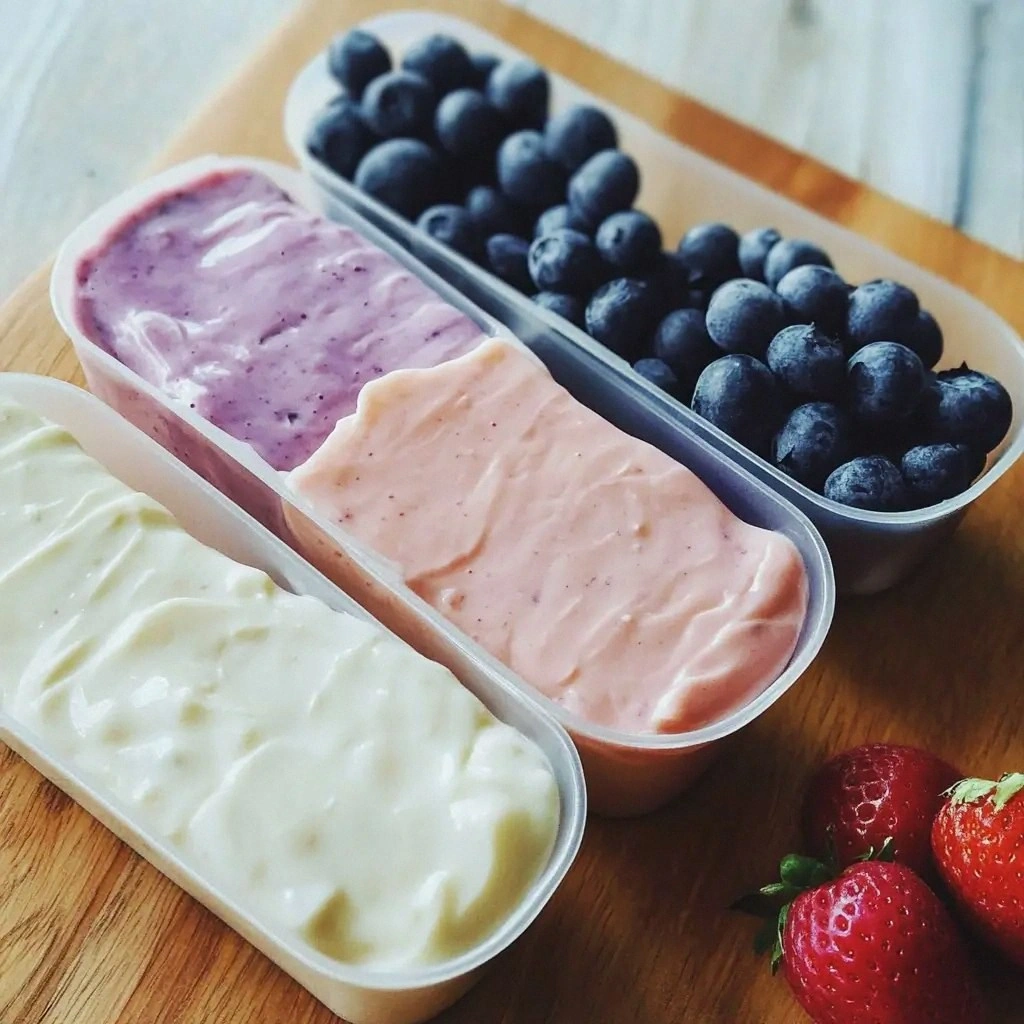
- Presentation: The translucent tubes look like miniature glass bottles, perfect for parties or brunches. The garnish of granola or nuts adds a contrasting texture and a pop of color. The visual appeal elevates the overall experience.
- Storage: The tubes keep well in the fridge for up to a week and freeze without losing texture. The recipe’s structure allows for batch cooking, saving time on busy days. This practicality makes it a go‑to snack for any schedule.
Inside the Ingredient List
The Flavor Base
4 cups of whole milk form the creamy foundation that gives the tubes their luxurious mouthfeel. 1 cup of plain Greek yogurt introduces the tang that balances the sweetness. 1 tsp of vanilla extract infuses a warm, aromatic undertone that elevates the overall flavor. 1/4 cup of honey provides natural sweetness while also contributing to the setting process through its sugar content. 1/4 tsp of sea salt enhances all the flavors and keeps the yogurt from becoming too sweet.
The Texture Crew
1 tbsp of chia seeds add a subtle crunch and help thicken the mixture as it cools. 1 tbsp of finely grated lemon zest brightens the flavor profile with a citrusy lift. 1 tbsp of coconut oil, brushed onto the silicone molds, prevents sticking and gives the tubes a glossy, almost glass‑like finish. Each of these elements works together to create a snack that feels indulgent yet light.
The Unexpected Star
2 cups of fresh mixed berries, such as strawberries, blueberries, and raspberries, add natural sweetness, color, and antioxidants. The berries also contain natural pectin that aids the setting process, ensuring a firm yet creamy texture. If you’re craving a tropical vibe, swap in diced mango or pineapple for a different flavor profile. The fruit’s juiciness keeps the tubes moist and enhances the overall experience.
The Final Flourish
1/2 cup of crunchy granola provides a delightful contrast in texture and a hint of toasted flavor. 1/4 cup of chopped nuts, like almonds or walnuts, adds a nutty crunch and healthy fats. Together, these toppings create a sensory layering that turns each bite into an adventure. They also make the tubes visually appealing, turning them into a showstopper for brunches or parties.
The Sweetener
1/4 cup of honey is the sweetener of choice for this recipe, offering a natural, floral sweetness that pairs perfectly with yogurt. If you prefer a maple flavor, simply replace honey with an equal amount of maple syrup. The sweetener not only adds flavor but also plays a role in the setting process by contributing sugars that help the mixture firm up. Adjust the amount to suit your taste preference, but remember that the balance is key.
The Garnish
Fresh mint leaves, finely chopped, add a refreshing aroma and a subtle herbal note. 1 tsp of lemon zest, used sparingly, gives a bright citrus finish that lifts the entire dish. These garnishes are optional but add a professional touch to the finished product. They also make the tubes feel fresh and vibrant, perfect for a summer brunch.
Everything's prepped? Good. Let's get into the real action...
The Method — Step by Step
- Gather all ingredients and ensure your silicone mold is clean and dry. Measure each component accurately to maintain the recipe’s balance. Set out a small bowl for whisking and a thermometer for precise temperature control. This preparation step guarantees a smooth process and reduces the risk of errors. Let’s dive into the first step.
- Place the milk in a heavy‑bottom saucepan and heat over medium heat, stirring occasionally to prevent scorching. Watch for the milk to reach a gentle simmer, not a full boil, to preserve its delicate flavor. The aroma of warm milk will fill your kitchen, signaling that you’re on the right track. Keep the heat steady to avoid overheating.
- Add vanilla extract, honey, and sea salt to the milk, stirring until the honey dissolves completely. This step infuses the mixture with sweetness and depth, while the salt balances the flavors. The mixture should bubble softly, indicating that the ingredients are blending well. Let it simmer for an additional minute to meld the flavors.
- Remove the saucepan from heat and let the mixture cool to 110°F (43°C). This precise temperature is crucial for preventing the yogurt from curdling. Use a thermometer to check the temperature accurately. If the mixture is too hot, let it cool for a few minutes; if it’s too cool, gently reheat it on low until it reaches the target. This careful step ensures a smooth, creamy base.
- Whisk in the Greek yogurt until the mixture is completely smooth and homogeneous. The yogurt should integrate seamlessly, creating a thick, custard‑like consistency. This is the moment of truth; any lumps will affect the final texture. Keep whisking until the mixture feels silky to the touch.
- Stir in the chia seeds, lemon zest, and coconut oil, making sure each component is evenly distributed. The chia seeds will begin to absorb liquid and expand, helping the mixture set. The coconut oil adds a subtle sheen and prevents sticking. This mixture should have a slightly thicker consistency, ready to be poured.
- Line each compartment of the silicone mold with a thin layer of coconut oil, then pour the mixture into the molds, filling each cavity about 3/4 full. The oil coating ensures easy release later on. Pour slowly to avoid creating air pockets. The mixture should be poured evenly across all compartments.
- Allow the tubes to sit at room temperature for 30 minutes, or until the edges begin to set but the center remains slightly soft. This resting period allows the chia seeds to expand fully, giving the tubes a firm yet creamy texture. The tubes should feel firm to the touch but still yield slightly under gentle pressure. This is a critical step for achieving the perfect consistency.
- Transfer the molds to the refrigerator and chill for at least 2 hours, or until the tubes are completely set. The cold temperature solidifies the mixture, locking in the flavors and textures. The tubes should feel solid and not liquidy when you press them gently. This chilling step is essential for a clean release later.
- Gently twist the silicone mold to release the tubes. Place each tube on a cutting board and drizzle with a thin layer of honey or maple syrup for extra sweetness. Sprinkle granola, nuts, and fresh mint on top for added texture and flavor. Arrange the tubes on a platter for a stunning presentation. This final touch elevates the snack to a showstopper.
- Serve immediately, or store in the refrigerator for up to a week. If you prefer a colder snack, keep the tubes chilled until you’re ready to eat. The tubes will keep their texture and flavor, making them perfect for meal prep or a quick breakfast. Enjoy the creamy, crunchy, and citrusy delight that will leave you craving more.
That's it — you did it. But hold on, I've got a few more tricks that'll take this to another level...
Insider Tricks for Flawless Results
The Temperature Rule Nobody Follows
Many people think any warm milk will do, but the exact 110°F temperature is critical for yogurt culture activity. If the mixture is too hot, the proteins coagulate too quickly, leading to a grainy texture. If it’s too cool, the yogurt won’t set properly, leaving a runny center. Use a digital thermometer and keep the heat low to maintain this sweet spot. This small detail makes the difference between a silky tube and a clumpy mess.
Why Your Nose Knows Best
As the yogurt mixture cools, a faint smell of tangy yogurt will emerge. This aroma signals that the culture is active and the setting process is underway. If the mixture smells flat or sour, the yogurt may have gone bad. Trust your nose to catch any off‑odors early. A good aroma means your tubes will taste fresh and vibrant.
The 5-Minute Rest That Changes Everything
After pouring the mixture into molds, let it rest for exactly five minutes before placing them in the fridge. This brief pause allows the surface to settle, preventing air bubbles from forming. Air pockets can lead to uneven textures or cracks in the final tubes. A quick five‑minute rest is a simple step that saves headaches later.
The Chia Seed Trick
Chia seeds act as a natural thickener, absorbing liquid and forming a gel. If you’re allergic or simply don’t like the texture, replace chia with ground flaxseed for a similar effect. The seeds also add omega‑3 fatty acids, boosting the snack’s nutritional profile. Ensure you stir the seeds in evenly to avoid clumping.
The Mold Prep Method
Brush each silicone compartment with coconut oil before pouring. This prevents sticking and gives the tubes a glossy finish. If you’re using a silicone mold that’s not food‑safe, skip this step or use a non‑stick spray instead. The oil coating is the secret to a clean release.
The Reheating Secret
If you need to warm the tubes, add a splash of milk or water to the bottom of the bowl before microwaving. This steams the tubes back to a creamy consistency without drying them out. Heat in short bursts of 20 seconds, stirring in between. This method preserves the texture and flavor.
Creative Twists and Variations
This recipe is a playground. Here are some of my favorite ways to switch things up:
Tropical Paradise
Swap the whole milk for coconut milk and add diced mango or pineapple for a tropical twist. The coconut milk gives a subtle coconut flavor that pairs beautifully with the fruit. The texture remains creamy, but the taste becomes exotic. Serve with a sprinkle of toasted coconut flakes for extra crunch.
Berry Blast
Use a combination of fresh berries and a spoonful of blueberry jam to intensify the fruit flavor. The jam adds a glossy sheen and a sweet burst. Keep the yogurt base the same for a familiar texture. This version is perfect for a berry‑loving crowd.
Chocolate Indulgence
Fold in 2 tbsp of unsweetened cocoa powder and swirl in dark chocolate chips for a decadent treat. The chocolate melts into the yogurt, creating a rich, velvety swirl. Add a pinch of sea salt to balance the sweetness. This is a chocolate lover’s dream.
Spiced Cinnamon
Stir in 1 tsp of ground cinnamon and a dash of nutmeg for a warm, spiced flavor. The spices pair wonderfully with the yogurt’s tang. Use a small amount of maple syrup to keep the sweetness balanced. This variation feels like a cozy fall snack.
Savory Herb
Replace honey with a drizzle of olive oil and add chopped rosemary and thyme for a savory version. The herbs infuse the yogurt with a Mediterranean vibe. Top with a sprinkle of sea salt and cracked pepper. This is a unique snack that works as an appetizer.
Sweet & Salty
Drizzle a salted caramel sauce over the tubes and sprinkle with crushed pretzels for a sweet‑salty combo. The caramel adds buttery sweetness, while the pretzels provide a crunchy, salty contrast. This version is perfect for a party or a fun family gathering.
Storing and Bringing It Back to Life
Fridge Storage
Keep the tubes in an airtight container in the refrigerator for up to one week. The airtight seal prevents the yogurt from absorbing odors from other foods. Store them upright to maintain their shape. The tubes will stay fresh and creamy.
Freezer Friendly
For longer storage, place the tubes in a freezer‑safe container and freeze for up to three months. Thaw in the refrigerator overnight before serving. The texture may soften slightly, but the flavor remains intact. This makes meal prep easy for busy weeks.
Best Reheating Method
To warm the tubes, add a splash of milk or water to a microwave‑safe bowl, cover, and heat in 20‑second intervals. Stir between bursts to ensure even heating. The addition of liquid helps the yogurt re‑soften without drying out. Serve immediately for a silky, creamy experience.