I still remember the night I tried to impress my sister with a fancy dessert, only to have the kitchen turn into a disaster zone. The oven was preheated, the timer set, but the pears I had sliced too thickly began to dry out before the pastry even touched the sheet. I was staring at a pile of over‑cooked fruit and a sheet of puff pastry that looked more like a paper cut than a flaky delight. I laughed, then sighed, and decided that this was the moment I needed to rewrite the rules of dessert. This recipe is the culmination of that night – a lesson that when you combine the right poaching liquid with the right pastry, you get something that feels like a hug in dessert form. I’m going to show you how to get pears that are tender yet firm, a syrup that sings with citrus and spice, and pastry that cracks like thin ice when you bite into it. The result? A dish that makes your guests question why they ever settled for ordinary desserts. I dare you to taste this and not go back for seconds. Let me walk you through every single step — by the end, you'll wonder how you ever made it any other way.
What Makes This Version Stand Out
- Flavor Depth: The poaching liquid is a symphony of citrus, vanilla, and St. Germain, creating a syrup that coats the pears like velvet. The subtle saffron adds an earthy note that lingers on the palate. This complexity turns a simple fruit dessert into a memorable experience.
- Texture Contrast: The pears remain juicy and slightly firm, while the puff pastry achieves a buttery, flaky edge that shatters like thin ice. The contrast between soft fruit and crisp pastry is a sensory delight that keeps diners engaged. It’s a textural dance you can’t find in most pear dishes.
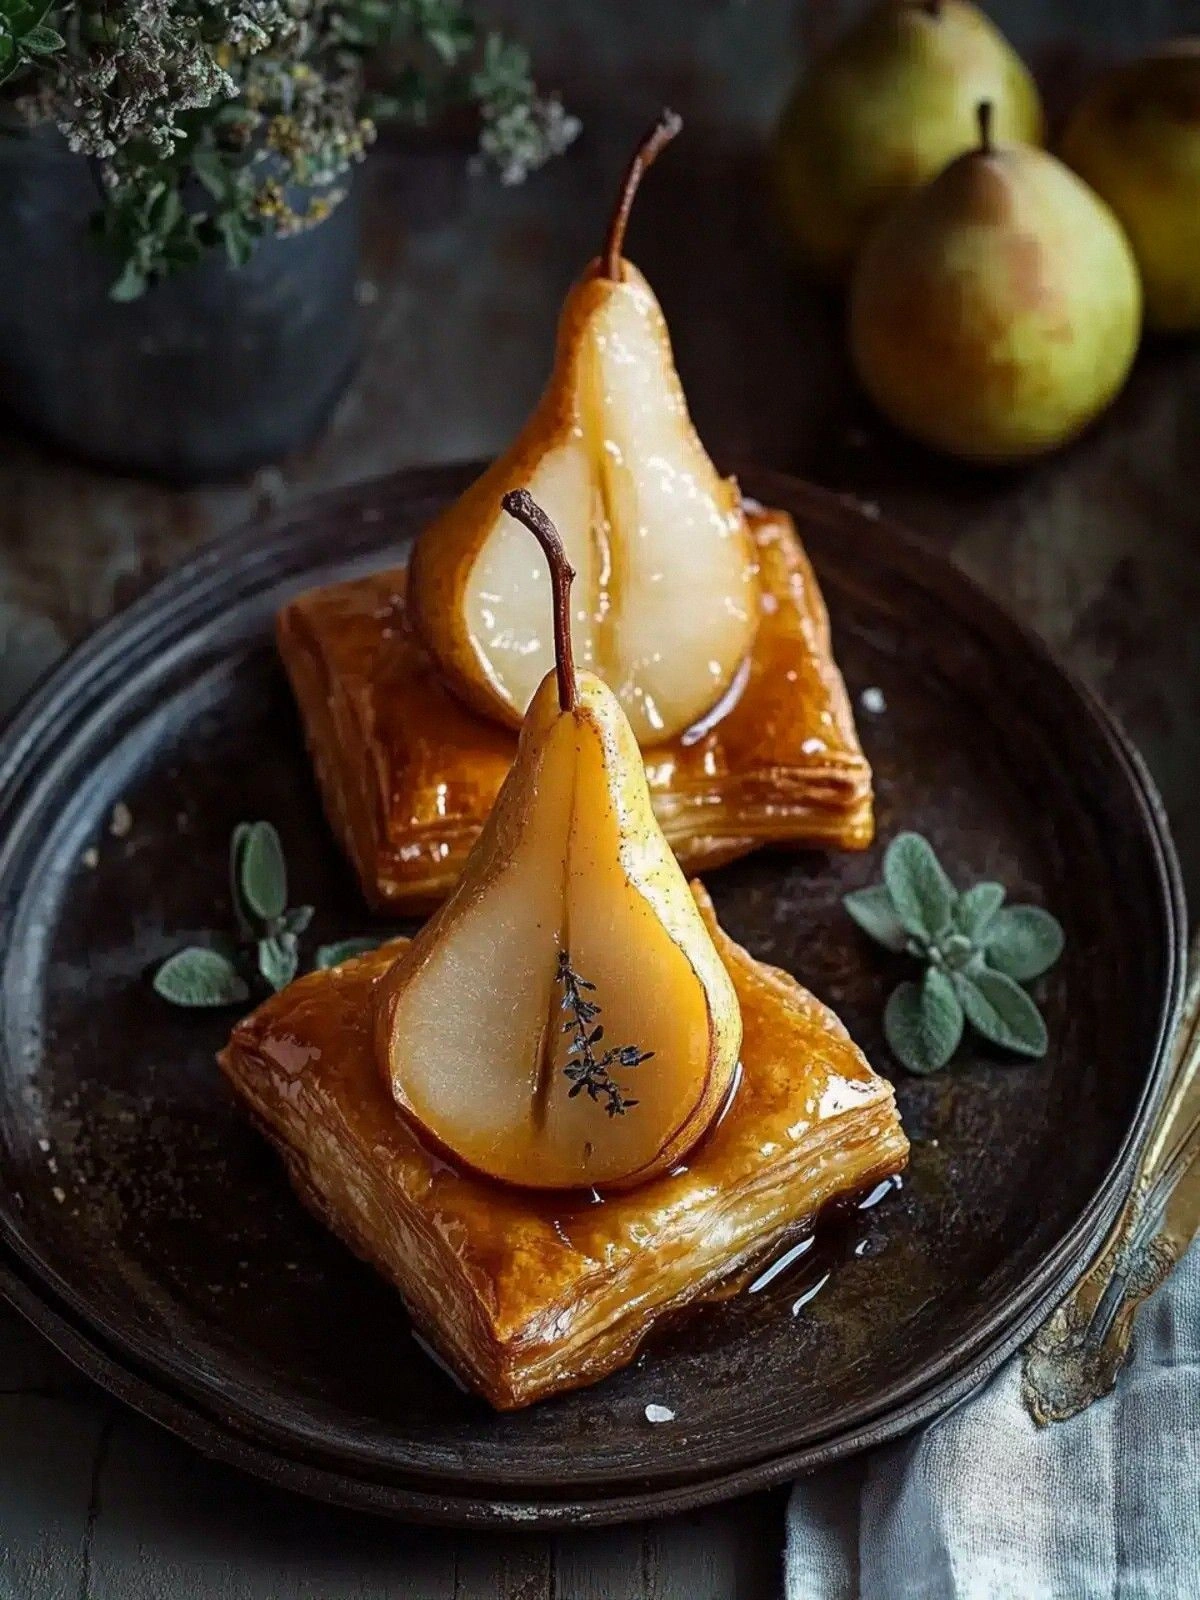
- Visual Appeal: The golden pastry, the translucent syrup, and the glossy pears together create a dessert that looks as good as it tastes. The color palette of amber, ivory, and pale green is both elegant and inviting. This makes it a perfect centerpiece for a romantic dinner or a sophisticated gathering.
- Simple Assembly: No complicated pastry work or advanced poaching techniques required. You only need a saucepan, a sheet of puff pastry, and a few pantry staples. This simplicity allows even novice cooks to achieve professional results.
- Make‑Ahead Friendly: The pears can be poached and refrigerated for up to two days, and the pastry can be assembled and frozen before baking. This flexibility makes it a great option for busy evenings or when you want to serve a dessert that feels fresh.
- Ingredient Quality: Using high‑quality Bosc pears and a generous splash of St. Germain elevates the dish from ordinary to extraordinary. Each component is chosen for its ability to shine individually and synergize as a whole. This attention to detail is what sets this recipe apart.
Alright, let's break down exactly what goes into this masterpiece...
Inside the Ingredient List
The Flavor Base
The poaching liquid is the heart of this dessert. Water provides the base, but sugar turns it into a syrup that caramelizes as it reduces. The citrus from a whole lemon adds brightness and balances the sweetness. St. Germain, that fragrant French liqueur, imparts a subtle botanical nuance that elevates the syrup beyond ordinary. Vanilla bean paste, not just extract, offers a deep, creamy undertone that complements the pears’ natural earthiness. If you’re short on St. Germain, a splash of elderflower cordial can mimic its floral character.
The Texture Crew
Puff pastry is the vehicle that carries the pears into a buttery, flaky experience. The sheet should be at room temperature to prevent premature puffing. A pinch of saffron, though tiny, introduces a golden hue and a whisper of spice that lingers. If you can’t find saffron, a pinch of turmeric will provide a similar color boost without the expense. The large egg and water for the wash give the pastry a glossy finish and a crisp edge. Skipping the egg wash will result in a dull surface that doesn’t pop when sliced.
The Unexpected Star
Cinnamon is the unexpected star that ties the sweet and savory elements together. It adds warmth that complements the citrus and the vanilla. If you prefer a spicier kick, replace cinnamon with a pinch of nutmeg or cardamom. The choice of Bosc pears is deliberate; their dense flesh holds up to poaching, and their sweet‑savory profile is a canvas for the syrup. When selecting pears, look for firm, unblemished skins and a slight give when pressed – that’s the sweet spot.
The Final Flourish
The final flourish is the assembly. Slice the pears into wedges, then arrange them on the puff pastry. Drizzle the syrup over the pears, allowing it to seep into the crevices. Fold the pastry over, sealing the edges with a fork for a decorative look. Bake until golden, then let it rest so the flavors meld. The result is a dish that feels both indulgent and refined.
Everything's prepped? Good. Let's get into the real action...
The Method — Step by Step
- Begin by bringing the water to a gentle simmer in a medium saucepan. Add the sugar, allowing it to dissolve completely; this creates the base for your syrup. Once the sugar has dissolved, squeeze the juice of the whole lemon into the pot, then add the whole lemon halves to infuse. This step is crucial for that bright, citrusy lift that will keep the pears from becoming sweetly dull.
- Add the St. Germain, vanilla bean paste, and cinnamon to the simmering liquid. Stir until the mixture thickens slightly, then reduce the heat to low. This is the moment where the aroma begins to dance around the kitchen – a hint of floral, a whisper of spice. Keep the mixture at a low simmer; you want a gentle reduction, not a rapid boil.
- Trim the stems from the Bosc pears and slice them into wedges. Carefully place the wedges into the simmering syrup, ensuring they’re fully submerged. Let them poach for about 12–15 minutes, or until the pears feel tender yet still hold their shape. This is where patience pays off; rushing the poaching step can leave the pears rubbery.
- While the pears finish poaching, preheat your oven to 400°F (200°C). Roll out the puff pastry on a lightly floured surface to a rectangle large enough to accommodate the pears. The pastry should be smooth and free of cracks for even baking.
- Drain the pears, reserving the syrup. Arrange the pear wedges on the pastry, spacing them evenly. Drizzle the reserved syrup over the pears, allowing it to soak into the pastry’s folds. The syrup will caramelize slightly in the oven, creating a glossy, flavorful glaze.
- Fold the pastry over the pears, sealing the edges by crimping with a fork. This not only holds everything together but also creates a decorative pattern that looks impressive on the plate. Brush the top with the egg wash to ensure a shiny finish.
- Place the pastry on a baking sheet lined with parchment paper and bake for 18–20 minutes, or until the pastry is golden and puffed. The aroma that fills your kitchen at this point is irresistible; it’s a promise of the sweet, citrusy, and buttery flavors to come.
- Remove the pastry from the oven and let it rest for 5 minutes. This brief rest allows the syrup to set slightly, preventing it from sliding off when sliced. Serve warm, garnished with a dusting of powdered sugar or a drizzle of extra St. Germain if you’re feeling indulgent.
That's it — you did it. But hold on, I've got a few more tricks that'll take this to another level...
Insider Tricks for Flawless Results
The Temperature Rule Nobody Follows
Many people bake at a low temperature, but the magic happens at 400°F. Baking too low will result in a soggy pastry that doesn’t puff properly. Conversely, baking too high can burn the top before the center cooks. By hitting that sweet spot, you get a pastry that’s crisp on the outside and tender inside, just like a well‑trained pastry chef would deliver.
Why Your Nose Knows Best
During the poaching phase, keep an eye on the smell. The aroma should shift from sweet to slightly caramelized. If it starts smelling overly sweet or burnt, lower the heat. Your nose is the best judge of when the syrup has reached the right thickness.
The 5‑Minute Rest That Changes Everything
Letting the pastry rest for exactly five minutes after baking allows the steam to redistribute, giving the pastry a perfect crispness. Skipping this step can leave the edges soggy. A quick 5‑minute rest is the difference between a good dessert and an unforgettable one.
Use a Sharp Knife for Clean Cuts
When slicing the pears, a sharp knife ensures clean edges that don’t tear the pastry. A dull blade can cause the pastry to tear or the pears to bruise, affecting both appearance and texture. A clean cut looks professional and keeps the pastry intact.
Reserve the Poaching Liquid
Never discard the poaching liquid. After the pears are done, let the liquid reduce further to create a sauce that can be drizzled over the finished pastry. This sauce adds depth and ensures every bite is saturated with flavor.
Creative Twists and Variations
This recipe is a playground. Here are some of my favorite ways to switch things up:
Maple‑Infused Pears
Swap the sugar in the poaching liquid with maple syrup for a richer, caramel‑like sweetness. The maple flavor pairs wonderfully with the subtle spice of cinnamon. This variation is perfect for fall gatherings where you want a touch of autumn.
Almond Crumble Topping
Sprinkle toasted almond slivers over the pastry before baking for a nutty crunch. The almonds add a subtle bitterness that balances the syrup’s sweetness. This version is great for those who love a bit of extra texture.
Citrus‑Zest Finish
Add a tablespoon of orange zest to the poaching liquid for a bright, citrusy kick. The zest infuses the pears with a lively aroma that lifts the entire dish. Serve with a splash of fresh orange juice for an extra zing.
Chocolate Drizzle
Finish the pastry with a drizzle of dark chocolate after it comes out of the oven. The chocolate’s bittersweet notes contrast beautifully with the sweet pears. This decadent twist turns the dessert into a showstopper for special occasions.
Herbal Infusion
Add a sprig of fresh rosemary to the poaching liquid for an herbal aroma. The rosemary’s piney flavor complements the pears and the pastry’s buttery richness. This variation is ideal for a spring dinner party.
Berry Compote Side
Serve the pears with a side of fresh berries mixed with a splash of balsamic vinegar. The acidity cuts through the sweetness and adds a vibrant color contrast. This side dish makes the dessert feel like a complete, balanced plate.
Storing and Bringing It Back to Life
Fridge Storage
Store leftover pastries in an airtight container at room temperature for up to 2 days. Avoid refrigerating the pastry directly, as it can become soggy. If you must refrigerate, wrap it loosely in parchment paper to preserve the crispness.
Freezer Friendly
Wrap the assembled pastry in plastic wrap, then place it in a freezer bag. It can stay frozen for up to 3 months. When ready to serve, thaw overnight in the refrigerator, then bake at 375°F (190°C) for 15 minutes to revive the crispness.
Best Reheating Method
Reheat the pastry in a preheated oven at 350°F (175°C) for 5–7 minutes. Add a tiny splash of water before reheating to create steam, which helps restore the pastry’s flakiness. This simple trick ensures the dessert tastes as good as the first time.