Picture this: I was in the middle of a dinner rush, juggling a pot of pasta, a simmering sauce, and a bag of frozen chicken breasts. I reached for the oven, only to discover it was on fire because I'd left the heat on too high. The kitchen smelled like scorched dreams, and the pan was a charred masterpiece. I stared at the disaster and thought, “If only I had a foolproof way to turn this mess into a triumph.” That’s when I decided to reinvent the classic garlic‑parmesan crust. I dare you to taste this and not go back for seconds.
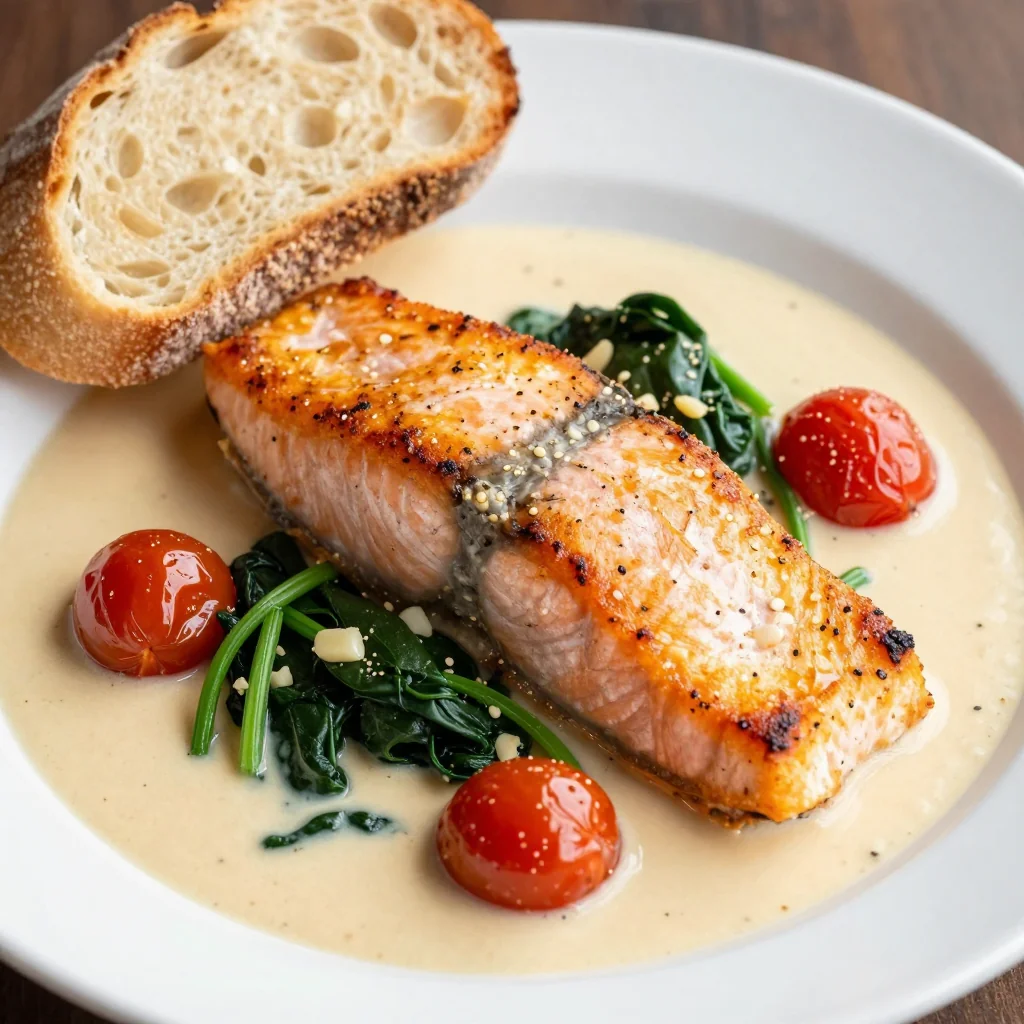
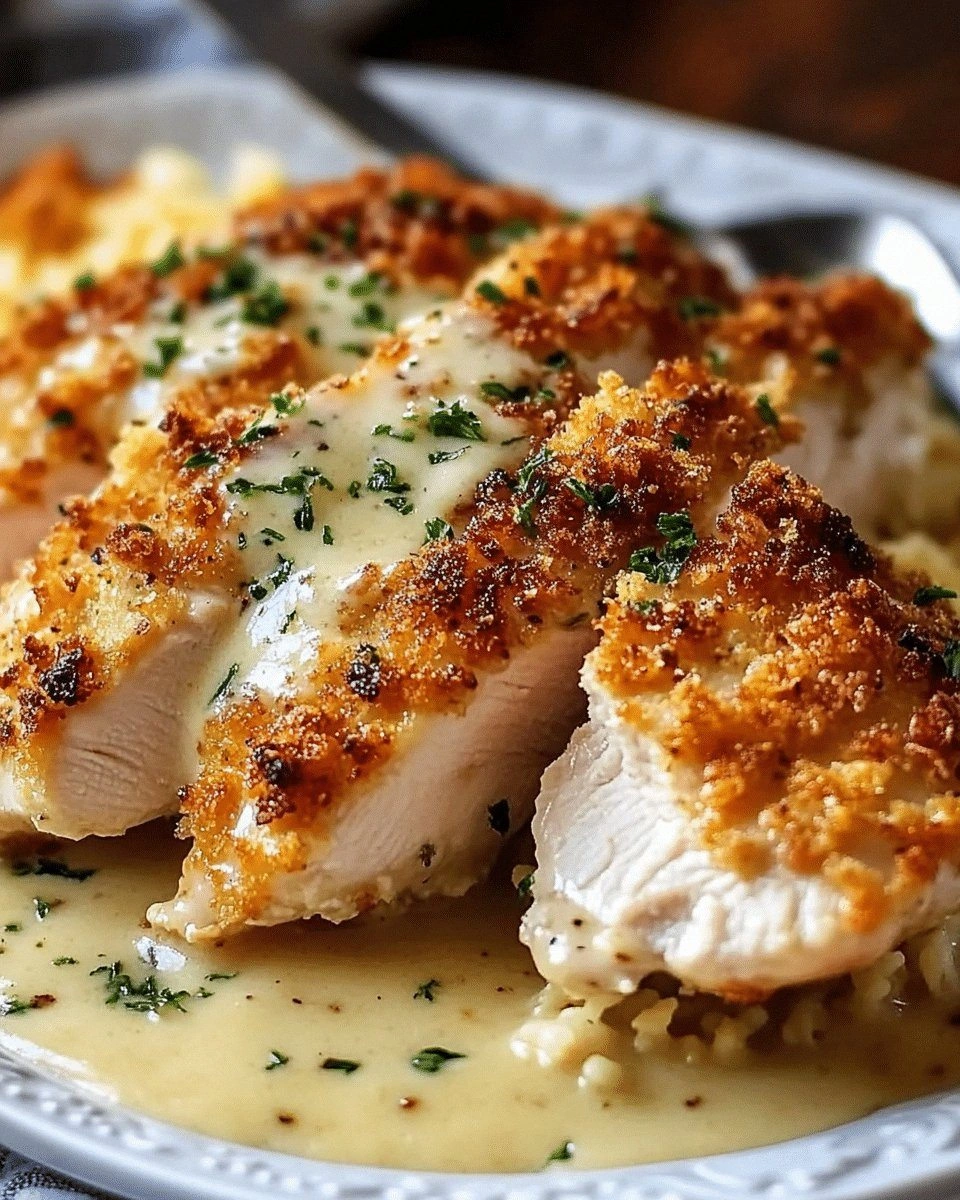
Now, imagine the first bite: the crust crackles like a winter sunrise, the garlic sings with a bright, aromatic zing, and the Parmesan melts into a silky, nutty glaze that coats the chicken like velvet. The inside is juicy, tender, and subtly seasoned, with a hint of basil and oregano that lifts the flavor profile to a whole new plane. The scent alone could make a room feel like a gourmet restaurant, while the texture delivers a satisfying crunch that shatters like thin ice. The moment the knife slices through the golden shell, a fragrant steam rises, teasing your senses before the first bite. It’s an experience that turns an ordinary dinner into an unforgettable feast.
This version stands out because it blends the crunch of panko with the richness of melted butter and mayonnaise, creating a coating that stays crisp even after the chicken rests. The secret lies in a two‑step coating process that locks in moisture and flavor, ensuring every bite is juicy yet crunchy. I added a splash of heavy cream to the sauce, giving it a luxurious, velvety finish that pairs perfectly with the savory crust. The use of dried herbs instead of fresh keeps the dish simple yet aromatic, making it ideal for week‑night cooking. Most recipes get this completely wrong by over‑browning or under‑seasoning; this one hits the sweet spot every time.
Let me walk you through every single step—by the end, you’ll wonder how you ever made it any other way. I dare you to taste this and not go back for seconds; the flavor will have you begging for more. If you’ve ever struggled with a greasy coating, you’re not alone—I've got the fix. Picture yourself pulling this out of the oven, the whole kitchen smelling incredible, and your guests applauding your culinary wizardry. And now, get ready for the game‑changer.
What Makes This Version Stand Out
- Crunch: The panko breadcrumb base gives a light, airy crunch that shatters like thin ice when you bite. It also creates a protective barrier that keeps the chicken juicy inside. The result is a satisfying snap that signals perfection.
- Flavor Depth: Combining garlic powder, dried basil, and oregano with a splash of heavy cream yields a savory, aromatic profile that lingers on the palate. The Parmesan adds a nutty richness that balances the herbs. This layered taste makes every bite a revelation.
- Simplicity: Only a handful of pantry staples are needed, and the process is straightforward enough for a beginner. No fancy sauces or equipment required. The recipe stays true to classic comfort food while elevating the experience.
- Make‑Ahead Friendly: You can assemble the coated chicken a few hours in advance and refrigerate; it will hold up well when reheated. The coating stays crisp, and the flavors deepen over time. This convenience is a game‑changer for busy weeknights.
- Crowd‑Pleaser: The golden crust and buttery interior make it a hit at family gatherings or dinner parties. Everyone loves a dish that looks impressive yet tastes comforting. The dish’s visual appeal draws people in before the first bite.
- Ingredient Quality: Using high‑quality Parmesan and fresh herbs elevates the dish from good to unforgettable. The butter adds a silky finish that only premium ingredients can provide. The result is a restaurant‑level flavor that’s entirely homemade.
- Versatility: Swap the chicken for pork chops or even tofu, and the coating still works beautifully. It’s a template for countless variations, allowing you to adapt the recipe to any dietary preference.
Inside the Ingredient List
The Flavor Base
The foundation of this dish is the chicken itself—4 boneless, skinless breasts that are the canvas for the crust. Olive oil, a modest 2 tablespoons, adds a subtle sheen and helps the coating adhere. Salt and black pepper, both to taste, provide the essential seasoning that brings the flavors together. Skipping these would leave the dish flat and unremarkable.
The Texture Crew
Mayonnaise, half a cup, acts as a binding agent that keeps the coating moist and flavorful. Grated Parmesan, also half a cup, infuses the crust with nutty depth. Panko breadcrumbs provide the signature crunch; their airy texture ensures a light, not heavy, bite. Melted butter, two tablespoons, adds richness and a golden finish. Together, these ingredients create a coating that is both indulgent and crisp.
The Unexpected Star
Three cloves of garlic—two minced early on and one later—add a punch of aroma that permeates the crust and sauce. Dried basil and oregano, each a teaspoon, contribute herbal brightness that lifts the dish. Heavy cream, half a cup, gives the sauce a silky, velvety texture that balances the crispness of the crust. These elements combine to create a harmonious flavor profile that is both comforting and sophisticated.
The Final Flourish
A quarter cup of grated Parmesan, added just before serving, provides an extra layer of cheesy richness. Two tablespoons of butter, melted at the end, create a glossy sheen that makes the dish look as good as it tastes. Together, these finishing touches elevate the dish to a gourmet experience while remaining accessible to home cooks.
Everything's prepped? Good. Let's get into the real action...
The Method — Step by Step
- Pat each chicken breast dry with paper towels. Season both sides with salt, black pepper, and 1 teaspoon of garlic powder. This step ensures the coating adheres evenly and the flavors penetrate the meat. The chicken should feel slightly tacky, not oily.
- In a shallow bowl, whisk together ½ cup mayonnaise, ½ cup grated Parmesan, and a pinch of salt. The mixture should be smooth and creamy, ready to coat the chicken. The mayo’s fat content helps the crust stay moist.
- In a separate bowl, combine ½ cup panko breadcrumbs, 2 tablespoons melted butter, 1 teaspoon dried basil, and 1 teaspoon dried oregano. Stir until the crumbs are evenly coated with butter and herbs. This creates a flavorful, crunchy base that will crisp beautifully.
- Dip each seasoned chicken breast first into the mayo mixture, ensuring a full coat, then into the panko mixture. Press gently to help the crumbs adhere. The double coating locks in moisture and creates a multi‑layered texture.
- Heat 2 tablespoons olive oil in a large skillet over medium‑high heat. Once shimmering, add the coated chicken. The pan should sizzle, creating a caramelized crust. Watch this part closely—too low heat and the coating will be soggy.
- Sear the chicken for 3–4 minutes per side until golden brown. Flip carefully; the crust should crackle and hold together. If the coating starts to burn, reduce the heat slightly. The goal is a uniform, golden exterior.
- Reduce the heat to medium, add 2 tablespoons butter, and let it melt into a glossy pool. Add 2 cloves minced garlic, ½ cup heavy cream, and a splash of the dried herbs. Simmer gently, stirring occasionally, until the sauce thickens and coats the back of a spoon.
- Check the internal temperature with a meat thermometer; it should read 165°F (74°C). The sauce should be thick enough to cling to the chicken without dripping. This step ensures the chicken is safely cooked and perfectly juicy.
- Remove the skillet from heat and let the chicken rest for 5 minutes. This allows the juices to redistribute, keeping the meat moist. The crust will stay crisp during this brief rest.
- Slice the chicken into medallions, drizzle with the remaining sauce, and serve immediately. The dish pairs wonderfully with roasted vegetables or a simple green salad. Enjoy the symphony of textures and flavors.
That's it — you did it. But hold on, I've got a few more tricks that'll take this to another level...
Insider Tricks for Flawless Results
The Temperature Rule Nobody Follows
Many cooks think searing at high heat is always best, but the secret to a crisp crust is a steady medium‑high flame. Too high, and the coating burns before the chicken cooks through. By keeping the heat moderate, you achieve a golden exterior while preserving interior moisture.
Why Your Nose Knows Best
Before flipping the chicken, listen to the aroma. A fragrant, nutty scent indicates the coating is ready to turn golden. If the smell is flat, give it a minute longer; the flavor will develop as the crust caramelizes.
The 5-Minute Rest That Changes Everything
Resting the chicken after cooking allows the juices to redistribute, preventing a dry bite. A five‑minute pause is enough to seal the flavor while maintaining a crispy exterior. Skipping this step can leave the meat gummy.
The Secret to Crispy Coating
Pat the chicken dry before coating; excess moisture hinders crisping. Use panko over regular breadcrumbs for a lighter crunch. If you prefer a thicker crust, double‑dip the chicken in the mayo and panko mixture.
The Creamy Finish Trick
Adding heavy cream to the sauce creates a velvety texture that balances the crunchy crust. Stir the sauce until it coats the back of a spoon, ensuring it’s thick enough to cling to the chicken. This step prevents the sauce from becoming watery.
The Herb Harmony
Dried basil and oregano work together to give the dish a Mediterranean feel. If you’re missing one, substitute with thyme or rosemary; the flavor profile will shift but remain delicious. Herbs should be added early to infuse the coating.
Creative Twists and Variations
This recipe is a playground. Here are some of my favorite ways to switch things up:
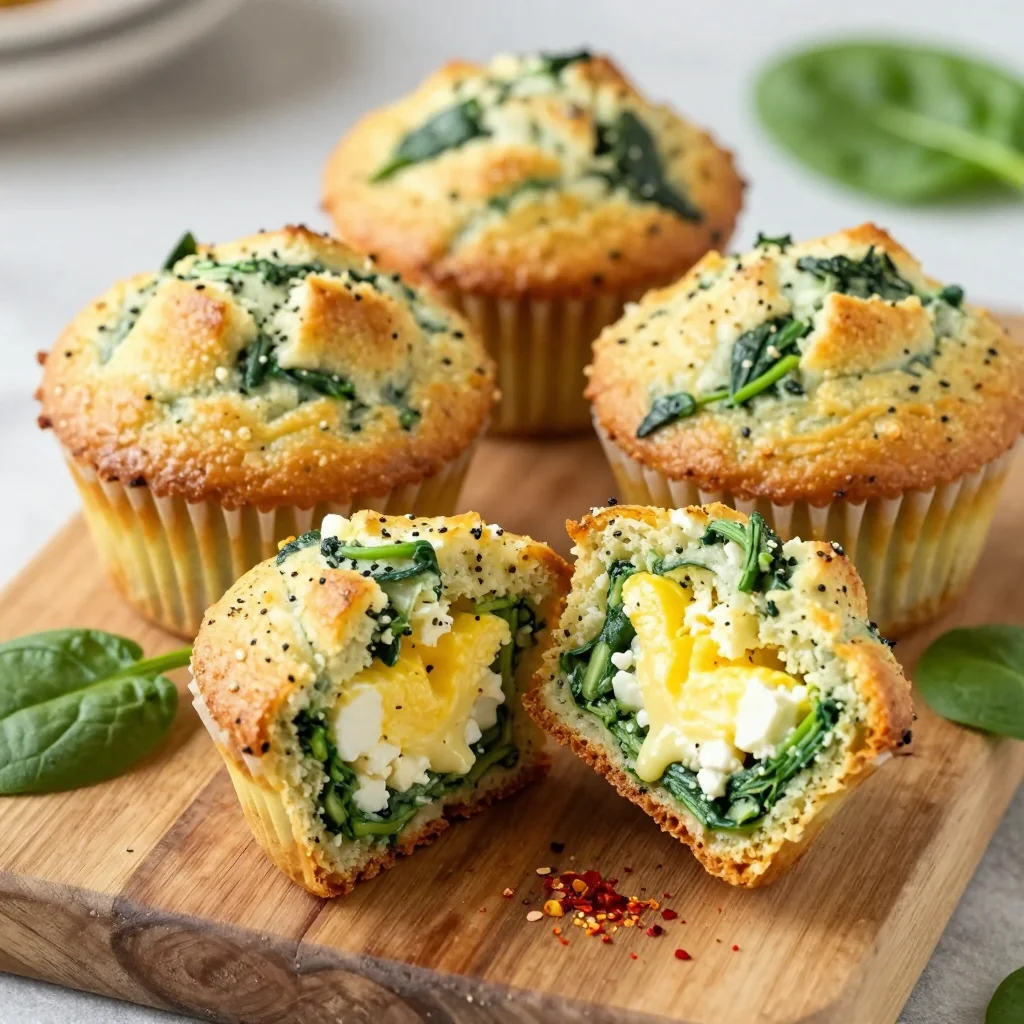
Cheesy Spinach Surprise
Fold sautéed spinach and a handful of feta into the mayo mixture before coating. The spinach adds earthiness while the feta introduces a tangy sharpness. This version is perfect for those who love a veggie boost.
Smoky Chipotle Twist
Replace dried oregano with chipotle powder and add a splash of smoky barbecue sauce to the cream. The result is a bold, smoky flavor that pairs beautifully with the crispy crust. Great for a late‑night craving.
Mediterranean Herb Medley
Swap basil and oregano for a mix of oregano, thyme, and dill. Add a squeeze of lemon juice to the sauce for brightness. This Mediterranean spin brings a fresh, herbaceous note.
Sweet Honey Glaze
Drizzle a thin layer of honey over the chicken after baking, then finish under the broiler for a caramelized finish. The honey adds a subtle sweetness that balances the savory crust. Ideal for a special occasion.
Crispy Onion Rings
Add sliced scallions to the panko mixture for an extra crunch. The onions caramelize during cooking, adding a sweet, savory layer. This variation is a crowd‑pleaser at game nights.
Veggie‑Loaded Version
Top the chicken with roasted bell peppers and zucchini before serving. The vegetables add color and a burst of flavor. This version is a wholesome, balanced meal.
Storing and Bringing It Back to Life
Fridge Storage
Store leftovers in an airtight container for up to 3 days. The crust may soften slightly, but the sauce will keep it moist. Keep the container in the coldest part of the fridge to preserve freshness.
Freezer Friendly
Freeze the cooked chicken in a single layer on a baking sheet before transferring to a freezer bag. It stays good for up to 2 months. Reheat in a preheated oven at 350°F until hot.
Best Reheating Method
Reheat in a skillet over medium heat, adding a splash of water or broth to steam the chicken gently. The water prevents the crust from becoming soggy while restoring moisture. Finish with a quick drizzle of the sauce for extra flavor.