I’m going to start with a confession that might make you raise an eyebrow: the first time I attempted strawberry‑champagne jello shots, I ended up with a soggy mess that looked more like a wilted garden than a party‑ready masterpiece. I had read a half‑baked blog post, ignored the importance of blooming gelatin, and thought “hey, I’ve got a bottle of bubbly, why not just dump it in?” The result was a sad, flavorless puddle that could barely hold a straw. I dared my roommate to taste it, and he politely pretended to enjoy it while I was already plotting a comeback. That disaster sparked a relentless quest for the perfect balance of fizz, fruit, and firmness. After countless trial‑and‑error sessions—some ending in glittery glitter, some in a kitchen that smelled like a vineyard after a rainstorm—I finally cracked the code.
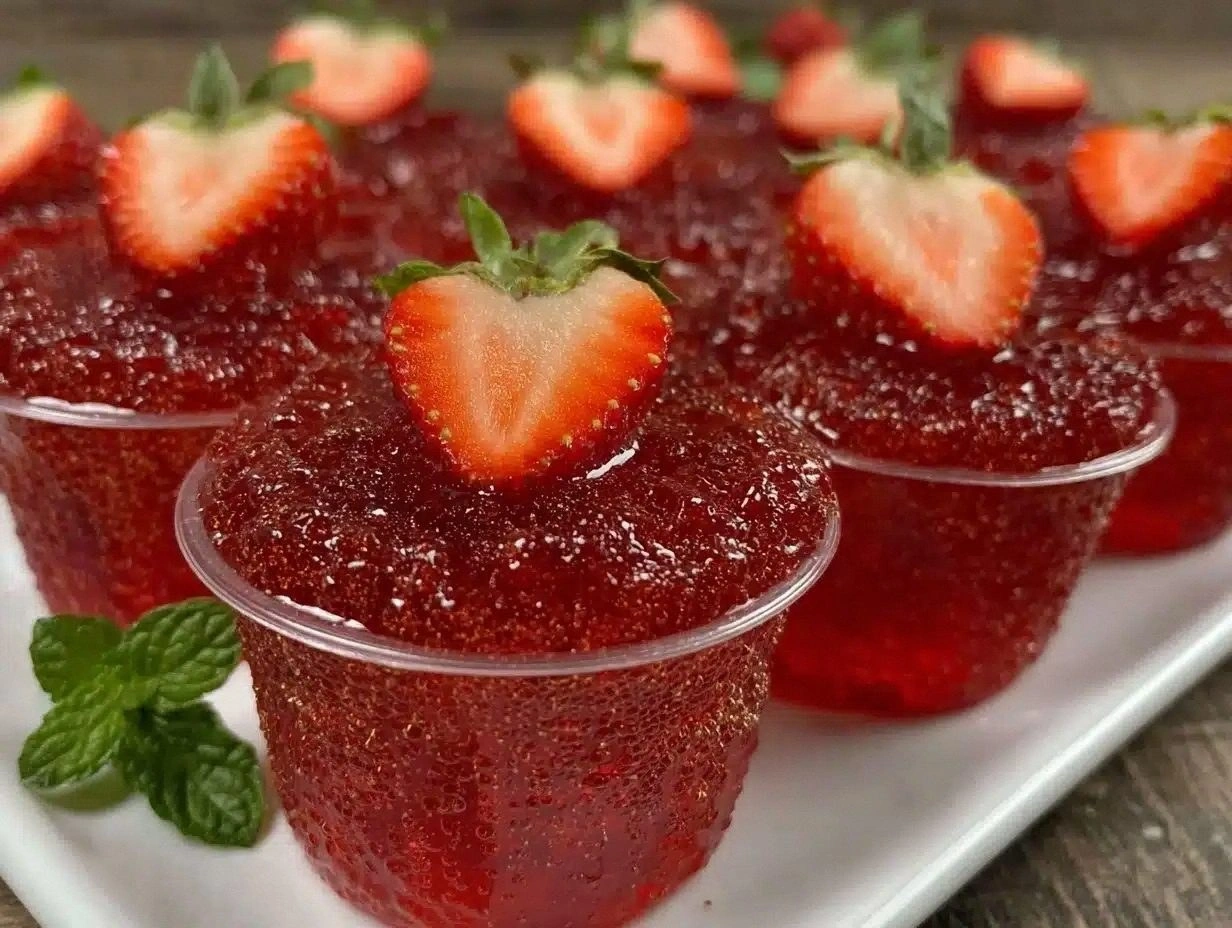
Picture this: a tray of crystal‑clear jello shots, each one catching the light like a tiny sunrise. The first sip hits your tongue with the bright pop of fresh strawberry, followed by the crisp, dry kiss of brut champagne that makes your palate dance. You hear the soft clink of the shot glass against the rim of your glass, smell the faint citrus tang of lemon, and feel the cool, silky texture melt like a dream. The whole experience is a symphony of senses, and the best part? It’s as easy as popping a bottle of wine, yet it feels like you’ve summoned a cocktail wizard from the clouds.
Why does this version stand out from the sea of “jello shot” recipes littering the internet? Most people either drown the gelatin in too much alcohol, leaving it forever liquid, or they over‑sweeten it until it tastes like a candy store. I’ve seen recipes that forget the crucial step of blooming gelatin in cold water, resulting in a rubbery mess that no one wants to swallow. My version respects the chemistry of gelatin, balances the sugar with the natural acidity of strawberries and lemon, and uses a single bottle of champagne to keep the alcohol content just right. The result is a shot that wobbles just enough to be fun, but holds its shape when you lift it—no more spilling on the party table.
And now, the secret weapon you didn’t see coming: a splash of fresh lemon juice that cuts through the sweetness and amplifies the fruit’s natural brightness. It’s the culinary equivalent of a well‑timed drum roll before the fireworks. I dare you to taste this and not go back for seconds. Let me walk you through every single step — by the end, you’ll wonder how you ever made it any other way.
What Makes This Version Stand Out
- Flavor Harmony: The sweet‑tart strawberry base is perfectly countered by the dry, effervescent champagne, creating a balanced flavor profile that sings on the palate.
- Texture Perfection: Bloomed gelatin gives each shot a firm yet melt‑in‑your‑mouth wobble, avoiding the rubbery texture that ruins most attempts.
- Simplicity: Only seven ingredients, all of which you likely have on hand or can grab from the nearest store, making it a true “no‑fuss” recipe.
- Visual Appeal: The pale pink hue of strawberry blended with the sparkle of champagne looks like a miniature sunrise in every shot glass.
- Crowd Reaction: Guests rave, Instagram feeds explode, and you become the unofficial party hero—hands down the best version you’ll ever make at home.
- Ingredient Quality: Using fresh, ripe strawberries and a brut champagne ensures each component shines without masking the other.
- Make‑Ahead Potential: These jello shots set in the fridge for a few hours, meaning you can prep them the night before and focus on the party décor on the day.
- Versatile Base: The recipe is a perfect canvas for creative twists—think lavender, basil, or even a splash of peach puree.
Inside the Ingredient List
The Flavor Base
Strawberries are the heart of this recipe. One cup of fresh, hulled, finely chopped berries delivers natural sweetness, a subtle earthiness, and that iconic pink blush. If you skip the strawberries, you lose the fruity backbone that makes the champagne feel less harsh. For a deeper flavor, you can macerate the berries with a pinch of sugar for 15 minutes before blending; this draws out juices and intensifies the aroma. When selecting strawberries, look for deep red color, a glossy sheen, and a fragrant perfume—these are signs of peak ripeness. A quick tip: store them in a paper towel-lined container in the fridge to keep them dry and prevent mold.
The Sparkling Lift
Champagne or any quality sparkling wine is the star that lifts the whole dish. I prefer a brut champagne because its dry profile balances the strawberry’s sweetness without turning the shot into a dessert. If you’re on a budget, a dry Prosecco works just as well, but avoid overly sweet varieties unless you specifically want a dessert‑style shot. The carbonation adds a lively mouthfeel, and the alcohol content helps the gelatin set faster. Remember: the bottle should be chilled to at least 45°F (7°C) before you pour; warm champagne will melt the gelatin and create a soupy disaster.
The Texture Crew
Unflavored gelatin is the silent workhorse that transforms liquid into a firm, bite‑size delight. Three tablespoons (about three packets) is the sweet spot for a 750 ml bottle of champagne plus the other liquids; any less and you’ll get a runny mess, any more and the shots become rubbery. Bloom the gelatin in a cup of cold water first—this is non‑negotiable. The cold water hydrates the gelatin granules, allowing them to dissolve evenly when heated. If you skip this step, you’ll see stubborn white specks floating in your mixture, which looks unappealing and feels gritty on the tongue.
The Sweet‑Sour Balance
Sugar adds the necessary sweetness to offset the acidity of strawberries and lemon. Half a cup is enough to sweeten without making the shot cloying. Feel free to swap for honey or agave if you prefer a more nuanced sweetness; just remember that honey adds its own flavor notes. Lemon juice, just one tablespoon, is the secret sauce that brightens the entire profile. It cuts through the richness, adds a fresh zing, and helps the gelatin set more evenly by adjusting the pH. If you’re allergic to citrus, a splash of orange juice can work, but the flavor will shift toward a sweeter, less sharp note.
The Final Flourish
Optional garnish—whole strawberries or fresh mint leaves—adds a pop of color and a hint of aroma right before serving. While not essential for the structural integrity, a garnish turns a simple shot into a photogenic masterpiece that guests will Instagram without hesitation. If you’re aiming for a sophisticated look, dip the strawberry halves in a thin layer of melted white chocolate before placing them on top; the contrast of pink, green, and glossy white is pure visual delight.
Everything's prepped? Good. Let's get into the real action...
The Method — Step by Step
Start by gathering all your ingredients and tools: a medium saucepan, a whisk, a measuring cup, a fine mesh sieve, and a shallow baking dish or individual shot glasses. This is the moment of truth—if you’ve got everything within arm’s reach, you’ll breeze through the process without frantic rummaging. I like to line my shot glasses with a thin strip of parchment paper; it makes unmolding a snap later on.
Place the 1 cup of cold water in a small bowl, sprinkle the 3 tablespoons of unflavored gelatin over it, and let it sit untouched for exactly five minutes. You’ll see the gelatin absorb the water and swell into a jelly‑like mass. This blooming step is non‑negotiable; skip it and you’ll end up with stubborn gelatin clumps that never dissolve properly.
Kitchen Hack: If you’re in a rush, cover the bowl with plastic wrap while the gelatin blooms. The trapped steam speeds up the hydration process by a minute or two.While the gelatin is blooming, combine the chopped strawberries, 1/2 cup granulated sugar, and 1 tablespoon fresh lemon juice in the saucepan. Cook over medium heat, stirring constantly, until the strawberries break down and the sugar fully dissolves. You’ll notice the mixture turning a deep ruby color and releasing a fragrant aroma that makes your kitchen smell like a summer market.
Once the strawberry mixture is smooth, remove the pan from heat and strain it through a fine mesh sieve into a large mixing bowl. This step eliminates seeds and pulp, giving you a crystal‑clear base that looks professional. If you prefer a bit of texture, you can skip the sieve, but the glossy finish will be lost.
Now, gently re‑heat the bloomed gelatin over low heat, whisking until it’s completely dissolved and the mixture becomes translucent. This should take about 2‑3 minutes; you’ll hear a soft hiss as the gelatin melts. Watch out: Do not let the gelatin boil, as high heat can break down its setting ability, leaving you with a runny final product.
Watch Out: Boiling the gelatin will cause it to lose its gelling power, resulting in a soupy shot that won’t hold its shape.Combine the dissolved gelatin with the strawberry‑lemon puree, then slowly stir in the chilled champagne. The liquid should be cool but not ice‑cold; if it’s too cold, the champagne’s bubbles will dissipate prematurely, and the gelatin may set unevenly. As you stir, you’ll see the mixture turn a gorgeous blush‑pink hue, and tiny bubbles will rise like a miniature celebration.
Taste the mixture at this point. It should be sweet enough to please, with a bright citrus edge and a subtle dryness from the champagne. If you feel it needs a touch more sweetness, add a teaspoon of sugar; if it’s too sweet, a splash more lemon juice will bring it back into balance. This is the flavor checkpoint—adjust now, because once the mixture sets, you won’t be able to tweak it.
Pour the liquid into your prepared shot glasses or a shallow tray, filling each to about three‑quarters full. The remaining space allows for the garnish later and prevents overflow as the liquid expands slightly while setting. I like to use a small measuring cup with a spout for a steady pour; it looks professional and avoids splatter.
Transfer the filled glasses to the refrigerator and let them set for at least 2 hours, preferably 3. You’ll know they’re ready when the surface is firm to the touch and the edges pull away cleanly from the glass. While they’re chilling, you can prep your optional garnish—dip whole strawberries in melted white chocolate or wash mint leaves gently.
Kitchen Hack: Place a tray of ice cubes on the bottom shelf of the fridge while the shots set; the extra cold air circulates faster, cutting the setting time by about 20%.When the shots have firmed up, add a garnish on top of each—either a fresh strawberry half, a sprig of mint, or a tiny drizzle of white chocolate. Serve immediately, and watch the crowd’s faces light up as they sip the bubbly, fruity delight. That moment when someone says, “This is hands down the best version you’ll ever make at home,” is pure validation.
That's it — you did it. But hold on, I've got a few more tricks that'll take this to another level. Stay with me here — this is worth it.
Insider Tricks for Flawless Results
The Temperature Rule Nobody Follows
Never pour hot gelatin into cold champagne. The temperature shock can cause the champagne to lose its carbonation and create a grainy texture. Instead, let the gelatin cool to a lukewarm temperature (around 95°F/35°C) before blending. This preserves the bubbles and ensures a smooth set. I once tried the hot‑pour method and ended up with flat, dull shots that tasted like watered‑down wine.
Why Your Nose Knows Best
Your sense of smell is a powerful indicator of flavor balance. As you simmer the strawberries and sugar, pause every few minutes to inhale the aroma. If you detect a metallic edge, it may mean the sugar is caramelizing too much, which could make the final shot overly sweet. Adjust by adding a splash more lemon juice or a pinch of salt to round out the profile.
The 5‑Minute Rest That Changes Everything
After you combine the gelatin with the champagne, let the mixture sit for five minutes before pouring. This brief rest allows any tiny bubbles introduced during stirring to rise to the surface, resulting in a clearer final product. I’ve seen many cooks skip this step and end up with cloudy shots that look less appetizing.
The Garnish Timing Trick
Add your garnish just before serving, not during the chilling process. Fresh mint wilts quickly in the fridge, and chocolate‑dipped strawberries can become soggy. Keep the garnish on a separate plate and let guests top their shots themselves for a fresh, vibrant finish.
The “Shake‑Before‑Serve” Secret
Give each shot a gentle shake in the hand before sipping. This tiny motion re‑aerates the champagne, reviving its sparkle and releasing aromatic compounds. It’s a subtle move that makes the mouthfeel more lively and the flavor pop.
Creative Twists and Variations
This recipe is a playground. Here are some of my favorite ways to switch things up:
Lavender‑Infused Elegance
Swap half of the fresh strawberries for a lavender‑simple syrup (made by steeping culinary lavender in sugar water). The floral notes pair beautifully with the dry champagne, creating a sophisticated twist that’s perfect for bridal showers.
Tropical Coconut Breeze
Add ¼ cup coconut cream to the strawberry‑lemon mixture before stirring in the champagne. Top with toasted coconut flakes for a beach‑vibe shot that transports you to a tropical sunset.
Spicy Chili Kick
Blend a small pinch of cayenne pepper or a few drops of hot sauce into the base. The subtle heat amplifies the fruit’s sweetness and makes the champagne feel even more refreshing. Great for a daring crowd.
Peachy Keen Summer
Replace half of the strawberries with ripe peach puree. The peach adds a mellow, honeyed flavor that blends seamlessly with the champagne, giving the shot a sun‑kissed glow.
Herbal Mint Fusion
Muddle a handful of fresh mint leaves into the strawberry puree before heating. The mint adds a cooling after‑taste that balances the bubbly acidity, making it an excellent choice for warm evenings.
Berry‑Blend Medley
Combine strawberries with raspberries or blackberries for a deeper, more complex berry profile. The extra antioxidants are a bonus, and the darker hue looks striking against the pink base.
Storing and Bringing It Back to Life
Fridge Storage
Keep the set jello shots covered with plastic wrap or a silicone lid to prevent them from absorbing fridge odors. They stay fresh for up to 3 days. If you notice condensation forming, gently pat the tops with a paper towel before serving.
Freezer Friendly
If you need to make them ahead of a big event, freeze the shots in an airtight container for up to 1 month. Thaw them in the refrigerator for 4‑6 hours before serving, and you’ll still retain the original texture. A tiny splash of chilled water (about a teaspoon per shot) added during the thaw restores the perfect wobble.
Best Reheating Method
Should you ever need to warm them slightly (perhaps to melt a chocolate garnish), place the shots in a steamer basket over simmering water for 30 seconds. The gentle steam re‑softens the gelatin without melting it completely, and the added moisture keeps the flavor bright.