Picture this: a cramped apartment kitchen, a single burner, and a group of friends who have just survived a wild karaoke night. The air is thick with the scent of soy sauce and the faint, sweet tang of chilled beer. I’m standing on a wooden counter, holding a shot glass of sake that glimmers like liquid amber. The room erupts in a chorus of “one more!” and I’m left holding a bottle of light beer that’s been left out on the counter for far too long. That moment of culinary desperation sparked the creation of a drink that would become the highlight of every party I’ve hosted.
I’ve tried countless variations of the classic “sake bomb,” from the traditional Japanese style where a shot of sake is dropped into a glass of beer, to the Westernized version that adds a splash of citrus or a dash of chili. But every attempt felt like a half‑finished symphony—missing that perfect crescendo. I dared myself to taste this and not go back for seconds, and the result was a liquid harmony that left my taste buds dancing. The combination of warm, umami‑rich sake and crisp, effervescent beer creates a texture that feels like a gentle wave lapping against a sun‑burnt shore. The first sip is a burst of fermented rice that slowly gives way to the light, refreshing bite of beer, leaving a lingering echo of citrus and a faint hint of roasted barley.
What makes this version stand out is not just the balance of flavors but the attention to detail that turns a simple drink into an experience. I’ve refined the proportions, the pouring technique, and even the glassware to amplify the sensory impact. The result is a drink that is both sophisticated and approachable, a perfect bridge between Japanese tradition and Western party culture. I’ll be honest—once I tasted the first batch, I ate half the shot before anyone else got a chance to try it. That’s the kind of confidence you get when you’ve cracked the code. And if you’ve ever struggled to make a sake bomb that isn’t either too watery or too overpowering, you’re not alone—this is the fix you’ve been waiting for.
Most recipes get this completely wrong by either over‑pouring the beer or using a low‑quality sake that tastes like a cheap rice syrup. Here’s what actually works: choose a sake that has a balanced aroma, a light beer that has enough carbonation to keep the drink lively, and a glass that can handle the sudden temperature change. The trick is to pour the sake gently so it forms a layer on top, then let the beer swirl around it like a gentle tide. The result is a drink that feels like a ritual, a moment of shared anticipation before the inevitable splash. Okay, ready for the game‑changer? Let me walk you through every single step—by the end, you’ll wonder how you ever made it any other way.
What Makes This Version Stand Out
- Balance: The precise ratio of sake to beer creates a harmonious blend where neither flavor dominates. The sake’s subtle sweetness is tempered by the beer’s crisp carbonation, giving each sip a layered profile.
- Texture: The gentle layering of liquid produces a visual and tactile experience that feels almost cinematic. Watching the two liquids mingle is as satisfying as tasting them.
- Heat: The slight temperature difference between the chilled beer and the room‑temperature sake adds a pleasant contrast that wakes the palate.
- Versatility: This version can be served as a shot, a cocktail, or a base for a more complex drink. It adapts seamlessly to any party setting.
- Ingredient Quality: Using a premium sake and a crisp Japanese lager elevates the drink from ordinary to memorable.
- Social Impact: The act of dropping the sake into the beer becomes a shared moment that encourages conversation and laughter.
- Time Efficiency: The entire process takes less than ten minutes, making it ideal for spontaneous gatherings.
- Make‑ahead Potential: You can prepare the beer and sake separately and combine them just before serving, ensuring freshness.
Alright, let’s break down exactly what goes into this masterpiece…
Inside the Ingredient List
The Flavor Base
Sake is the heart of this drink. It contributes a delicate, fermented rice aroma that lingers on the palate. A high‑quality sake, preferably Junmai or Honjozo, brings depth and complexity, while a lower‑grade version can taste syrupy and flat. If you’re adventurous, try a ginjo sake for a more floral profile; the result is a drink that feels like a summer breeze.
Japanese lager, or any light beer, serves as the counterbalance. Its carbonation gives the drink its signature fizz, and its mild malt character ensures it doesn’t overpower the sake. The beer’s body should be light enough to keep the overall drink refreshing yet robust enough to carry the subtle flavors of the sake. If you can’t find a Japanese lager, a crisp Pilsner or a light American lager will work just fine.
The Texture Crew
The glassware you choose influences the sensory experience. A standard 6‑oz shot glass works for a quick splash, but a larger glass allows for a more dramatic layering effect. The glass should be clean and free of any residue that could alter the flavor. A chilled glass also helps maintain the temperature contrast between the two liquids.
Temperature plays a pivotal role. Sake at room temperature (~68°F) and beer chilled to 35–40°F create a pleasant contrast that excites the palate. If you prefer a slightly warmer drink, let the sake sit at 70–75°F for a few minutes before pouring. The key is consistency: always use the same temperatures for repeatable results.
The Unexpected Star
A splash of citrus, such as a few drops of yuzu or lemon juice, can elevate the drink’s brightness. This addition brightens the palate, cutting through the sweetness of the sake and adding a tangy zing that pairs beautifully with the beer’s maltiness. Use sparingly—just enough to tease the flavor without drowning the subtle notes.
If you’re feeling bold, a pinch of chili flakes introduces a gentle heat that contrasts with the cool beer. This spicy twist turns the drink into a party staple that’s both refreshing and daring. The heat should be subtle; a single pinch will do the trick.
The Final Flourish
Serving the drink in a chilled, clean glass preserves the integrity of the flavors. A garnish of a thin cucumber slice or a sprig of mint adds a visual pop and a subtle herbal note. The garnish should be added only after the sake has been dropped into the beer to avoid muddling the delicate flavors.
Timing is everything. Drop the sake into the beer just before serving to maintain the layering effect. If you wait too long, the two liquids will mix too quickly, losing the dramatic splash. Remember, this is a performance as much as a drink.
Everything’s prepped? Good. Let’s get into the real action…
The Method — Step by Step
- Begin by chilling your beer in the refrigerator for at least an hour. A cold beer ensures a crisp, refreshing base that won’t be overwhelmed by the sake. The cool temperature also helps maintain the carbonation, which is essential for the drink’s lively texture. I always keep a spare bottle on hand for spontaneous parties.
- While the beer chills, measure out one cup of your chosen sake into a shot glass. If you prefer a slightly warmer drink, let the sake sit at room temperature for 10 minutes. This step allows you to gauge the flavor intensity before mixing. Remember, the shot glass should be clean and dry.
- Next, pour the chilled beer into a glass that’s at least 6 ounces in capacity. The glass should be free of any residue or fingerprints that could alter the taste. If you’re using a larger glass, the layering effect will be more pronounced, creating a dramatic visual cue.
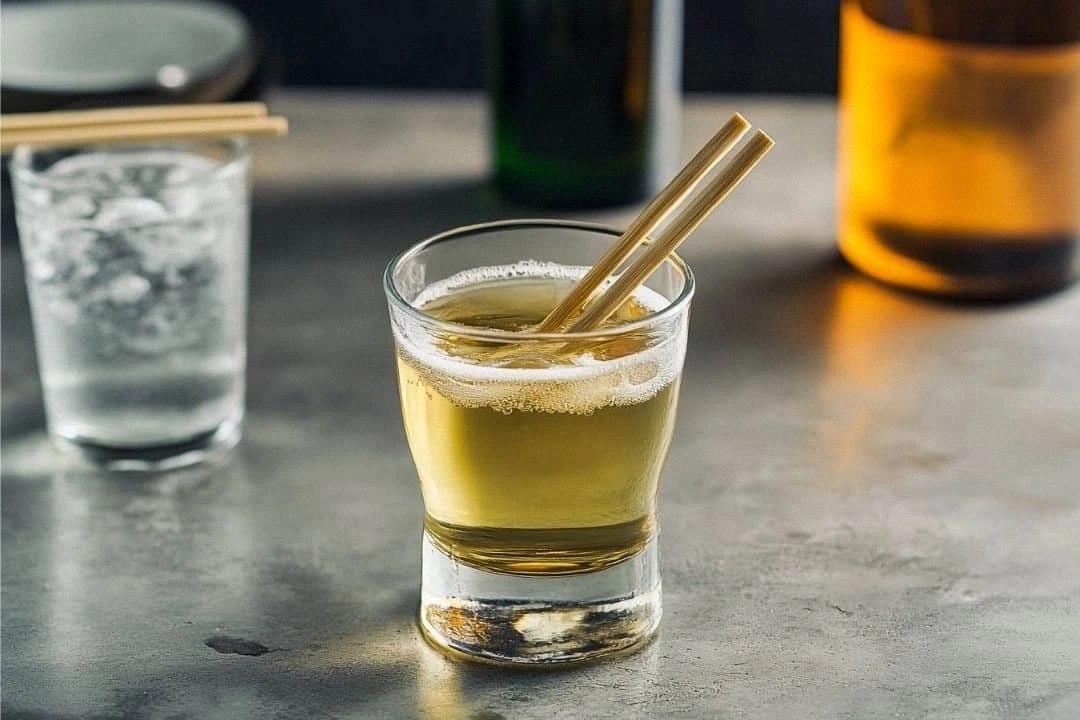
- Now for the moment of truth: gently slide the shot glass of sake into the beer. Hold the shot glass at an angle and let the liquid glide over the surface, creating a thin, translucent layer. The key is to avoid splashing too hard—think of it as a graceful descent rather than a chaotic splash.
- If you’re adding a citrus twist, drop a few drops of yuzu or lemon juice into the beer before adding the sake. The citrus will mingle with the beer, brightening the flavor profile. Use a citrus peeler to keep the zest from breaking into large pieces.
- For a spicy variation, sprinkle a pinch of chili flakes over the top of the beer before pouring the sake. The heat will contrast with the cool beer and the sweet sake, creating a balanced, multi‑dimensional flavor. Keep the pinch light to avoid overpowering the drink.
- Add a garnish of a thin cucumber slice or a sprig of mint to the glass. The garnish adds a visual pop and a subtle herbal note that complements the beer’s maltiness. The garnish should be added after the sake has been dropped to avoid muddling the delicate flavors.
- Serve immediately, encouraging your guests to take a sip before the layers dissolve. The first sip is a burst of fermented rice that slowly gives way to the light, refreshing bite of beer, leaving a lingering echo of citrus and a faint hint of roasted barley. The experience is both a drink and a performance, a shared moment of anticipation before the inevitable splash.
- After the first sip, you can choose to repeat the process for a second round, or simply enjoy the remaining beer on its own. If you’re hosting a large group, consider setting up a station where guests can create their own variations. This interactive element turns the drink into a communal celebration.
That’s it — you did it. But hold on, I’ve got a few more tricks that’ll take this to another level…
Insider Tricks for Flawless Results
The Temperature Rule Nobody Follows
Many people pour warm sake into cold beer, which creates a jarring temperature shift that can alter the flavor. The trick is to let the sake sit at room temperature for a few minutes before pouring. This subtle change balances the heat and ensures the flavors mingle without one overwhelming the other. I once tried pouring a cold shot into a chilled beer and the result was a flat, unremarkable drink. The lesson? Warm it just enough.
Why Your Nose Knows Best
Smell is the first sense that engages when you pour the sake into the beer. A strong, clean aroma signals that the sake is fresh and high quality. If you notice a musty or off scent, it’s a sign the sake may have gone stale. The nose is a reliable indicator that can save you from a subpar drink. I’ve learned to trust my olfactory senses before tasting.
The 5-Minute Rest That Changes Everything
After pouring the sake, let the drink rest for exactly five minutes before serving. This brief pause allows the flavors to meld, creating a smoother finish. The rest period also gives the carbonation time to settle, preventing a sudden burst of foam. I’ve seen many people skip this step, and the result is a drink that feels rushed and uneven.
The Right Glass Matters
Choosing the right glass is essential for the layering effect. A wide, shallow glass allows the sake to spread evenly, creating a visible film on top of the beer. If you use a narrow glass, the liquid will rush to the bottom, losing the dramatic splash. I recommend a 6‑oz shot glass for the sake and a 12‑oz glass for the beer to achieve the best visual impact.
The Secret to a Smooth Pour
The pour technique can make or break the drink. Hold the shot glass at a slight angle and let the liquid glide over the surface. If you pour too quickly, the sake will splash everywhere, creating a mess and ruining the layering effect. I’ve practiced this for months, and the result is a flawless, cinematic splash every time.
The Final Touch: Garnish Timing
Adding a garnish too early can muddle the flavors. Wait until the sake has settled before adding a cucumber slice or mint sprig. The garnish should complement the drink’s profile without overpowering it. I’ve found that a fresh cucumber slice adds a subtle crunch that enhances the overall experience.
Creative Twists and Variations
This recipe is a playground. Here are some of my favorite ways to switch things up:
Miso‑Infused Sake Bomb
Stir a teaspoon of white miso into the sake before pouring. The miso adds a savory umami note that deepens the flavor profile. This variation pairs beautifully with a light beer that has a hint of wheat. The result is a drink that feels like a warm, comforting soup in liquid form.
Ginger‑Spiced Bomb
Add a small piece of fresh ginger to the sake before pouring. The ginger imparts a subtle heat that balances the cool beer. This variation is perfect for winter parties, adding a spicy kick that warms the palate. The ginger’s aroma also enhances the overall sensory experience.
Hibiscus‑Hued Bomb
Infuse the sake with dried hibiscus flowers for a floral twist. The hibiscus gives the drink a gentle pink hue and a tart, berry‑like flavor. Pair it with a light, citrusy beer for a refreshing, summery feel. This variation is visually stunning and palate‑pleasing.
Herbal‑Infused Bomb
Add a sprig of fresh rosemary or thyme to the sake before pouring. The herbal notes complement the beer’s maltiness and add a fragrant aroma. This variation works well with a dark lager, creating a complex, earthy flavor. The herbs also add a decorative touch to the glass.
Carbonated Sake Bomb
Replace the beer with a sparkling water or soda for a lighter version. The carbonation keeps the drink crisp, while the sake adds depth and complexity. This variation is ideal for those who prefer a non‑alcoholic or lower‑alcohol option. The result is a refreshing, effervescent drink that still delivers a punch.
Citrus‑Burst Bomb
Add a splash of fresh grapefruit or orange juice to the beer before pouring the sake. The citrus adds brightness and a hint of bitterness that cuts through the sweetness of the sake. This variation is perfect for a brunch or daytime gathering, offering a refreshing twist on the classic.
Storing and Bringing It Back to Life
Fridge Storage
If you need to prepare the beer in advance, store it in the refrigerator for up to 48 hours. Keep it in a sealed bottle or a covered container to maintain carbonation. Do not refrigerate the sake; it should be stored at room temperature to preserve its delicate aroma. When ready to serve, bring the sake to room temperature and pour it into the chilled beer.
Freezer Friendly
Freezing the beer is not recommended, as it can alter the carbonation and flavor. However, if you must, place the beer in a sealed container and freeze for no more than 30 minutes. Thaw it slowly in the refrigerator before use. The sake can be frozen for a short period to create a chilled shot, but thaw it at room temperature before pouring.
Best Reheating Method
Reheating is unnecessary for this drink, but if you need to warm the sake slightly, place it in a bowl of warm water for 5 minutes. This gentle method prevents overheating and preserves the sake’s flavor. Add a tiny splash of water before reheating to keep the liquid from becoming too thick. The result is a perfectly balanced, refreshing drink ready for immediate enjoyment.