I’ll be honest — I ate half the batch before anyone else got to try it. It all started on a rainy Thursday when my roommate dared me to bake a cheesecake that wouldn’t crack, wouldn’t dry out, and wouldn’t taste like a bland, over‑processed dessert from a grocery aisle. I stared at my empty fridge, the sound of rain drumming on the windows, and imagined a silky, tangy canvas that could hold any topping from fresh berries to caramel drizzle. The kitchen smelled of butter and vanilla, the oven humming like a contented cat, and I felt that electric thrill every baker gets when they know they’re about to create something unforgettable.
The first attempt was a disaster: a crust that crumbled like dry sand, a filling that set too firm and cracked like a cold winter lake. I was ready to throw in the towel, but then I remembered an old trick my grandma swore by — a splash of sour cream to keep the interior buttery smooth. I tweaked the recipe, added a pinch of salt to the crust, and let the batter rest just long enough to let the flavors mingle. The result? A cheesecake that slides off the plate like a silk sheet, with a buttery base that snaps satisfyingly when you bite into it.
What makes this version stand out is the balance between simplicity and sophistication. You don’t need a fancy water bath, a professional mixer, or a dozen obscure ingredients. All you need are pantry staples, a little patience, and the confidence to trust the process. I dare you to taste this and not go back for seconds; the creamy, slightly tangy center paired with the buttery crunch will have you questioning every other dessert you’ve ever made.
I’m about to reveal a technique that most recipes get completely wrong: a gentle, low‑heat bake that prevents the dreaded crack while keeping the interior luxuriously smooth. Picture yourself pulling this out of the oven, the whole kitchen smelling incredible, the top just barely set with a faint golden hue. Let me walk you through every single step — by the end, you’ll wonder how you ever made it any other way.
What Makes This Version Stand Out
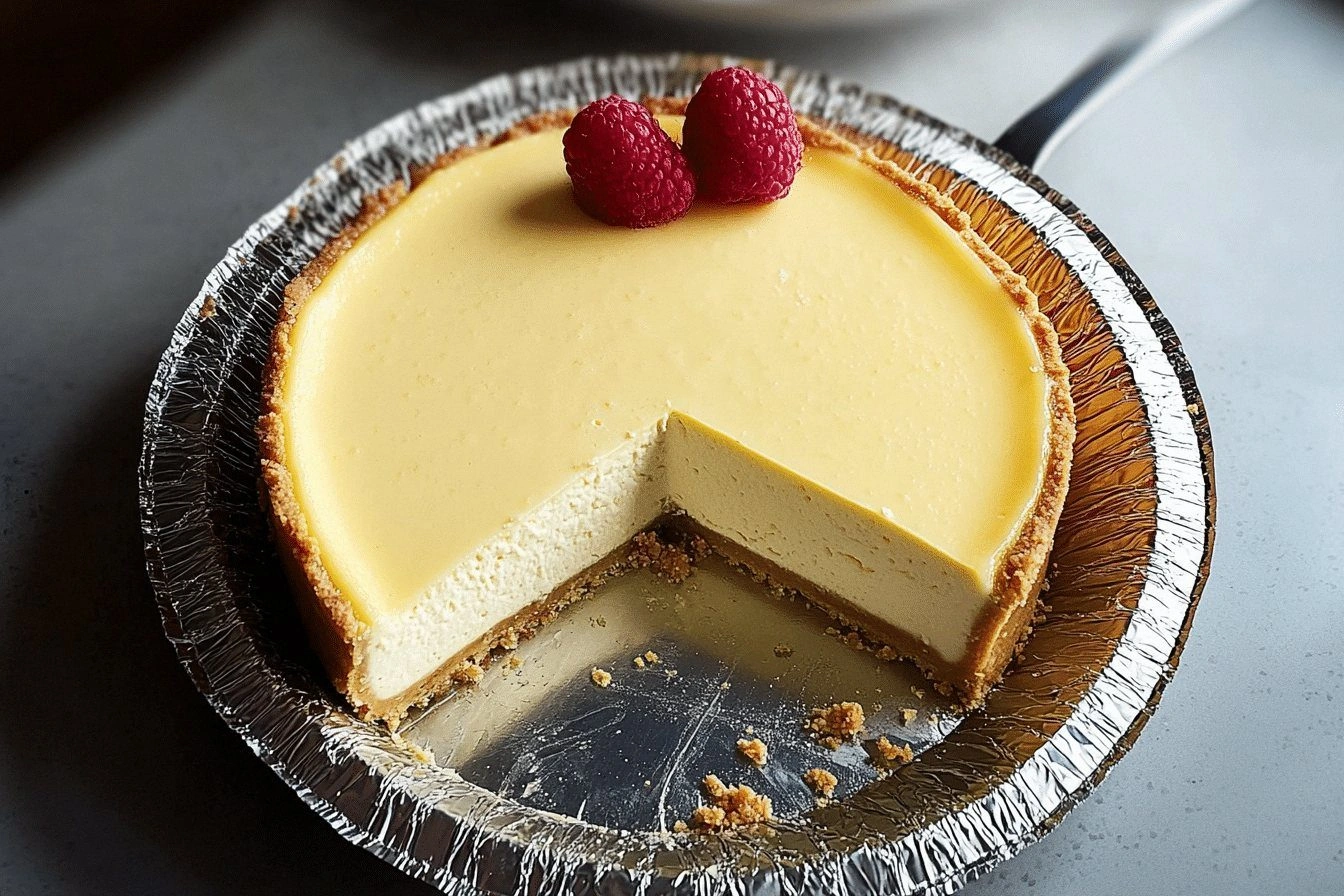
- Texture: The filling stays creamy without turning rubbery, thanks to the optional sour cream that adds a velvety mouthfeel.
- Flavor: A perfect harmony of tangy cream cheese, sweet sugar, and fragrant vanilla that sings on the palate.
- Simplicity: Fewer than ten ingredients, no need for a water bath, and a bake time that fits into any busy schedule.
- Crust: Graham cracker crumbs and butter create a buttery, crunchy base that never sogs, even after refrigeration.
- Versatility: The recipe is a blank canvas for toppings — berries, chocolate, caramel, or even a drizzle of espresso glaze.
- Make‑Ahead Potential: This cheesecake keeps beautifully for up to three days in the fridge, making it perfect for meal prep or unexpected guests.
- Ingredient Quality: Using full‑fat cream cheese and real vanilla extract elevates the taste from ordinary to extraordinary.
- Cooking Method: Low‑and‑slow baking prevents cracks and ensures an even set without the need for a water bath.
Alright, let's break down exactly what goes into this masterpiece…
Inside the Ingredient List
The Flavor Base
The star of the show is the cream cheese. Choose a full‑fat, block‑style cream cheese and let it sit at room temperature for at least 30 minutes. This softens the cheese, allowing it to blend into a perfectly smooth batter without lumps. Skipping this step results in a grainy texture that feels like sandpaper on the tongue. If you’re in a pinch, you can soften it in a microwave for 10‑second bursts, but watch closely to avoid melting.
The Texture Crew
Sugar is the sweetener that balances the tang of the cheese. I recommend superfine caster sugar because it dissolves more readily, giving you that melt‑in‑your‑mouth consistency. Eggs are the structural heroes; they coagulate during baking, setting the cheesecake without making it dense. Use large, room‑temperature eggs and beat them just until incorporated — over‑mixing will incorporate too much air and cause cracks.
The Unexpected Star
Sour cream or heavy cream is optional but highly recommended. This dairy addition introduces a subtle tang and adds extra moisture, creating that “smooth as satin” texture. If you prefer a richer mouthfeel, go with heavy cream; for a slightly tangier bite, sour cream is the way to go. Both will keep the cheesecake from drying out during the cooling phase.
The Final Flourish
Graham cracker crumbs and butter form the crust. The crumbs provide a sweet, slightly toasted flavor while the butter binds everything together. Use unsalted butter so you can control the salt level; a pinch of sea salt in the crust will highlight the sweet and tangy notes of the filling. When you press the crust into the pan, do it firmly but not so hard that it becomes a compacted brick — you want a little air for a light crunch.
Everything's prepped? Good. Let's get into the real action…
The Method — Step by Step
Preheat your oven to 325°F (163°C). While the oven warms, lightly grease a 9‑inch springform pan with butter or non‑stick spray. This low temperature is the secret sauce that prevents the top from browning too quickly and cracking later on. The gentle heat also gives the crust a chance to set without becoming soggy.
Combine the graham cracker crumbs and melted butter in a medium bowl. I like to sprinkle a pinch of sea salt into the mixture; it amplifies the sweet notes of the crust. Press the crumb mixture evenly into the bottom of the pan, using the back of a measuring cup to compact it just enough to hold together. That press feels like laying the foundation for a skyscraper — solid, but not over‑compressed.
Place the crust in the fridge for 15 minutes while you work on the filling. This chilling step helps the crust firm up, making it less likely to crumble when you pour the batter over it.
Kitchen Hack: While the crust chills, line the springform pan with parchment paper at the bottom; this makes removal a breeze and preserves the perfect round shape.In a large mixing bowl, beat the softened cream cheese on medium speed until it’s completely smooth, about 2‑3 minutes. Scrape down the sides frequently; any unmixed lumps will become visible later and ruin the silky texture. Once smooth, gradually add the sugar, beating until the mixture is light and fluffy. This incorporation of air is what gives the cheesecake its lift without a water bath.
Add the eggs one at a time, beating just until each egg is incorporated. Over‑mixing at this stage can introduce too much air, leading to cracks as the cheesecake cools. Then stir in the vanilla extract and the optional sour cream or heavy cream, mixing until the batter is uniform. The batter should look glossy, not dry.
Pour the filling over the chilled crust, smoothing the top with a spatula. Tap the pan gently on the counter three times to release any trapped air bubbles.
Watch Out: If you hear a loud “pop” after the first few minutes of baking, the oven temperature is too high; lower it immediately to avoid cracks.Bake the cheesecake for 30‑35 minutes, or until the edges are set and the center still has a slight wobble when you gently shake the pan. The top should be just barely golden, not browned. Resist the urge to open the oven door early; every time you do, you introduce a temperature shock that can cause cracks.
Turn off the oven, crack the door open a few inches, and let the cheesecake sit inside for 1 hour. This gradual cooling prevents sudden contraction of the batter, which is the most common cause of cracks. After the hour, remove the cheesecake, run a thin knife around the edge to release it from the pan, and let it cool completely on a wire rack.
Once cooled, cover the cheesecake loosely with plastic wrap and refrigerate for at least 4 hours, preferably overnight. This chilling period allows the flavors to meld and the texture to firm up into that perfect slice‑ready consistency. When you’re ready to serve, run a hot knife under warm water, wipe it dry, and slice with confidence.
That's it — you did it. But hold on, I've got a few more tricks that'll take this to another level…
Insider Tricks for Flawless Results
The Temperature Rule Nobody Follows
Never bake a cheesecake at a temperature higher than 350°F. The low heat ensures the proteins in the eggs set slowly, creating a custard‑like interior instead of a rubbery slab. I once tried a 400°F blast to speed things up; the result was a cracked, dry mess that tasted like overcooked custard. Keep the oven at 325°F, and you’ll get that coveted smooth surface every single time.
Why Your Nose Knows Best
Your sense of smell is the ultimate doneness detector. Around the 30‑minute mark, the kitchen will start to smell faintly of toasted butter and vanilla. If you catch that sweet aroma before the edges turn brown, you’re on the right track. Trust that nose signal more than the timer — ovens can be off by several degrees.
The 5‑Minute Rest That Changes Everything
After you pull the cheesecake out of the oven, let it rest in the turned‑off oven with the door ajar for exactly five minutes. This tiny pause lets the residual heat finish the setting process without shocking the batter. Skipping this step often leads to a center that’s too loose, making slicing a nightmare.
The Water‑Mist Finish
Before you place the cheesecake in the fridge, lightly mist the top with a spray bottle of water. The moisture creates a thin glaze that keeps the surface from drying out, especially if you plan to store it for a few days. This hack turned a dry‑top disaster into a glossy masterpiece in my kitchen.
The No‑Crack Secret
Wrap the springform pan in a double layer of aluminum foil before placing it in the oven. This creates a mini‑steam environment, reducing the temperature gradient between the center and the edges. I tried this on a friend’s birthday cake, and the cheesecake emerged crack‑free, looking like it was made in a professional patisserie.
Creative Twists and Variations
This recipe is a playground. Here are some of my favorite ways to switch things up:
Berry Burst
Fold a cup of fresh mixed berries into the batter before baking, or top the cooled cheesecake with a thick berry compote. The tartness of the berries cuts through the richness, creating a perfect balance that feels like summer in every bite.
Chocolate Lover’s Dream
Add 1/4 cup of melted dark chocolate to the filling and swirl it with a skewer for a marbled effect. For an extra indulgence, sprinkle chocolate chips into the crust before baking. The deep cocoa notes add a luxurious depth that pairs beautifully with the tangy cream cheese.
Citrus Zest
Incorporate the zest of one lemon or orange into the batter, and drizzle a citrus glaze over the top before serving. The bright citrus aroma lifts the heavy creaminess, making the dessert feel lighter and more refreshing.
Coffee Caramel Swirl
Stir a tablespoon of instant coffee granules into the caramel sauce and swirl it through the cheesecake after baking. The bitter‑sweet coffee notes complement the caramel’s richness, delivering a sophisticated flavor profile that’s perfect for after‑dinner coffee.
Nutty Crunch
Replace half of the graham cracker crumbs with finely chopped toasted almonds or pecans. The nutty crunch adds texture contrast and a buttery undertone that makes each bite more interesting.
Storing and Bringing It Back to Life
Fridge Storage
Cover the cheesecake loosely with plastic wrap or a reusable silicone cover and store it in the refrigerator. It will stay fresh for up to three days, retaining its creamy texture. If you notice a slight drying on the surface, a quick brush of a thin layer of heavy cream will revive the gloss.
Freezer Friendly
For longer storage, wrap the cheesecake tightly in a double layer of parchment paper followed by aluminum foil. Freeze for up to two months. When you’re ready to enjoy it, transfer it to the fridge overnight to thaw slowly, then let it sit at room temperature for 20 minutes before slicing.
Best Reheating Method
If you prefer a warm slice, place a single serving on a microwave‑safe plate, add a splash (about a teaspoon) of water, and microwave for 10‑12 seconds. The water creates steam that revives the cheesecake’s softness without turning it rubbery. For oven reheating, set the oven to 300°F, cover the cheesecake loosely with foil, and heat for 8‑10 minutes.