I still remember the first time I attempted a pot roast. It was a gray Sunday in November, the kind of day that begs for fuzzy socks and something bubbling on the stove. I tossed a hunk of beef into my Dutch oven with a few lonely carrots, some potatoes that had started to sprout eyes, and a carton of beef broth I found wedged behind last month's oat milk. The result? A watery, grayish stew that tasted like wet cardboard and disappointment. My roommate politely choked down a bowl, then asked if we could order pizza—just to be safe.
Fast-forward three years and a dozen failed experiments later, and I'm here to tell you that pot roast vegetables can be downright transcendent when treated with the respect they deserve. Picture this: beef so tender it surrenders at the mere suggestion of a fork, carrots that taste like candy kissed by earth, potatoes that have absorbed every last drop of savory glory, and a sauce so rich you'll be tempted to lick the plate. The aroma alone will make your neighbors knock on your door asking if they can move in.
What changed everything was understanding that pot roast isn't just about throwing ingredients into a pot and hoping for the best. It's about layering flavors like you're building a symphony, coaxing each vegetable to its fullest potential, and understanding that patience isn't just a virtue—it's the secret ingredient. Most recipes rush the process or skip crucial steps that seem insignificant but make the difference between "meh" and "where has this been all my life?"
The version I'm sharing today comes from a snowy weekend in Vermont where a French-trained chef revealed her grandmother's technique during a cooking class I almost didn't attend because, honestly, who drives three hours through a blizzard for pot roast? But that snowy detour changed my culinary life, and now I'm passing the torch to you. Let me walk you through every single step — by the end, you'll wonder how you ever made it any other way.
What Makes This Version Stand Out
Flavor Bomb: This isn't your grandmother's bland pot roast. We're talking about a depth of flavor that comes from searing the beef until it develops a mahogany crust, then deglazing with Worcestershire sauce that adds layers of umami complexity. The tomato paste caramelizes against the hot pot, creating a fond so rich it could make a grown chef weep.
Vegetable Nirvana: Each vegetable is added at precisely the right moment so nothing turns to mush. The carrots maintain a gentle bite, the potatoes develop creamy centers while keeping their shape, and the celery provides a refreshing contrast that prevents the whole dish from becoming a homogeneous mass of brown.
Foolproof Technique: While most recipes tell you to dump everything in at once, we build this dish in stages, ensuring each component reaches its peak potential. The result is vegetables that taste like they were cooked by someone who actually cares about vegetables, not just someone trying to stretch a piece of meat.
One-Pot Wonder: Despite the sophisticated results, everything happens in a single vessel. No separate pans, no complicated techniques, no mountain of dishes mocking you from the sink. Just pure, unadulterated comfort food that makes you look like a culinary genius.
Leftover Gold: The flavors actually intensify overnight, transforming into something even more magnificent. Tomorrow's lunch will make your coworkers jealous, and you'll find yourself hiding the last portion in the back of the fridge behind the kale you bought during your last health kick.
Weekend Flex: This is the kind of dish that makes people think you've been slaving away all day, when really you've been binge-watching your favorite show while the oven does all the heavy lifting. It's culinary multitasking at its finest.
Inside the Ingredient List
The Flavor Foundation
Chuck roast is the undisputed champion of slow cooking, and once you understand why, you'll never reach for another cut again. This beautifully marbled piece of beef comes from the shoulder area, where the muscles have worked hard developing connective tissue that transforms into gelatin during long, slow cooking. The result is meat that becomes spoon-tender while maintaining its structural integrity, unlike pricier cuts that can turn stringy and dry. Look for a roast with good marbling throughout—those white streaks of fat are flavor highways that will baste the meat from the inside out. If you can only find a lean cut, don't panic; just know you'll need to add a bit more fat to the cooking process.
Beef broth forms the liquid backbone of this dish, but not all broths are created equal. Skip the sodium-bomb varieties that taste like liquid salt licks, and invest in a good quality broth or better yet, make your own if you're feeling ambitious. The broth should taste like beef, not like someone waved a beef-scented wand over salt water. If you're stuck with grocery store options, look for low-sodium versions so you can control the salt level yourself—nothing ruins a beautiful pot roast faster than over-salting.
The Aromatics Alliance
Yellow onion is the aromatic workhorse that forms the flavor base, but here's where most recipes go wrong—they tell you to just chop and toss. Instead, let your onions cook until they're golden and sweet, developing caramelized edges that add incredible depth to the final sauce. The natural sugars in onions undergo the Maillard reaction, creating hundreds of flavor compounds that make your pot roast taste like it's been simmering for days instead of hours. Don't rush this step; those translucent onions are flavor goldmines waiting to happen.
Garlic is your aromatic secret weapon, but timing matters more than you think. Add it too early and it becomes bitter and acrid; add it too late and it tastes raw and harsh. The sweet spot is after the onions have softened but before you add the liquid, giving the garlic just enough heat to mellow while preserving its pungent personality. Fresh garlic beats pre-minced every time—those jars of pre-chopped garlic floating in citric acid taste like disappointment and regret.
The Vegetable Cast
Carrots bring more than just color to this party; they're natural sweeteners that balance the richness of the beef and add layers of complexity. Choose medium-sized carrots over those bagged baby carrots that taste like orange-flavored water. The real magic happens when carrots cook slowly, their natural sugars concentrating while they maintain enough structure to provide textural contrast. Peel them but don't obsess over perfect shapes—rustic chunks actually hold up better during the long cooking process.
Yukon Gold potatoes are the creamy dream team that sets this pot roast apart from recipes using russets or reds. Their naturally buttery flavor and waxy texture mean they hold their shape while developing fluffy interiors that soak up the sauce like little edible sponges. Cut them into large chunks—about two-bite size—because they will break down slightly and you want them to maintain some integrity. If Yukon Golds aren't available, baby potatoes make an acceptable substitute, but avoid russets unless you enjoy potato soup mixed with your pot roast.
Celery often gets dismissed as filler, but in this dish, it's the refreshing counterpoint that prevents everything from becoming too rich and heavy. The key is adding it at the right moment—too early and it becomes mushy and bitter, too late and it's aggressively crunchy. Look for firm stalks with fresh leaves still attached; those leaves are packed with flavor and should be saved for the final garnish. If you're one of those people who claim to hate celery, I challenge you to try this version before writing it off completely.
The Flavor Enhancers
Worcestershire sauce is your umami bomb, that mysterious ingredient that makes people ask "what's in this that makes it taste so good?" This fermented sauce adds layers of complexity that you can't quite identify but would definitely miss if omitted. A little goes a long way—too much and your pot roast tastes like it was marinated in a steakhouse. The trick is to let it cook into the sauce rather than adding it at the end, giving those complex flavors time to marry with the other ingredients.
Tomato paste provides acidity and natural sugars that balance the richness while helping to thicken the sauce. Don't just squeeze it in and stir; let it cook against the hot pot until it turns a deep brick red and starts to smell slightly sweet. This caramelization process removes any tinny, metallic flavors and transforms the paste into a flavor powerhouse that adds body and complexity to your sauce. If you only have tomato sauce or diced tomatoes, don't substitute—they'll add too much liquid and not enough concentration.
Everything's prepped? Good. Let's get into the real action...
The Method — Step by Step
- Start by patting your chuck roast absolutely dry with paper towels, pressing firmly to remove every last bit of surface moisture. This isn't some optional step for overachievers—this is the difference between a beautiful brown crust and sad, gray meat swimming in its own juices. Season aggressively with salt and pepper on all sides, using about a teaspoon of salt per pound of meat. Don't be shy here; most of it will stay on the surface, and under-seasoned meat is a culinary tragedy that no amount of sauce can fix. Let the seasoned roast sit at room temperature while you prep everything else—cold meat hitting a hot pan is a recipe for disaster and uneven cooking.
- Heat a heavy-bottomed Dutch oven over medium-high heat until a drop of water sizzles and evaporates immediately—this usually takes about three minutes, but don't rush it. Add just enough olive oil to create a thin film across the bottom, then carefully lower your roast into the pot. That immediate sizzle when the meat hits the metal? That's the sound of flavor being created. Resist every urge to move the meat around; let it develop a deep, mahogany crust for about four minutes per side. If you try to flip it and the meat sticks, it's not ready—give it another minute until it releases easily.
- Once your roast is beautifully browned on all sides, remove it to a plate and immediately lower the heat to medium. Add your chopped onions to the rendered fat in the pot, scraping up all those gorgeous brown bits from the bottom—that's pure flavor gold that will make your sauce taste like it's been simmering for days. Cook the onions slowly, stirring occasionally, until they're golden and sweet, about eight minutes. This is where patience pays off; rushed onions taste sharp and one-dimensional, while properly caramelized onions add a depth that makes people close their eyes and sigh with happiness.
- Clear a small space in the center of the pot and add your minced garlic, letting it sizzle for just thirty seconds until fragrant. Stir in the tomato paste, coating the onions, and let it cook for another two minutes until it turns a deep brick red. The paste should start to smell slightly sweet and lose any tinny aroma—that's when you know it's ready. Pour in a splash of your beef broth and scrape vigorously with a wooden spoon, lifting every last bit of fond from the bottom of the pot.
- Nestle your roast back into the pot, adding any juices that collected on the plate—waste not, want not. Pour in the remaining beef broth and Worcestershire sauce, then sprinkle in the dried thyme and rosemary. The liquid should come about halfway up the sides of the roast; add more broth if needed, but resist the urge to completely submerge the meat. Bring everything to a gentle simmer, then cover tightly with a lid and transfer to a 325°F oven. This is the moment of truth—walk away and let time work its magic.
- After two hours of slow braising, your kitchen will smell like you've died and gone to comfort food heaven. Carefully remove the pot from the oven and add your potatoes, pushing them down into the liquid but not completely submerging them. Return to the oven for another hour, letting the potatoes start to absorb all that glorious flavor. The key here is adding them at the right moment—too early and they'll dissolve into the sauce, too late and they'll be crunchy in the center.
- Add your carrots and celery to the pot, arranging them around the roast so they can cook in the flavorful liquid. Cover and return to the oven for the final 45 minutes to an hour. The vegetables should be tender but not mushy, holding their shape while soaking up all that incredible sauce. Test doneness by piercing a carrot with a fork—it should slide in with gentle resistance, not fall apart or require force.
- Remove the pot from the oven and let it rest for ten minutes—this isn't just restaurant nonsense, it allows the juices to redistribute and the sauce to thicken slightly. Transfer the roast to a cutting board and slice it against the grain into thick, juicy pieces. The meat should practically fall apart, but still hold together enough to transfer to plates. Taste the sauce and adjust seasoning with salt and pepper if needed—the flavors should be bold and well-balanced, not timid or one-dimensional.
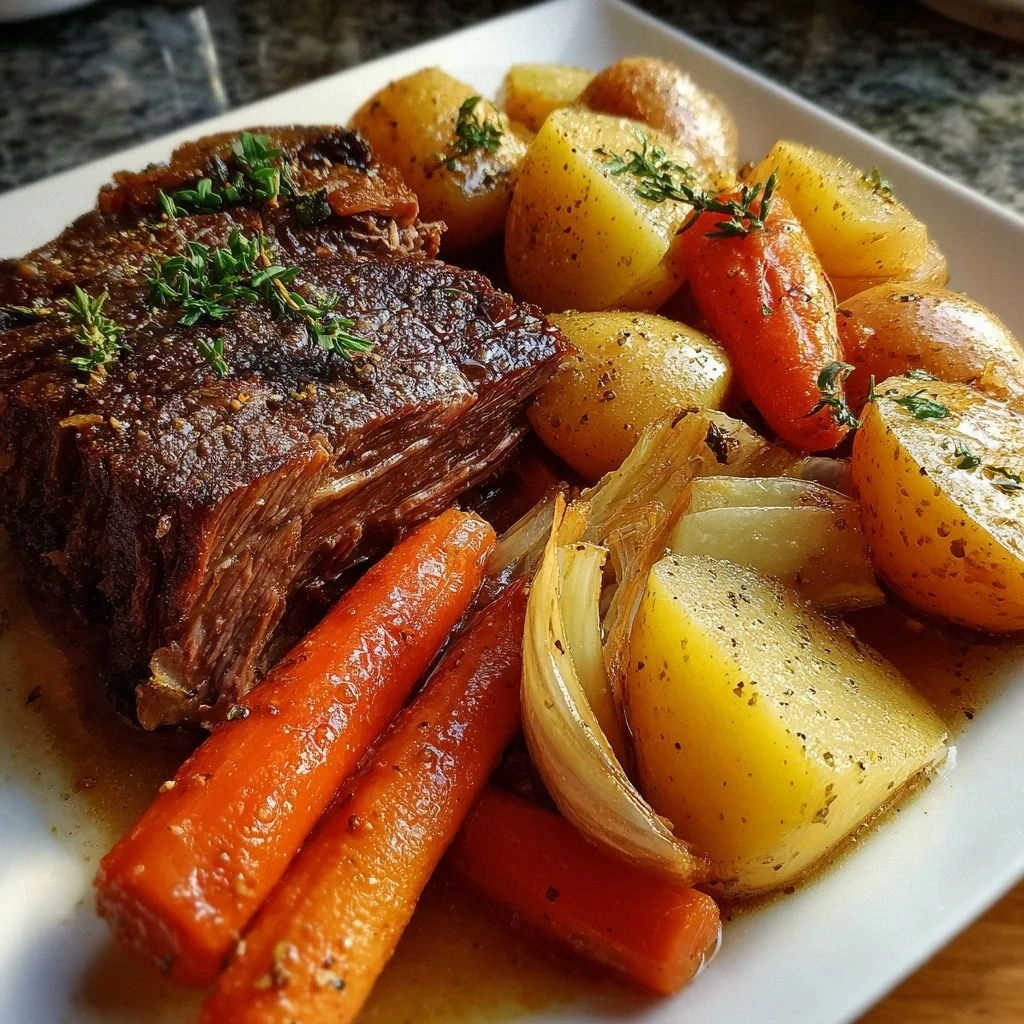
- Now for the fun part: arrange slices of that magnificent beef on plates, surrounded by the glazed vegetables and drizzled with the rich, glossy sauce. Garnish with fresh herbs if you're feeling fancy, or just dig in like the hungry human you are. I dare you to taste this and not go back for seconds—that's a bet you'd lose every single time. The combination of tender beef, perfectly cooked vegetables, and sauce that tastes like liquid comfort will ruin you for all other pot roasts forever.
That's it—you did it. But hold on, I've got a few more tricks that'll take this to another level...
Insider Tricks for Flawless Results
The Temperature Rule Nobody Follows
Here's the thing that separates good pot roast from legendary pot roast: oven temperature. Most recipes throw everything in at 350°F and call it a day, but that's actually too hot for the connective tissue to break down properly. Lower and slower is the name of the game—325°F gives the collagen time to transform into gelatin without drying out the meat. A friend tried rushing this step once at 375°F, and the result was beef that resembled shoe leather swimming in greasy broth. Trust the process; those extra thirty minutes at a lower temperature make the difference between "pretty good" and "I need to sit down for this."
Why Your Nose Knows Best
Your sense of smell is your most powerful tool when making pot roast, but most people don't know how to use it properly. When the onions are perfectly caramelized, they'll smell sweet and nutty, not sharp or sulfurous. The garlic should hit your nose with bright, pungent notes, not bitter or burnt aromas. If you smell anything acrid or harsh, you've gone too far—dial back the heat immediately. I'll be honest: I ate half the batch of caramelized onions before anyone else got to try them, claiming I needed to "test for seasoning." My nose told me they were perfect, and my stomach agreed wholeheartedly.
The 5-Minute Rest That Changes Everything
After your pot roast finishes cooking, resist the siren call of immediate gratification. Those five minutes of resting time aren't just for show—they allow the sauce to thicken naturally as the temperature drops slightly, and the meat fibers relax and reabsorb some of their juices. Slice too early and you'll watch all those glorious juices run out onto your cutting board instead of staying in the meat where they belong. Use this time to set the table, pour yourself a glass of wine, or just bask in the glow of what you've accomplished. Future you, sinking a fork into perfectly rested, juicy beef, will thank present you for the restraint.
The Secret Ingredient You're Already Using
That splash of Worcestershire sauce? It's not just for flavor—it's your natural meat tenderizer. The vinegar and tamarind in Worcestershire contain acids that help break down tough muscle fibers, working in harmony with the slow cooking to create melt-in-your-mouth results. But here's what most recipes get wrong: they add it at the end, where it tastes harsh and one-dimensional. When you let Worcestershire cook into the sauce, it mellows and integrates, becoming part of the background complexity rather than a sharp accent. Most recipes get this completely wrong. Here's what actually works: add it with the broth so it has time to cook and develop.
The Make-Ahead Magic Trick
Here's a game-changer: this pot roast actually tastes better the next day. The flavors have time to meld and deepen, the sauce thickens naturally, and the vegetables absorb even more of that incredible broth. Make it on Sunday for a stress-free Monday dinner that tastes like you spent all day cooking. Just reheat gently on the stovetop, adding a splash of broth if needed to loosen the sauce. Your future self will think you're a genius, and honestly, who couldn't use that kind of confidence boost on a Monday?
Creative Twists and Variations
This recipe is a playground. Here are some of my favorite ways to switch things up:
The Mediterranean Makeover
Swap the Worcestershire for balsamic vinegar and add a handful of Kalamata olives along with some sun-dried tomatoes. Replace the thyme and rosemary with oregano and a bay leaf, then finish with a sprinkle of feta cheese and fresh parsley. The briny olives and sweet balsamic create a completely different flavor profile that transports you to a coastal villa in Greece. This version is especially good with crusty bread for sopping up that Mediterranean-inspired sauce.
The Smoky Southwest Version
Add a teaspoon of smoked paprika and a diced chipotle pepper in adobo sauce to the pot. Swap the regular potatoes for sweet potatoes, and add a can of fire-roasted tomatoes with the broth. Finish with fresh cilantro and a squeeze of lime juice. The smoky heat plays beautifully against the richness of the beef, and the sweet potatoes add a different kind of sweetness than regular potatoes. This version will warm you up on the coldest winter night and make your house smell like a Texas barbecue joint.
The French Onion Soup Inspired Twist
Cook down three large sliced onions until they're deeply caramelized—this takes about 45 minutes but creates incredible flavor. Add a splash of dry sherry along with the beef broth, and finish with Gruyère cheese melted over the top during the last five minutes. The result tastes like the best bowl of French onion soup you've ever had, but with tender beef and vegetables to make it a complete meal. It's comfort food meets elegant bistro fare, and it's absolutely magical.
The Asian-Inspired Fusion
Replace the Worcestershire with soy sauce and add a piece of fresh ginger along with some star anise. Swap regular potatoes for daikon radish chunks, and add some bok choy during the last 30 minutes of cooking. The soy sauce creates a different kind of umami depth, while the ginger and star anise add warming spice notes that make the whole dish taste exotic and intriguing. Finish with sliced scallions and a drizzle of sesame oil for a dish that bridges comfort food and adventurous eating.
The Root Vegetable Remix
Replace the regular potatoes with a mix of parsnips, turnips, and rutabaga for a more complex, earthy flavor profile. These root vegetables hold their shape beautifully while adding different textures and flavors that make each bite interesting. Add some chopped kale or collard greens during the last 20 minutes for a nutritional boost and pop of color. This version tastes like autumn in a bowl and makes you feel virtuous about eating your vegetables while still being completely satisfying.
The Luxury Upgrade
Add a handful of dried porcini mushrooms soaked in warm water, using the soaking liquid as part of your broth. Replace the regular potatoes with fingerling potatoes, and add some pearl onions along with your regular vegetables. Finish with a swirl of crème fraîche and some fresh chives. The porcini add an incredible depth and earthiness that makes the whole dish taste restaurant-quality, while the fingerling potatoes and pearl onions make it feel special enough for company.
Storing and Bringing It Back to Life
Fridge Storage
Let your pot roast cool completely before transferring to airtight containers—this prevents condensation that can water down your sauce and create off-flavors. Store the meat and vegetables together in the sauce, which acts like a protective blanket keeping everything moist and flavorful. Properly stored, this will keep for up to four days in the refrigerator, though honestly, it rarely lasts that long in my house. The sauce may gelatinize when cold—this is a good sign that you've extracted plenty of collagen from the meat. It will melt back into liquid gold when reheated.
Freezer Friendly
This pot roast freezes beautifully for up to three months, making it perfect for meal prep or emergency comfort food. Freeze in portion-sized containers so you can thaw exactly what you need without defrosting the whole batch. Leave about an inch of space at the top of containers for expansion, and label with the date so you don't play freezer roulette six months from now. The texture of the potatoes may change slightly upon freezing— they'll be a bit softer but still delicious. For best results, thaw overnight in the refrigerator rather than using the microwave defrost setting.
Best Reheating Method
Gentle is the key word when reheating pot roast—aggressive heat will turn your tender meat into stringy disappointment. Use low heat on the stovetop with a splash of broth or water to loosen the sauce, stirring occasionally until everything is heated through. The microwave works in a pinch, but use 50% power and stir every minute to prevent hot spots that can toughen the meat. Add a tiny splash of water before reheating—it steams back to perfection and prevents the sauce from becoming too thick or gloppy. Whatever you do, don't reheat it multiple times; only warm up what you'll eat in one sitting.