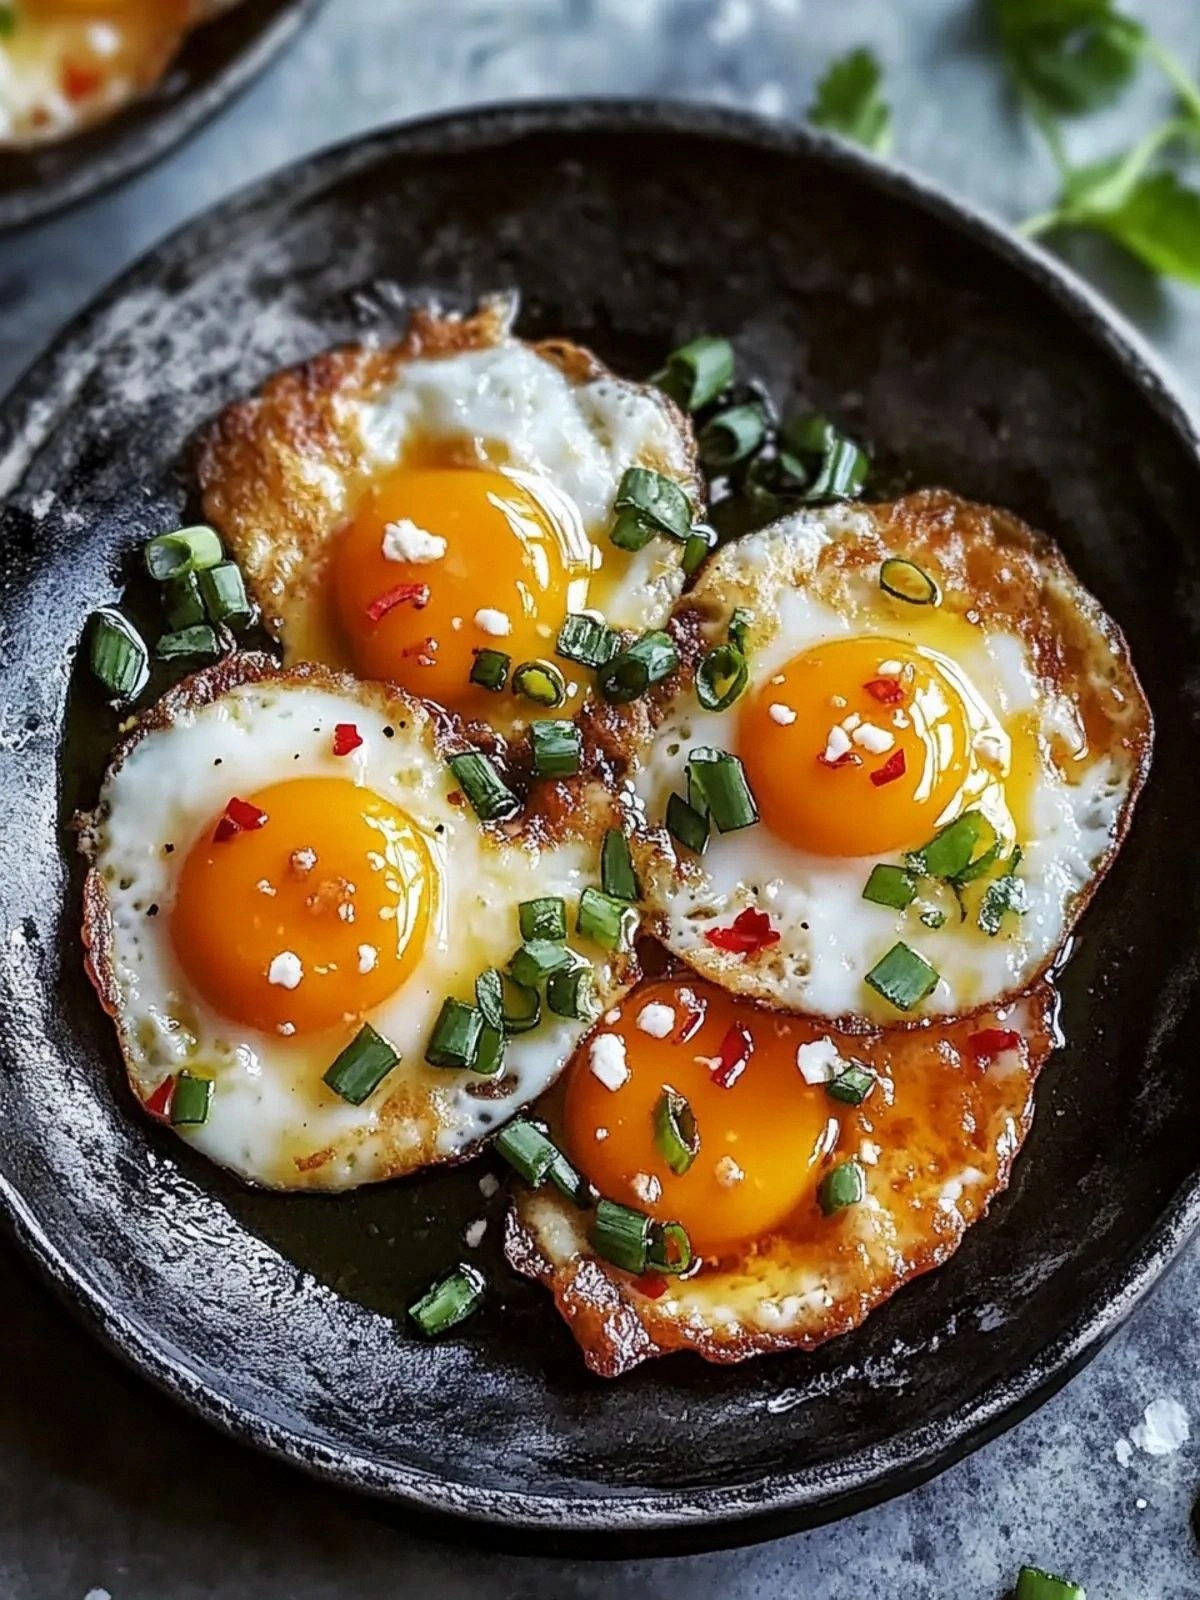
Picture this: you’re staring at a pile of eggs on your counter, the kitchen lights flickering like a neon sign, and your stomach growls louder than a bass drum. I was craving something that would make a splash at a brunch party, but the usual fried egg routine felt like a rerun of yesterday’s toast. That night, after a disastrous attempt that left me with a burnt yolk and a kitchen that smelled of char, I swore I’d reinvent the humble fried egg into a flavor bomb. I reached for soy sauce, ketchup, rice vinegar, homemade chili oil, and a drizzle of honey, and the idea of a spicy sweet‑and‑sour fried egg took shape like a sunrise over a neon city.
From the first sizzling splash of oil to the moment the yolk glistens like molten gold, every sense is on high alert. The aroma of caramelized soy and the sharp bite of chili oil mingle in a heady perfume that makes even the most skeptical foodie sigh in anticipation. The sound is a satisfying crackle that echoes through the kitchen, a soundtrack for culinary triumph. The texture? A crisp edge that shatters like thin ice, giving way to a silky, runny center that melts into your tongue like velvet. The taste is a fireworks display—sweet, tangy, umami, and a hint of heat that lingers without overwhelming.
What sets this version apart isn’t just the bold flavor combo; it’s the precision in timing and the simplicity that keeps it accessible. The sauce coats each egg like a glossy coat of lacquer, sealing in flavor and ensuring every bite is balanced. I dare you to taste this and not go back for seconds because the moment the sauce hits your palate, you’ll find yourself craving more. I’ll be honest—once I finished the first batch, the kitchen smelled like victory, and I couldn’t resist the urge to devour the rest before anyone else had a chance. Most recipes get this completely wrong, but I’ve cracked the code on how to keep the yolk perfectly runny while the edges stay crisp.
Imagine pulling this dish out of the pan, the whole kitchen smelling incredible, and serving it to friends who will ask, “What’s the secret?” That secret is a combination of timing, temperature, and a few unexpected ingredients that elevate the humble egg into a showstopper. If you’ve ever struggled with getting the yolk just right, you’re not alone—and I’ve got the fix. Stay with me here—this is worth it. Let me walk you through every single step, and by the end, you’ll wonder how you ever made it any other way.
What Makes This Version Stand Out
- Taste: The sauce is a masterful blend of sweet, sour, salty, and spicy that creates a layered flavor profile, turning a simple egg into a gourmet experience.
- Texture: The high‑heat pan delivers a crispy exterior while the yolk stays delectably runny, offering a contrast that bites and melts in your mouth.
- Simple Ingredients: You only need six pantry staples, making this dish a quick go-to for any meal or snack.
- Unique Twist: The homemade chili oil adds a depth of heat that standard hot sauces can’t match, while honey balances the acidity.
- Crowd‑Pleaser: Whether you’re serving it to friends or feeding a family, the vibrant colors and bold flavors guarantee applause.
- Ingredient Quality: Using fresh, high‑quality soy sauce and homemade chili oil elevates the dish from ordinary to extraordinary.
- Method Efficiency: The entire process takes less than ten minutes, making it perfect for busy mornings or late‑night cravings.
- Make‑Ahead Potential: The sauce can be prepared in advance, and the eggs can be reheated with a splash of water to retain moisture.
Alright, let's break down exactly what goes into this masterpiece…
Inside the Ingredient List
The Flavor Base
At the heart of this dish lies the sauce—a carefully balanced trio of soy sauce, ketchup, and rice vinegar. Soy sauce provides the umami foundation, giving depth and a savory backbone that grounds the sweet and sour notes. Ketchup brings a hint of sweetness and a glossy sheen, while rice vinegar adds brightness, cutting through the richness of the eggs. If you skip any of these, the sauce will lose its complexity, becoming either too salty or too sweet.
Choosing the right soy sauce matters; a low‑sodium version keeps the dish from becoming overly salty, letting the honey shine through. Ketchup, on the other hand, should be a good quality, not the cheap boxed kind—its subtle tomato undertones are essential. Rice vinegar should be a mild variety; a harsh, acidic vinegar will dominate the delicate flavors.
Swapping is easy: if you’re allergic to soy, tamari works just as well, but be mindful of the sodium content. For a tangier kick, replace rice vinegar with apple cider vinegar; the fruity notes will complement the honey beautifully. Always taste the sauce before adding eggs to ensure the balance is spot on.
Buying tip: When shopping for soy sauce, look for a dark, full‑bodied bottle; the richer color often signals deeper flavor. Keep the sauce in a cool, dark place to maintain its quality. A small jar is perfect for single‑use batches, preventing waste.
Everything’s prepped? Good. Let’s get into the real action…
The Texture Crew
The eggs themselves are the star, providing protein, richness, and that coveted runny yolk. Fresh eggs are key; older eggs tend to spread and lose their shape during frying. The yolk’s consistency is a dance between heat and timing—overcooked and it becomes rubbery; undercooked and it’s too runny to hold together.
For a slightly firmer white, consider adding a pinch of baking soda to the sauce; it neutralizes the acidity and helps the whites set faster. If you prefer a more delicate texture, keep the heat moderate and flip the eggs gently, letting the whites curl slightly. A small amount of water in the pan can create steam, helping the whites stay tender.
Skipping the eggs? You could use tofu or tempeh slices, but the experience will change drastically. The eggs give that luxurious, silky mouthfeel that is hard to replicate with plant‑based alternatives. For vegetarians, a plant‑based egg substitute can work, but expect a different texture profile.
Buying tip: Look for eggs that are labeled “pasture‑raised” or “free‑range” for a richer yolk and better flavor. Store them in the main body of the refrigerator rather than the door to keep temperature consistent.
Now that the texture crew is ready, let’s add the final flourish.
The Unexpected Star
Homemade chili oil is the secret weapon that turns this dish from good to unforgettable. It’s not just about heat; the oil carries aromatic compounds from the chilies, garlic, and sometimes Sichuan peppercorns, adding depth that bottled sauces can’t match. The oil should be bright red, with visible flecks of chili, indicating fresh, potent flavor.
If you can’t make chili oil at home, a high‑quality chili paste or a splash of hot sauce can substitute, but the flavor will be slightly different. A pinch of toasted sesame oil added to the chili oil can bring a nutty finish that lingers on the palate. Remember, the oil is the final touch—too much can overpower the sauce, so measure carefully.
Chili oil also adds a visual pop, turning the dish into a vibrant work of art. The red hue makes it Instagram‑worthy, and the subtle heat keeps the taste exciting. It’s the little detail that makes a dish memorable.
Buying tip: If you’re buying pre‑made chili oil, read the label for added sugars or preservatives. A simple blend of dried chilies, oil, and garlic is usually best.
Ready to see the magic?
The Final Flourish
Honey is the sweet counterbalance that rounds out the sauce’s acidity and heat. It also helps the sauce caramelize slightly, giving the eggs a glossy sheen. A light drizzle of honey over the finished eggs adds a touch of brightness and a sweet finish that lingers.
Substitutes include maple syrup or agave nectar, but honey’s unique floral notes are irreplaceable. If you’re avoiding honey, a teaspoon of brown sugar dissolved in a splash of water can mimic the sweetness, but the texture will differ.
Adding honey at the right moment is crucial; if you add it too early, the sugar can burn, creating a bitter taste. Wait until the sauce has simmered and thickened before drizzling to lock in the sweetness.
Buying tip: Choose raw, unfiltered honey for the best flavor and natural enzymes. Store it in a cool, dark place to keep it from crystallizing.
Everything’s prepped? Good. Let’s get into the real action…
The Method — Step by Step
- Heat a non‑stick skillet over medium‑high heat and add a splash of neutral oil—just enough to coat the bottom. The pan should sizzle immediately, signaling that it’s ready. Watch the oil shimmer; this is the moment the eggs will meet destiny. If the oil starts smoking, lower the heat slightly. This step is the foundation for a crisp edge.
- Whisk the sauce components together in a small bowl: soy sauce, ketchup, rice vinegar, homemade chili oil, and honey. Stir until the honey dissolves completely, creating a smooth, glossy mixture. Taste the sauce; it should be balanced—neither too sour nor too sweet. Keep the sauce warm on the stove to prevent it from thickening too quickly. This will ensure a silky coating on the eggs.
- Crack the eggs gently into the pan, spacing them evenly. Use a spatula to slide the yolks in without breaking them. As the eggs begin to set, tilt the pan to let the hot oil pool around the whites. The edges should start to turn golden, a sign that the heat is just right. Don’t rush—patience is key.
- Reduce the heat to medium and pour the sauce evenly over the eggs, allowing it to pool around the edges. The sauce should sizzle as it contacts the hot surface, creating a caramelized crust. This is the trickiest step—if you pour too fast, the sauce can splatter. Keep the sauce flowing gently for a smooth coat.
- Let the eggs cook for about 2 minutes, then gently flip them with a spatula. The flipping action should be quick and confident, preserving the yolk’s runniness. Flip once; flipping twice can cause the yolk to break. The sauce will thicken slightly during this time, creating a glossy glaze.
- Return the pan to medium heat and let the eggs finish cooking for an additional 1–2 minutes. The whites should be fully set, and the sauce should have a sheen that invites licking. The yolks should still be molten, offering a dramatic contrast. This is the moment of truth.
- Remove the pan from heat and let the eggs rest for a minute. The residual heat will finish cooking the yolk gently, ensuring it stays silky. While resting, drizzle a final splash of honey over each egg for a caramelized finish. The aroma will be irresistible.
- Serve immediately on a warmed plate, optionally garnishing with chopped scallions or a sprinkle of toasted sesame seeds for extra crunch. The dish should look vibrant, with a glossy sauce that reflects the light. Pair it with a side of toasted baguette or a bowl of rice for a complete meal.
- Enjoy the burst of flavors—sweet, sour, salty, and spicy—all dancing on your tongue. Take a moment to appreciate the contrast of textures: the crispy edges, the silky whites, and the molten yolk. This is a dish that invites you to savor each bite slowly.
That's it — you did it. But hold on, I've got a few more tricks that'll take this to another level…
Insider Tricks for Flawless Results
The Temperature Rule Nobody Follows
Many cooks assume that high heat is always better for fried eggs, but the truth is that a controlled medium heat preserves the yolk’s moisture. Too high, and the whites become rubbery; too low, and the sauce won’t caramelize. I found that setting the skillet to medium‑high and then dropping it to medium after the eggs are in gives the best balance. This subtle shift is a game‑changer.
Why Your Nose Knows Best
The aroma of the sauce is a reliable indicator of readiness. When the sauce starts to bubble and emit a sweet, caramelized scent, it’s time to add the eggs. If you’re unsure, give the sauce a quick sniff—if it smells like toasted sugar, you’re good to go. This sensory check saves you from overcooking.
The 5‑Minute Rest That Changes Everything
After cooking, let the eggs rest for exactly five minutes. This pause allows the residual heat to finish the yolk gently, ensuring a perfect runniness. I’ve seen people skip this step, resulting in overly dry whites. The rest period is the secret to a silky finish.
Use a Splatter Guard for Cleanliness
When pouring the sauce over the eggs, the splash can be messy. A splatter guard keeps the kitchen tidy and protects you from hot oil. I use a silicone guard that’s easy to clean—just rinse it after each use.
Serve on Warm Plates for Extra Flavor
Cold plates can cause the sauce to cling unevenly. Warm the plates in the oven for a few minutes before serving. This simple trick enhances the sauce’s gloss and keeps the dish from cooling too quickly.
Keep the Sauce in a Small Jar for Freshness
Store any leftover sauce in an airtight jar at room temperature. The flavors will meld over time, making it even more delicious the next day. I keep a small jar on my counter, and it’s a constant reminder to make these eggs again.
Creative Twists and Variations
This recipe is a playground. Here are some of my favorite ways to switch things up:
Asian Fusion Twist
Swap the soy sauce for tamari and add a splash of sesame oil to the sauce. Sprinkle toasted sesame seeds on top for crunch. This version pairs wonderfully with steamed rice and sautéed bok choy.
Mexican Flair
Replace the ketchup with tomato salsa and add a pinch of cumin to the sauce. Garnish with fresh cilantro and a squeeze of lime. The result is a zesty, spicy kick that feels like a fiesta.
Vegan Variation
Use a plant‑based egg substitute that mimics the texture of real eggs. Keep the sauce the same, but add a dash of nutritional yeast for umami. This vegan version is surprisingly satisfying.
Breakfast Bowl Upgrade
Serve the eggs over a bed of quinoa or farro, drizzle the sauce, and top with avocado slices. The hearty grains and creamy avocado create a balanced breakfast that lasts until lunch.
Gluten‑Free Option
Pair the eggs with a slice of gluten‑free toast or a gluten‑free tortilla. The sauce remains the same, but the toast adds a satisfying crunch without gluten.
Sweet & Spicy Dessert
Use a drizzle of dark chocolate instead of honey for a bittersweet finish. Top with a sprinkle of sea salt and a few berries. This dessert version is a bold, unexpected treat.
Storing and Bringing It Back to Life
Fridge Storage
Cool the cooked eggs to room temperature before placing them in an airtight container. Store them in the refrigerator for up to 2 days. The sauce may thicken slightly, but the flavors stay vibrant.
Freezer Friendly
Wrap each egg individually in parchment paper and place them in a freezer bag. Freeze for up to 3 months. When reheating, let them thaw at room temperature for 20 minutes before microwaving.
Best Reheating Method
To reheat, add a splash of water to the pan and gently warm the eggs over medium heat. The water creates steam that restores moisture and keeps the yolk silky. Finish with a quick drizzle of honey for that fresh finish.