It started with a kitchen catastrophe that would have left me in a panic. I was halfway through a batch of battered chicken strips when a rogue potato chip bag slipped from the counter, splattering crunchy shards across the stove. The mess was a nightmare, but the aroma of frying chicken and toasted chips filled the air like a promise that something delicious was still possible. I stared at the chaos, then decided to turn the disaster into a culinary triumph—because if you can’t salvage a kitchen mishap, you’re missing an opportunity to create something legendary.
The first bite was a revelation. The chicken was juicy, the coating a buttery, golden shell that cracked like thin ice, and the potato chips inside added a surprising crunch that echoed with every chew. The scent of butter, garlic, and smoked paprika rose from the pan, mingling with the faint sweetness of caramelized onions. The sound of sizzling was a rhythmic soundtrack to the anticipation building in my mouth. My taste buds were already dancing, and the texture felt like a harmony between crisp and tender, a sensory symphony that left me craving more.
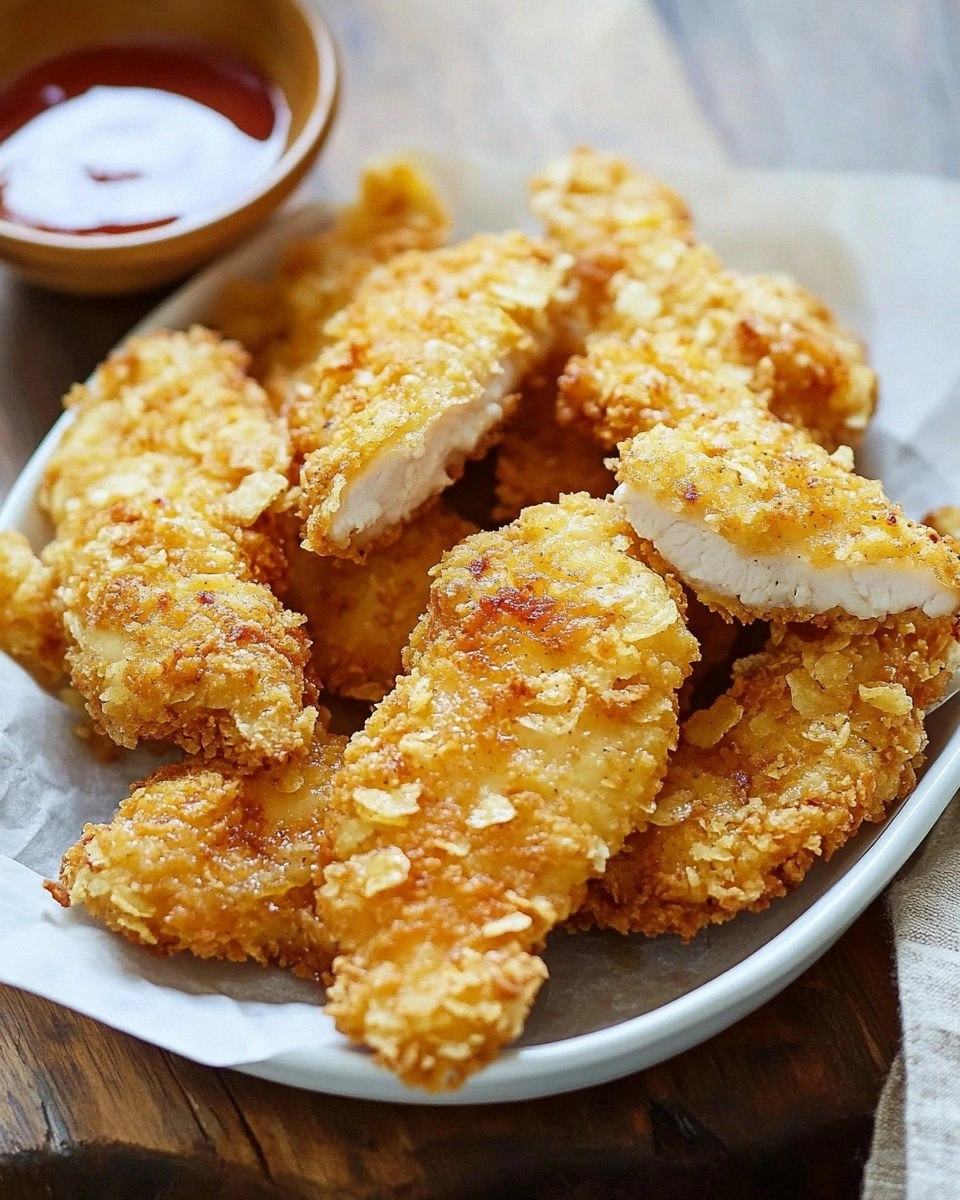
What sets this version apart from the countless other “chicken strips” recipes you’ll find online is the strategic use of potato chips as the coating base. Traditional batters can be heavy and greasy; here, the chips break apart into a light, airy crust that still delivers the satisfying crunch people love. The blend of spices is balanced—just enough heat to wake up the palate without overpowering the natural flavor of the chicken. The method ensures that the coating stays crisp even when you’re reheating or serving it alongside a dip, making it a perfect crowd‑pleaser for parties or a quick weeknight dinner.
There’s a secret twist you won’t expect: a splash of buttermilk and a pinch of cayenne pepper in the batter that unlocks a depth of flavor that feels both familiar and adventurous. I dare you to taste this and not go back for seconds. Picture yourself pulling this out of the oven, the whole kitchen smelling incredible, and watching friends’ faces light up when they take their first bite. Let me walk you through every single step—by the end, you’ll wonder how you ever made it any other way.
What Makes This Version Stand Out
- Crunch: The potato chip coating delivers a light, airy crunch that shatters like thin ice, giving you that satisfying first bite without the heaviness of traditional breading.
- Flavor: A balanced blend of smoked paprika, garlic powder, and a dash of cayenne gives the strips a smoky, slightly spicy kick that lingers on the tongue.
- Texture: The chicken stays juicy inside while the coating remains crisp even after reheating—ideal for parties, leftovers, or a quick snack.
- Speed: From prep to plate, the entire process takes less than an hour, making it a go‑to solution when you’re craving something delicious but short on time.
- Versatility: Use it as a main dish, a side, or an appetizer. Pair with ranch, honey mustard, or a spicy aioli for endless flavor combinations.
- Make‑ahead: The batter can be pre‑mixed and stored in the fridge; the chicken can be marinated overnight for deeper flavor, saving you a rush on busy evenings.
Inside the Ingredient List
The Flavor Base
At the heart of this dish is a simple yet potent blend of spices that transforms ordinary chicken into a flavor powerhouse. Smoked paprika gives a subtle smokiness that pairs beautifully with the buttery crunch of potato chips. Garlic powder adds a savory depth, while onion powder provides a gentle sweetness that balances the heat from cayenne pepper. A pinch of salt and freshly cracked black pepper tie all the flavors together, ensuring every bite is seasoned to perfection.
The Texture Crew
Potato chips are the secret weapon here. When crushed finely, they create a coating that is light and airy yet robust enough to hold the chicken together. They also impart a delightful crunch that sets this recipe apart from the typical battered strips that can become soggy. Flour acts as a binder, helping the coating adhere to the chicken while providing a neutral base that lets the spices shine. Egg, beaten to the right consistency, locks everything in place and gives the coating a golden, glossy finish when fried.
The Unexpected Star
Buttermilk is the unsung hero that brings moisture and tang to the batter. It reacts with the flour, creating tiny bubbles that expand during frying, giving the coating a light, airy texture. The acidity of buttermilk also tenderizes the chicken, ensuring it stays juicy even after a quick fry. If you’re dairy‑free, a splash of plant‑based milk mixed with a tablespoon of vinegar or lemon juice will mimic the same effect.
The Final Flourish
After the chicken strips have hit the pan, a quick sprinkle of fresh herbs—parsley or cilantro—adds a burst of color and a fresh, herbal note that cuts through the richness. A drizzle of lemon zest or a squeeze of fresh lemon juice right before serving brightens the dish, making the flavors pop. For an extra layer of indulgence, a dusting of grated Parmesan or a sprinkle of sesame seeds can be added after frying for a nutty undertone.
Everything's prepped? Good. Let's get into the real action...
The Method — Step by Step
- Begin by slicing boneless, skinless chicken breasts into strips about 1 inch wide. Pat the pieces dry with paper towels to remove excess moisture; this ensures the coating sticks and the crust crisps up beautifully. Toss the chicken in a bowl with a pinch of salt and pepper, letting the seasoning penetrate the meat for about 10 minutes. This step is the foundation for a juicy, flavorful bite.
- In a separate shallow dish, combine 1 cup of finely crushed potato chips, ½ cup of all‑purpose flour, 1 teaspoon of smoked paprika, ½ teaspoon of garlic powder, ¼ teaspoon of onion powder, and a pinch of cayenne pepper. Mix until the spices are evenly distributed; this creates a uniform coating that will give each strip a consistent crunch.
- In a third bowl, whisk together 1 cup of buttermilk, 1 beaten egg, and 1 tablespoon of melted butter. The butter adds richness while the buttermilk’s acidity tenderizes the chicken. Whisk until the mixture is smooth, ensuring no lumps that could affect the coating’s adhesion.
- Now, dip each chicken strip first into the buttermilk mixture, letting any excess drip back into the bowl. Then coat thoroughly in the crushed chip and flour mixture, pressing gently so the coating sticks. For an extra crisp, double‑dip the chicken—return it to the buttermilk and then to the chip mixture again. Place the coated strips on a wire rack set over a baking sheet; this prevents them from sitting in oil and becoming soggy.
- Preheat a large skillet over medium‑high heat and add 3 tablespoons of vegetable oil. To test if the oil is ready, flick a small drop of water into the pan; it should sizzle and evaporate instantly. This ensures the coating will crisp up without absorbing excess oil.
- Carefully slide the chicken strips into the hot oil, arranging them so they don’t touch. Fry for 2–3 minutes on each side, or until the coating turns a deep golden brown and the internal temperature reaches 165°F (74°C). The sizzle should be audible and steady, indicating the oil temperature is just right.
- Use tongs to remove the strips and place them on a plate lined with paper towels. This step drains excess oil, keeping the coating crisp. While the chicken is still hot, sprinkle a pinch of freshly ground black pepper and a drizzle of lemon juice to brighten the flavors.
- Serve immediately with your choice of dipping sauces—ranch, honey mustard, or a spicy aioli. The warmth of the strips will melt the butter in the coating, creating a silky finish that coats the palate. Enjoy the moment of pure culinary bliss!
That's it — you did it. But hold on, I've got a few more tricks that'll take this to another level...
Insider Tricks for Flawless Results
The Temperature Rule Nobody Follows
Maintaining a consistent oil temperature is crucial. Use a kitchen thermometer to keep the oil between 350°F and 375°F. If the oil is too hot, the coating will burn before the chicken cooks through; too cool, and the strips will absorb oil and become greasy. A simple visual cue is the appearance of bubbles around the oil surface; they should form quickly but not erupt violently.
Why Your Nose Knows Best
Before you start frying, close your eyes and sniff the batter. If you notice a hint of sourness from the buttermilk, the batter is fresh. A sour smell indicates the buttermilk has fermented slightly, adding a tang that enhances the overall flavor profile. Trust your nose; it’s a reliable indicator of freshness and quality.
The 5‑Minute Rest That Changes Everything
After coating the chicken, let it rest on a wire rack for 5 minutes before frying. This allows the coating to set and prevents it from falling off during cooking. I once skipped this step and the strips lost their crispness; the coating fell apart like a soggy cookie. The rest period is a small price for a big payoff.
Double‑Dip for Extra Crunch
The double‑dip technique—first in buttermilk, then in chip mixture, again in buttermilk, and finally in the chip mixture—creates a thicker, more robust coating. The second buttermilk layer helps the chip mixture adhere better, resulting in a crunch that lasts longer. It’s a simple step that elevates the texture from good to unforgettable.
Finish with Fresh Herbs
Right before serving, scatter fresh parsley or cilantro over the hot strips. The herbs release essential oils that add a bright, herbal note that cuts through the richness of the coating. The visual pop of green also makes the dish more appetizing, turning a simple snack into a gourmet experience.
Creative Twists and Variations
This recipe is a playground. Here are some of my favorite ways to switch things up:
Spicy Cajun Kick
Swap the smoked paprika for a Cajun seasoning blend and add a dash of cayenne. The result is a fiery version that pairs perfectly with a cool mango salsa. Ideal for those who love a bit of heat in their bite.
Herb‑Infused Crunch
Incorporate dried thyme and rosemary into the chip mixture. The earthy herbs complement the chicken’s natural flavor, creating a Mediterranean twist. Serve with a lemon‑yogurt dip for a refreshing finish.
Cheesy Delight
Mix shredded cheddar or mozzarella into the coating before frying. The cheese melts into the crust, giving each strip a gooey, melty interior while still maintaining the crunchy exterior. A must‑try for cheese lovers.
Asian Fusion
Replace the buttermilk with coconut milk and add a splash of soy sauce to the batter. Toss the finished strips in a drizzle of sesame oil and sprinkle toasted sesame seeds. Pair with a sweet chili sauce for an Asian‑inspired snack.
Gluten‑Free Version
Use a gluten‑free all‑purpose flour blend in place of regular flour. Keep the potato chips as they are, ensuring they’re gluten‑free as well. The texture remains crisp, and the flavor profile stays unchanged.
Breakfast Bonanza
Serve the strips with a side of scrambled eggs and a drizzle of maple syrup for a sweet‑savory breakfast treat. The crunch of the coating pairs wonderfully with the softness of the eggs, creating a satisfying start to the day.
Storing and Bringing It Back to Life
Fridge Storage
Store cooked strips in an airtight container for up to 4 days. Keep them on a paper towel to absorb excess moisture. When ready to reheat, place them in a single layer on a baking sheet and warm in a 350°F oven for 10 minutes.
Freezer Friendly
Freeze the strips in a single layer on a parchment‑lined tray before transferring to a freezer bag. They stay fresh for up to 3 months. To reheat, bake at 400°F for 12–15 minutes until crisp.
Best Reheating Method
Reheating in the oven or on a skillet preserves the crunch. If you prefer a quick microwave, add a splash of water to a paper towel and wrap the strips; microwave for 30 seconds. The water steams the coating back to a light crispness.